background image

31 


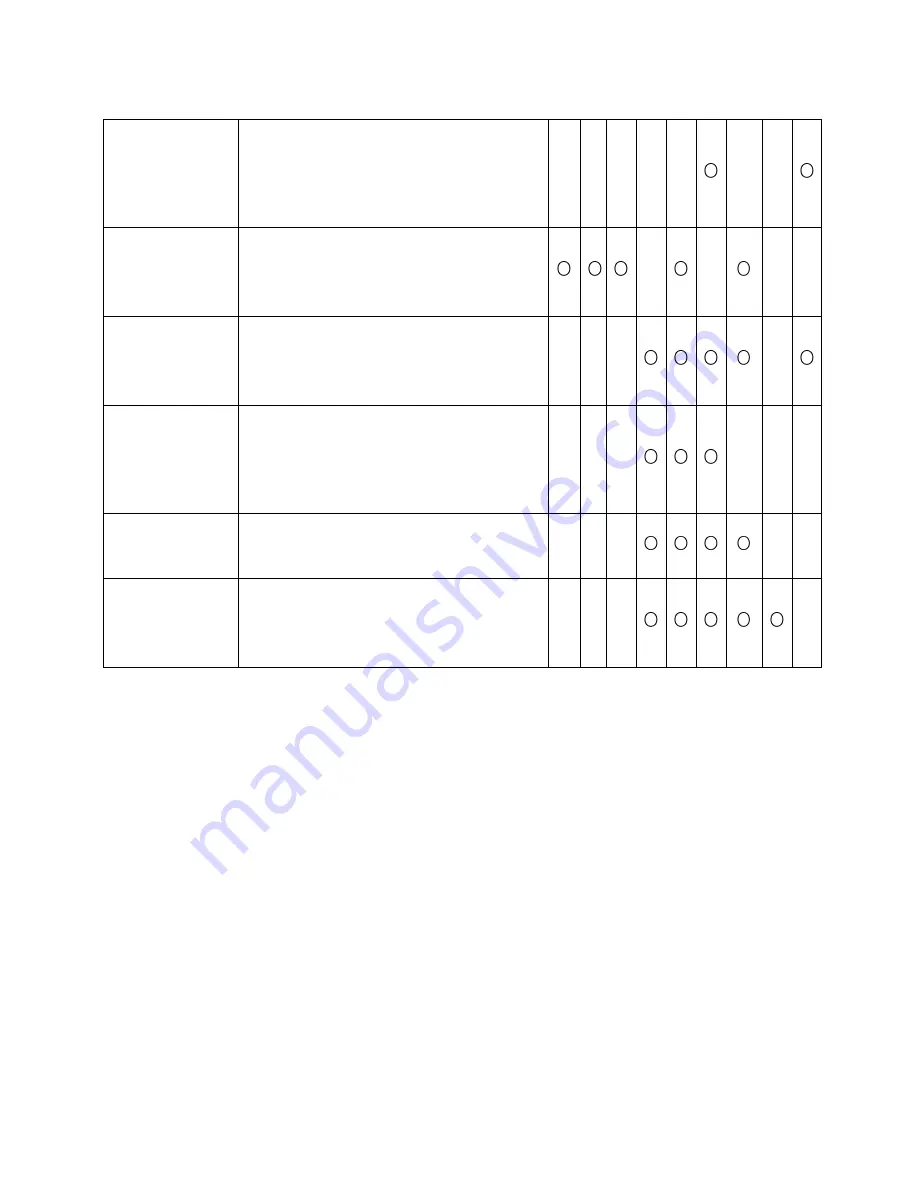
Body of weld gun 

1. Loose connection of conductive tip, nozzle 

and nozzle contactor 

2. Contactor of weld gun body is not plunged 

in or tightened well 


Power supply 

cable of weld gun 

as well as cable of 

switch control 


1. Break off (bending fatigue) 

2. Damaged by weighted drop 


Surface Condition 

of Parent material 

and length that 

wire stretches out 


1. Oil, dirty, rust and paint residues 

2. Too long length of wire stretched out 


Output Cable 

1.  Cross-section  of  cable  that  connects  to 

parent material is not enough 

2.  Loose connection of 

+

)(

,   -

output cable 

3.  Bad electric conductivity of parent material 


Lengthened 

Cable 

1. Cross-section of cable is not enough 

2. It is rolled up or folded 


Work Condition 

for Welding 

Welding  current,  voltage,  angle  of  weld 

gun,  welding  rate  and  wire  length 

stretched  out  should  be  confirmed  once 

again 


Summary of Contents for MIG300GD

Page 1: ...MIG 300GD WLEDING MACHINE USER MANUAL...

Page 2: ...words after this sign means there is some potential danger which may cause hurt or property lose if it is not followed The words after this sign means there is potential risk which may cause equipmen...

Page 3: ...5 4 1 Front panel layout 15 4 2 Operation instruction 16 4 3 Welding environment and safety 22 4 4 Welding problems and resolution 23 5 Daily maintenance and checking 24 6 Trouble shooting and fault f...

Page 4: ...cause choke Spark and hot workpiece after welding may cause fire Bad connected cable may cause fire Incompletion connection of workpiece side circuit may cause fire Never weld on the case of tinder s...

Page 5: ...minutes later The capacitance is chargeable device Please ensure it has no voltage before start again even if the power source is cut off Do not use wire with inadequate section surface or damage ins...

Page 6: ...harmful to health please wear protective appliance Eye protection against arc is recommended when welding or supervise welding Please wear preventive spectacles Welder s gloves welder s goggles long...

Page 7: ...ding the wire manually or pressing the switch For better work efficiency and power source maintenance please note the following Precautions against toppling over Never use the welding equipment for pi...

Page 8: ...e control cable signal cable and phone cable b Wireless electric as well as TV radiation and reception equipment c Computer and other control equipments d Safety recognition equipment etc Such as supe...

Page 9: ...ble should be short enough to be close to each other and the ground d Ensure the safety of all the welding metal parts and other parts nearby e The workpiece should be well earth f Shield or protect t...

Page 10: ...arameters easily Our CO2 gas shielded welding machine is equipped with unique electronic reactor circuit which can precisely control the short circuiting transfer and mixed transfer resulted in better...

Page 11: ...t A MMA 40 300 MIG 45 300 Output voltage V MMA 21 6 32 MIG 16 2 29 Duty cycle 35 Power factor 0 93 Efficiency 85 Type of wire feeder Internal Wire feed speed m min 2 2 15 Post flow time S 3 Welding wi...

Page 12: ...rth cable into socket at the front panel c Set the wire wheel with wire on the wheel axis the wheel hole should be matched with the wheel fixer d Choose wire slot according to wire size e Loosen the s...

Page 13: ...conglutination If such problems occur please change the polarity of the fastened plug It should adopt negative connection when welding with alkaline electrode while positive connection when welding w...

Page 14: ...14 Installation drawing of MIG 300GD MIG Installation drawing of MIG 300GD MMA...

Page 15: ...lection key 0 8mm 1 0mm 1 2mm 4 Data selection key effective under MIG mode 5 Store mode selection key Memory1 Memory2 Memory3 6 Multifunctional data adjusting knob coarse adjustment by pressing the k...

Page 16: ...lay The starting up display Switch on the welding power source the front panel displays as Chart 1 After the Multifunctional data display or any key or knob on front panel flashes for 5 seconds the ma...

Page 17: ...parameters the multifunctional data display would flashes for one time which means the data has been saved f The panel displays as Chart 4 when perform welding which means the welding voltage is 23 2...

Page 18: ...essing the torch switch or any key or knob on the panel Both multifunctional data display and GAS CHECK stops flashing and the gas stops checking Chart 7 Gas check display under MIG mode e Under MIG m...

Page 19: ...stable and the adjustment range of preset voltage is 20 Press the data selection key for the second time the multifunctional data display displays as Chart 9 which means the inductance is adjustable a...

Page 20: ...e wire feeder is malfunctioning and the multifunctional data display flashes continuously the machine can not work normally Please restart the machine the panel would display the parameters that were...

Page 21: ...el displays as Chart 16 when overheating and the multifunctional data display flashes continuously the machine can not work normally Only when the temperature of the welding machine falls below 60 the...

Page 22: ...e is a fan in inter machine to cool down machine Make sure the intake is not in block or covered it is 0 3 meter from welding machine to objects of environment User should make sure the working area i...

Page 23: ...ach rated value The deviation of power voltage from rated value may cause that the output current does no accord with adjusted value When the power voltage is lower than rated value the maximum output...

Page 24: ...de film with sand paper and connect again d Prevent water from entering into the machine and prevent the machine from getting moist If any blow and dry Measure the insulation with megohmmeter to make...

Page 25: ...n or not Housing and other fixed parts loosen or not WELDING TORCH Position Checking keys Remarks Loophole If installment fixed distorted the front Reason for air hole Attach splash or not Reason for...

Page 26: ...Pressing arm If put the arm to the suitable indicating level notes not to damage wire less than 1 2mm Lead to unstable arc and wire sending Wire lead tube If powder or residue store up in the mouth o...

Page 27: ...g adopt suitable method to check according to working place Simple check daily Careful and in depth check on fixed period Input cable If the connect of power supply input protective equipment input an...

Page 28: ...n control board contact dealers The meter shows Fan works normally No welding output 1 Check if all the sockets in the machine are connected well 2 There is open circuit or badness of connect at the j...

Page 29: ...l welding troubles is shown below A trouble happened may be found in the column of Abnormal items on up right of the list please inspect and maintain for the corresponding items which have mark in the...

Page 30: ...s out No Wire Feeding Bad Arc Ignition Unstable Arc Dirt on Edge of Weld Sea Wire Stick to Parent material Wire Stick to Conductive Tip Blowhole Formed Wire Feeding Device 1 Wire feeding wheel does no...

Page 31: ...l and length that wire stretches out 1 Oil dirty rust and paint residues 2 Too long length of wire stretched out Output Cable 1 Cross section of cable that connects to parent material is not enough 2...

Page 32: ...16 5 50 60 10 10 1 0 0 8 0 9 0 75 85 17 17 5 50 60 10 10 15 1 2 0 8 0 9 0 80 90 16 16 5 50 60 10 10 15 1 6 0 8 0 9 0 95 105 17 18 45 50 10 10 15 2 0 1 0 1 2 0 0 5 110 120 18 19 45 50 10 10 15 2 3 1 0...

Page 33: ...45 0 70 80 17 18 50 60 10 10 15 1 2 0 9 1 0 45 0 85 90 18 19 50 60 10 10 15 1 6 1 0 1 2 45 0 100 110 19 20 50 60 10 10 15 2 1 0 1 2 45 0 115 125 19 20 50 60 10 10 15 2 3 1 0 1 2 45 0 130 140 20 21 50...

Page 34: ...eed 0 8 0 8 0 9 10 0 60 70 16 17 40 45 10 10 15 1 2 0 8 0 9 30 0 80 90 18 19 45 50 10 10 15 1 6 0 8 0 9 30 0 90 100 19 20 45 50 10 10 15 2 3 0 8 0 9 47 0 100 130 20 21 45 50 10 10 15 1 0 1 2 47 0 120...

Page 35: ...35 Appendix Circuit diagram...

Page 36: ...36 Appendix Components figure and list Structure Chart of MIG 300GD...

Page 37: ...odule 2 40 Right supporting of the tray 1 13 radiator 1 41 Handle of the kit 2 14 radiator 1 42 Supporting of the front wheels 1 15 Fan board 1 43 tray 1 16 Fan net 1 44 axis 1 17 Silicon single wheel...

Reviews: