background image

RVZC30 (and BB/T/TBB/WA), RVZP30 (and BB/T/TBB/WA), RVC24

13

0407

LINE UP ASSEMBLY

1.

Set the first Reach-In into the desired position and level
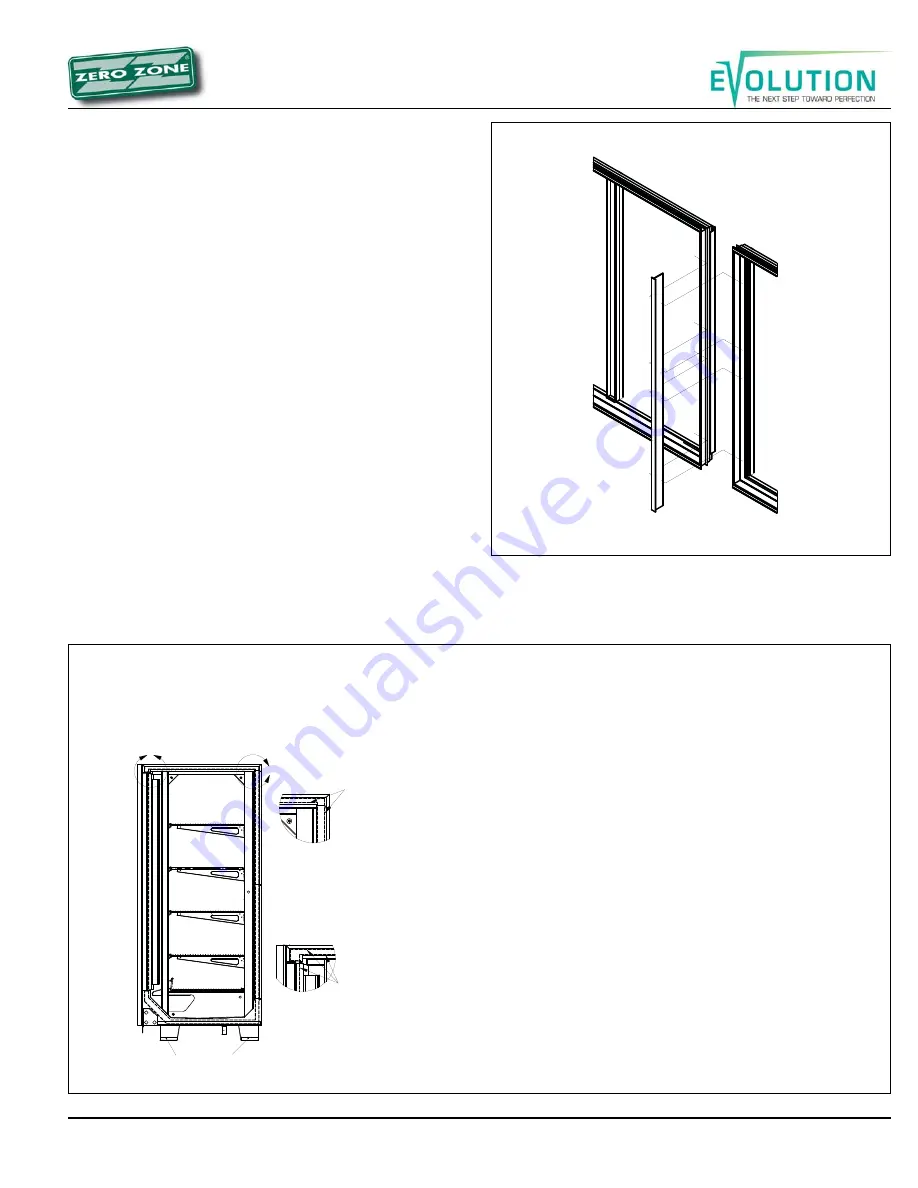
it. Run a 1/4” to 3/8” diameter bead of Butyl caulk 1/2”
in from both the inner and outer surfaces of the case
end. (Figure 9).

2.

Push the second Reach-In against the end of the first.
Level the second Reach-In. Remove the left and right
end coil covers and the rectangular pocket hole covers,
accessing the holes in the end frames of each case as
shown. The bolt kit supplied with the cases includes
diagrams of these locations. Install tee strips between
the door frames at case joints (See Figure 10).  Use the
special screws and nuts provided.

3.

Start the joining bolts, but do not tighten them. Begin
tightening the bolts at the top rear, working down the
back of the case and up the front making sure that the
front seams are flush.

4.

For NSF case installation, the interior case seams need
to be sealed using NSF approved caulk  (not supplied)
(Figure 11).

5.

The end panel protector support plates  should be
removed after the cases are set in their final position.

Figure 9: Caulking cases to be joined

Figure 10: T-Strips

DO NOT APPLY EXCESS AMOUNTS OF BUTYL SEALANT THAT WOULD CAUSE IT TO SQUEEZE ONTO END
FRAME METAL AREAS. 

Caulk-sealant used to join cases and complete the sealing requirements for NSF compliance

should not come in contact with butyl sealant. Apply to clean, dry surfaces free of contaminants that adversely affect
adhesion and could change color of sealant joint areas over time.

Procedure for Joining Cases

These procedures are critical! Failure to follow these guide-
lines will result in a poorly functioning case. This is espe-
cially true of freezers.

1.

Apply two 1/4” to 3/8” wide beads of Butyl sealant, 1/2”

in from the inside and outside edges of foamed insu-
lated ceiling, rear wall, base and door frame to be
joined. Apply to only one case joint to avoid excessive
amounts of Butyl sealant that would squeeze out of the
joint.  Sealant is not applied to the structural steel end
frames.  After cases are joined, caulk the top and back
exterior seams (if possible) at this time.

2.

When joining ends of cases, caulk sealant should be

applied in the same like manner for joints.

If 4 shipping blocks are installed to inside of base ends,
remove them to comply with NSF.

A

B

DETAIL A 

SCALE 1 : 5

1/4" - 3/8" TYPICAL

BUTYL SEALANT

BEADS

DETAIL B 

SCALE 1 : 5

1/4" - 3/8" TYPICAL

BUTYL SEALANT
BEADS

Summary of Contents for RVZC30

Page 1: ......

Page 2: ...RVZC30 and BB T TBB WA RVZP30 and BB T TBB WA RVC24 2 0407...

Page 3: ...Refrigerant Piping 17 Figure 16 Penetration sealing 17 Figure 17A Refrigeration line sizing Frozen Foods 18 Figure 17B Refrigeration line sizing Ice Cream 19 Figure 18 45 elbow suction line 20 Tempera...

Page 4: ...AT TIME OF DELIVERY AND ALL CLAIMS FOR DAMAGES MUST BE FILED WITH THE TRANSPORTATION COMPANY NOT WITH ZERO ZONE The carrier will supply necessary report and claim forms PACKAGING Each case in a line...

Page 5: ...RVZC30 and BB T TBB WA RVZP30 and BB T TBB WA RVC24 5 0407 Figure 1 Case label information...

Page 6: ...tional hat channels to raise the case height place them under each pair of bases The 3 and 4 door hat channels will be angled slightly to support the front and rear bases Figures 3 5 6 Place the requi...

Page 7: ...VZP30 and BB T TBB WA RVC24 7 0407 Figure 4 Shims under bases and case Figure 3 Typical hat channel locations Hat section Shim Base Shim Base Both corners of the base must be supported by shims to pre...

Page 8: ...RVZC30 and BB T TBB WA RVZP30 and BB T TBB WA RVC24 8 0407 Figure 5A All base locations 1 Door Case Wrap Around Case WA Back to Back Wrap Around Case WB...

Page 9: ...RVZC30 and BB T TBB WA RVZP30 and BB T TBB WA RVC24 9 0407 Figure 5B All base locations...

Page 10: ...RVZC30 and BB T TBB WA RVZP30 and BB T TBB WA RVC24 10 0407 Figure 5C All base locations...

Page 11: ...floor as high as necessary for transport The fork truck should be driven slowly avoiding any abrupt motions or bumps The following fork lift dimensions must be maintained to avoid damaging the case w...

Page 12: ...RVZC30 and BB T TBB WA RVZP30 and BB T TBB WA RVC24 12 0407 Figure 8 Expandable base Figure 6 Removing wood planks Figure 7 Wood block inside base Spacers...

Page 13: ...ases to be joined Figure 10 T Strips DO NOT APPLY EXCESS AMOUNTS OF BUTYL SEALANT THAT WOULD CAUSE IT TO SQUEEZE ONTO END FRAME METAL AREAS Caulk sealant used to join cases and complete the sealing re...

Page 14: ...e and a drain trap to the tee Plug the open end of the tee using the clean out plug supplied with Figure 11 Required sealing for NSF approved installations the drain trap kit The drain line must be pi...

Page 15: ...nt kick plate Installing Bumper Figure 14 The front kick plate and bumper attaches using 1 screws attached to brackets located on the front of the case The kick plate can be adjusted up and down to fi...

Page 16: ...ers on a 2 door 3 spacers on a 3 door 1 To ease installation hook the bumper to the case and position the kick plate Then pull the bottom edge of the bumper forward hold the spacer in place and then i...

Page 17: ...ired Figure 18 A piping chase in front of the fan shroud allows the refrigerant lines to be run through the right or left end frame Piping should not be placed near the electric defrost heaters The de...

Page 18: ...8 2 820 5 280 5 8 2 250 4 220 5 8 1 920 3 600 5 8 7 710 12 800 7 8 5 290 8 780 7 8 4 230 7 030 7 8 3 610 6 000 7 8 12 810 20 300 7 8 8 790 14 000 7 8 7 040 11 200 7 8 6 010 9 530 7 8 20 310 41 000 1...

Page 19: ...5 8 1 850 3 450 5 8 1 570 2 950 5 8 6 310 10 500 7 8 4 330 7 180 7 8 3 460 5 750 7 8 2 960 4 910 7 8 10 510 16 600 7 8 7 190 11 400 7 8 5 760 9 120 7 8 4 920 7 790 7 8 16 610 33 600 1 1 8 11 410 23 1...

Page 20: ...ling or delayed cycling Figure 18 45 elbow suction line Temperature Control Adjustment When factory installed the temperature control is located to ward the right end of the case behind the black kick...

Page 21: ...rs are de energized The defrost heaters are energized The compressor continues to run and pumps down the coil The compressor cycles off on its low pressure control If there is any residual liquid left...

Page 22: ...RVZC30 and BB T TBB WA RVZP30 and BB T TBB WA RVC24 22 0407 Figure 21 Electric defrost 30 wiring...

Page 23: ...RVZC30 and BB T TBB WA RVZP30 and BB T TBB WA RVC24 23 0407 Figure 22 Electric defrost 24 wiring...

Page 24: ...RVZC30 and BB T TBB WA RVZP30 and BB T TBB WA RVC24 24 0407 Figure 23 Hot gas wiring...

Page 25: ...RVZC30 and BB T TBB WA RVZP30 and BB T TBB WA RVC24 25 0407 Figure 24 Single point wiring...

Page 26: ...RVZC30 and BB T TBB WA RVZP30 and BB T TBB WA RVC24 26 0407 Figure 25 Master satellite wiring...

Page 27: ...hermostat or probe attached to the dump line At ASHRAE test conditions termination ranges from 12 22 minutes If the cases are so equipped the defrost termination is 65 F Zero Zone provides a defrost t...

Page 28: ...into the serpentine coil attached to the floor of the case and then into the evaporator Condensed liq uid leaves the evaporator through the side port distributor through a check valve into the liquid...

Page 29: ...RVZC30 and BB T TBB WA RVZP30 and BB T TBB WA RVC24 29 0407 Figure 27 24 Electric Figure 26 30 Electric...

Page 30: ...RVZC30 and BB T TBB WA RVZP30 and BB T TBB WA RVC24 30 0407 Figure 28 Coil 30 Hot gas Figure 29 Coil 24 Hot gas...

Page 31: ...ght switch off during the initial case temperature pull down to prevent the case lights from cycling off and on Always turn the lights off when replacing lamps Case Thermometer The cases are shipped w...

Page 32: ...g Heaters are installed in the reverse order of how they were removed Evaporator Fans Air is circulated throughout the case with 115 volt low tempera ture fan motors These motors must be operating at...

Reviews: