background image

4

1. WELCOME

       Thanks for purchasing a Zero-X Blitz Drone, get ready to have the time of your life! 

We’re sure your Zero-X Blitz drone will bring you a world of great experiences in 
the air. Please take the time to read the following safety warnings and operating 
instructions carefully.


BEFORE YOU GET UP IN THE AIR

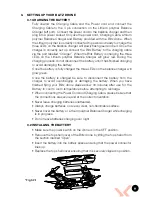
       Unwind and connect the charging cable to the Lithium polymer balance charger 

and then plug the Lithium polymer balance charger into a power outlet using the 
included power cord. When the charger is powered the 3 LEDs will slowly flash 
green and red.

       Once your Lithium polymer balance charger is set up and powered, connect 

the charging cable to the Blitz battery via the port labelled “Charger”. When the 
Blitz battery is charging the LEDs on the charger will shine red, once charging is 
complete all 3 LEDs will change from red to green.

       While your Blitz drone is charging please take the time to read the instructions 

and familiarise yourself with the controls, maintenance and operation of the 
Zero-X Blitz Racing Drone.


GENERAL SAFETY

       Please familiarise yourself with your local legislation regarding drone usage before 

you begin using your Zero-X Blitz drone. Included in the package contents of 
your Zero-X Blitz drone are the Australian CASA guidelines, please read carefully  
and understand this information as operating a drone outside of these guidelines 
may result in legal issues. The manufacturer takes no responsibility for operation 
of this product outside of what is legally permissible in your local area.

      •  Do not fly your Blitz drone any closer than 30 metres from people, animals, or 

buildings, and check to make sure you are no closer than 5.5 kilometres   
from any airfields or airports.

      For more information on CASA’s Australian legislation visit:  


http://www.casa.gov.au/

 For information outside Australia please visit the 

website of your local aviation authority.

      •  Do not attempt to modify the Blitz drone or any of its components in any way, 

doing so will void your warranty and may affect the operation of the drone.

      •  Do not use the Blitz drone in any conditions that could affect, damage or 

impair your view of the Blitz drone including rain, wind, snow, fog or low light.

      •  Avoid getting your Blitz drone wet, dusty or sandy. These elements will damage 

the components of your Blitz drone.

      •  Please pay attention to the indication of low battery to avoid damage to your 

Blitz drone, or your surroundings.

      •  Please do not attempt to touch the Blitz drone when the Remote Control is 

powered on or if the rotor blades are turning.

      • When flying your Blitz drone, please keep in mind the privacy of others.
      •  Do not power off the remote control without first disarming the motors. Failing 

to complete this will cause the Blitz to go into lost signal mode which will cause 
the rotor blades to spin.

Summary of Contents for ZX-BTZ

Page 1: ...DRONE USER MANUAL PRODUCT CODE ZX BTZ www zero x com au www zero x co nz BLITZ v1...

Page 2: ......

Page 3: ...nstalling a Micro SD Card Micro SD Card not included 10 Fig 3 3 1 10 3 4 Remote Control 10 4 Flight Safety 10 4 1 Flying your Blitz Drone 10 11 Fig 4 1 1 10 Fig 4 1 2 11 4 2 Controlling you Blitz Dron...

Page 4: ...derstand this information as operating a drone outside of these guidelines may result in legal issues The manufacturer takes no responsibility for operation of this product outside of what is legally...

Page 5: ...batteries when charging Do not leave batteries in direct sunlight After each flight or crash please check battery for any damage or swelling If the battery is damaged leaking making noise punctured or...

Page 6: ...2 1 PACKAGE CONTENTS 2 7 1 1 X Blitz Drone 2 2 X Drone Batteries 3 1 X Remote Control 4 1 X Balance Charger with cables 5 8 X Rotor Blades 6 Maintenance Kit 7 User Manual 8 2 x Thumbstick covers 1 4 5...

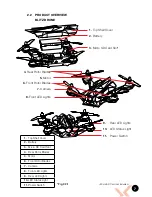
Page 7: ...r LED Lights 10 LED Status Light 11 Power Switch 4 Rear Rotor Blades 5 Motor 6 Front Rotor Blades 7 Camera 8 Front LED Lights 1 Top Shell Cover 2 Battery 3 Micro SD Card Slot 4 Rear Rotor Blades 4 Mot...

Page 8: ...d 4 Power Indicator LED 5 Power Switch 6 Speaker 7 Handle 8 Left Thumb Stick Yaw 9 Photo Capture 10 5 8Ghz FPV Channel Switch 11 Video Start Stop REMOTE CONTROL 1 Mode Setting Switch 2 Right Thumb Sti...

Page 9: ...the battery is fully charged the three LEDs on the balance charger will glow green Once the battery is charged be sure to disconnect the battery from the charger to avoid overcharging or damaging the...

Page 10: ...any airport or airfield whilst flying Drones should also not be flown over populated areas or any closer than 30 metres from vehicles people or animals It is also required that you check your surround...

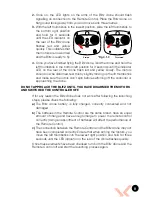
Page 11: ...pin before switching off the controller or approaching the drone DO NOT APPROACH THE BLITZ UNTIL YOU HAVE DISARMED THE MOTORS AND SWITCHED THE CONTROLLER OFF If for any reason the Blitz drone does not...

Page 12: ...at you always start in low speed mode To select low speed mode switch the Mode Setting Switch 1 to the top position marked beginner mode In this mode the Blitz drone will control and fly slowly It is...

Page 13: ...flip and the accelerometer will be deactivated during the flip it is advised that the user has significant drone experience It is advised that rolls are performed quickly and that you allow 10M in all...

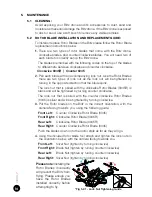
Page 14: ...at is paired with the clockwise Rotor Blades 6045R is black and will be tightened by turning counter clockwise The lock nut that is paired with the counter clockwise Rotor Blades 6045 is silver and wi...

Page 15: ...warrants that this product is free from defects in material and workmanship for a period of 12 months from the date of purchase or for the period stated on the packaging This warranty is only valid wh...

Page 16: ...www zero x com au www zero x co nz Zero X v1 0 2016...

Reviews: