Zepter TUTTOLUXO 2S Operating Instructions Manual Download Page 10

EN

8

4

6

1

3

5

2

7

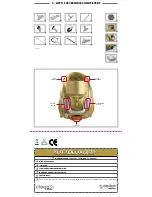
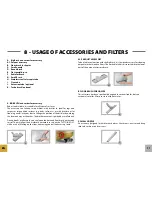
6.1 HosE AND ACCEssoriEs FiTTiNG

Insert the hose with its connection into the SLALOM SYSTEM

TM

 at the front. (See 

Chapter 4.1: Patented Features, Slalom System

TM

).

In order to clean floors, it will be necessary to insert the proper accessories into 

the special extension tube (Pict.1) by using the proper fit/release button (Pict. 2) 

and then connect to the grip handle by simply pressing.
When the hose is inserted, all 3 orange lights will start blinking. The machine is 

now on "STAND BY", ready for use. 
The tank lid fasteners have been designed in such a way that, should they be 

hit when they are open, they will not be damaged. They might break loose, but 

it is very easy to put them back into place, by fitting the forks onto the support 

pins (Pict. 3).
For your convenience you will find 2 TUBE-CARRIERS on each side of the device 

in which you can insert the extension tubes whenever you need your hands free 

for something else (move furniture around, etc.), (Pict. 4). 

MAX speed

MED speed

MIN speed

Function

button

Cable winder 

button

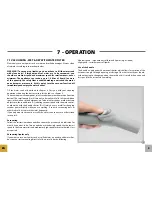
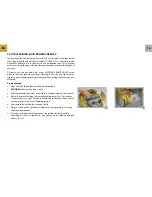
6.2 PrEPAriNG THE VACUUM FUNCTioN

Connect the power cord (Pict.5) by pulling it out from the back of the machine 

and inserting it into a mains plug. In order to avoid the power cord getting hot 

inside the machine, always pull it out to its complete extension. To rewind, push 

the cable winder button (Pict.6) on the upper right side of the machine; do not 

let the plug whip around while rewinding.

Upon plugging into the mains, 3 flashing LEDS on the function button (Pict.7) 

will come on  to signal that the machine is now connected and on standby. Press 

the function button again and quickly release, the three flashing LEDS now go 

off, and one steady orange LED will come on: the machine is now running on 

minimum speed and you can start vacuuming.

If you want to change vacuum power, keep the function button pressed for a 

few seconds: 2 steady LEDS will come on, to indicate MEDIUM vacuum power; 

or if you keep the function button pressed, the speed will change to MAX and so 

on until the button is released at the desired speed.

reminder! To turn the machine off, give a short push on the same button!

To switch off the motor, press and then quickly release the function button.

Summary of Contents for TUTTOLUXO 2S

Page 1: ...I J K G H B C F A E D OPERATING INSTRUCTIONS PWC 200 L COPYRIGHT HOME ART SALES SERVICES AG ZEPTER GROUP PMD HC31 09 EN Art Work BRID MARKETING ITALY 1 OVERVIEW OF TUTTOLUXO 2S PWC 200...

Page 2: ...E OF PURCHASE SERIAL NO STAMP AND SIGNATURE OF RETAILER NAME AND ADDRESS OF PURCHASER FAULT DEFECT This warranty card has to be sent to the retailer together with the defective device and the receipt...

Page 3: ...1 INSTRUCTIONS FOR USE...

Page 4: ...NOTICE page 06 6 GETTING STARTED page 07 6 1 Hose and accessories fittings page 08 6 2 Preparing the vacuum function page 08 7 OPERATION page 09 7 1 Vacuuming Wet Dry with Water Filter page 09 7 2 Air...

Page 5: ...C Small nozzle D Round brush E Flat special brush F Radiator brush G Small brush H Stainless steel telescopic tube I Flex tube J Extension tube optional K Turbo brush optional G Polyester filter H Ca...

Page 6: ...ainer Moreover it offers an intelligent and environmentally aware 4 level filtering system no more paper filters to buy separately and then dispose of As well as saving on running costs TUTTOLUXO 2S s...

Page 7: ...2 O 20 8 kPa Recovery tank volume 1 6 l Length of flexible tube 2 m Working reach 8 m Length of power lead 5 5 m Cable rewind button Patented systems Spray SystemTM Slalom SystemTM Simply SystemTM Pro...

Page 8: ...turer cannot be held responsible for any damage or injury deriving from improper incorrect or unreasonable use Do not use on children or animals or allow it to be used as a toy Always unwind the power...

Page 9: ...cold water pict 4 up to the level corresponding to the mark printed on the separator livello H2 O Pict 5 The tank can be removed for filling if required Pict 6 Close the tank lid and refasten it Now y...

Page 10: ...unction button Cable winder button 6 2 PREPARING THE VACUUM FUNCTION Connect the power cord Pict 5 by pulling it out from the back of the machine and inserting it into a mains plug In order to avoid t...

Page 11: ...objects use the round brush D reducing vacuum speed with the main control or otherwise with the handle shutter Pict 1 which is very useful for changing vacuum power directly while you are working If y...

Page 12: ...ion of aroma therapy while working and for many hours afterward Aroma therapy Open the tank lid and take out the purification tank CAUTION Make sure the tank is clean Refill the tank with clean water...

Page 13: ...bristles by pushing the lever one way or the other The brush movement is guided by small wheels During breaks or after work you can fasten the hose and floor brush on the tube carrier This will allow...

Page 14: ...e fabrics and clothes To vacuum delicate padded items e g Alcantara we recommend low vacuum speed to avoid creasing H STAINLESS STEEL TELESCOPIC TUBE With rapid lock system for choosing desired length...

Page 15: ...d monthly The Polyester filter at the rear air outlet is designed to trap particles as small as 0 3 micron catching anything that escaped in the water tank 2 AIR INTAKE FILTER A function you can find...

Page 16: ...Intake Filter Check the efficiency of filter To do this remove the filter with the help of the float by pushing it up against the filter Wash the filter element with plenty of cold water and neutral d...

Page 17: ...o inspect the filter proceed in the following way 1 Remove the grilled cover at the back of the TUTTOLUXO 2S Pict 1 The polyester filter is fitted inside Place the grilled cover on the floor and extra...

Page 18: ...ow all pieces to dry or dry them yourself before replacing them in the machine and closing the cover Moisture left inside could create mildew and unpleasant odours REPLACEMENT OF FILTERS Floater Filte...

Page 19: ...r applicable national legislation in force nor the consumer s rights against the retailer arising from the sales purchase agreement In the absence of applicable national legislation this guarantee wil...

Page 20: ...tened The gasket along the water bucket is not properly positioned Reposition correctly the gasket between the bucket and cover The hose or an accessory is obstructed by dirt Check and free the passag...

Page 21: ...delicateand decorativeitems RADIATORS STEEL TAPS KITCHEN WORKTOP LINOLEUM ARMCHAIRS SOFAS CAR WINDOWS Big brush Parquet accessory Big brush Floor brush for liquids Small nozzle Round brush Flat specia...

Page 22: ...EN 20 NOTES...

Reviews: