background image

29

BBV24C01AG Use, Care, and Installation Guide

Limited Warranty


Five Year Limited Warranty for Compressor:

 For five 

years from the date of your original purchase of the 

Products, we will provide, free of charge, compressor 

parts to replace those that failed due to manufactur-

ing defects subject to the exclusions and limitations 

below. We may choose, in our sole discretion, to 

repair or replace parts before we elect to replace the 

Products. 

Two Year Limited Warranty for Parts:

 For two years 

from the date of your original purchase of the 

Products, we will provide, free of charge, Products or 

parts (including LED light bulbs, if applicable) to 

replace those that failed due to manufacturing 

defects subject to the exclusions and limitations 

below. We may choose, in our sole discretion, to 

repair or replace parts before we elect to replace 

the Products.

One Year Limited Warranty for Labor:

 For one year 

from the date of your original purchase of the Prod-

ucts, we will provide, free of charge, the labor cost 

associated with repairing the Products or parts to 

replace those that failed due to manufacturing 

defects subject to the exclusions and limitations 

below. After the first year from the date of your 

original purchase, you are responsible for all labor 

costs associated with this warranty.

To Obtain Service Under Limited Warranty:

 To qualify 

for warranty service, you must: (a) notify us at the 

address or telephone number stated below within 60 

days of the discovery of the defect; (b) give the 

model number and serial number; and (c) describe 

the nature of any defect in the Product or part. At the 

time of the request for warranty service, you must 

present evidence of your proof of purchase and proof 

of the original purchase date. If we determine that 

the warranty exclusions listed above apply or if you fail 

to provide the necessary documentation to obtain 

service, you will be responsible for all shipping, travel, 

labor and other costs related to the services.  This 

warranty is not extended or restarted upon warranty 

repair or replacements.

Zephyr Ventilation, LLC (referred to herein as “we” or “us”) warrants to the original consumer purchaser 

(referred to herein as “you” or “your”) of Zephyr products (the “Products”) that such Products will be free from 

defects in materials or workmanship as follows:


Warranty Exclusions:


This warranty covers only repair or 

replacement, at our option, of defective Products or parts and 

does not cover any other costs related to the Products including 

but not limited to: (a) normal maintenance and service required for 

the Products and consumable parts such as filters, light bulbs, fuses; 

(b) any Products or parts which have been subject to freight 

damage, misuse, negligence, accident, faulty installation or 

installation contrary to recommended installation instructions, 

improper maintenance or repair (other than by us); (c) commercial 

or government use of the Products or use otherwise inconsistent with 

its intended purpose; (d) natural wear of the finish of the Products or 

wear caused by improper maintenance, use of corrosive and 

abrasive cleaning products, pads, and oven cleaner products; (e) 

chips, dents or cracks caused by abuse or misuse of the Products; 

(f) service trips to your home to teach you how to use the Products; 

(g) damage to the Products caused by accident, fire, floods, acts 

of God; or (h) Custom installations or alterations that impact 

serviceability of the Products. (I) Damage to personal property or 

food spoilage from use of this product. If you are outside our service 

area, additional charges may apply for shipping costs for warranty 

repair at our designated service locations and for the travel cost to 

have a service technician come to your home to repair, remove or 

reinstall the Products. After the first year from the date of your 

original purchase, you are also responsible for all labor costs 

associated with this warranty. All Products must be installed by a 

qualified professional installer to be eligible for warranty repairs or 

service.

Limitations of Warranty:

 OUR OBLIGATION TO REPAIR OR 

REPLACE, AT OUR OPTION, SHALL BE YOUR SOLE AND EXCLUSIVE 

REMEDY UNDER THIS WARRANTY. WE SHALL NOT BE LIABLE FOR 

INCIDENTAL, CONSEQUENTIAL OR SPECIAL DAMAGES ARISING OUT 

OF OR IN CONNECTION WITH THE USE OR PERFORMANCE OF THE 

PRODUCTS. THE EXPRESS WARRANTIES IN THE PRECEDING SECTION 

ARE EXCLUSIVE AND IN LIEU OF ALL OTHER EXPRESS WARRANTIES. WE 

HEREBY DISCLAIM AND EXCLUDE ALL OTHER EXPRESS WARRANTIES 

FOR THE PRODUCTS, AND DISCLAIM AND EXCLUDE ALL WARRANTIES 

IMPLIED BY LAW, INCLUDING THOSE OF MERCHANTABILITY AND 

FITNESS FOR A PARTICULAR PURPOSE.

 Some states or provinces do 

not allow limitations on the duration of an implied warranty or the 

exclusion or limitation of incidental or consequential damages, so 

the above limitations or exclusions may not apply to you. To the 

extent that applicable law prohibits the exclusion of implied 

warranties, the duration of any applicable implied warranty is 

limited to the same two-year and one-year periods described 

above if permitted by applicable law. Any oral or written descrip-

tion of the Products is for the sole purpose of identifying the 

Products and shall not be construed as an express warranty. Prior to 

using, implementing or permitting use of the Products, you shall 

determine the suitability of the Products for the intended use, and 

you shall assume all risk and liability whatsoever in connection with 

such determination. We reserve the right to use functionally 

equivalent refurbished or reconditioned parts or Products as 

warranty replacements or as part of warranty service. This warranty 

is not transferable from the original purchaser and only applies to 

the consumer residence where the Product was originally installed 

located in the United States and Canada. This warranty is not 

extended to resellers.

Please check our website for any additional Product information, www.zephyronline.com.

MAR20.0201

Summary of Contents for Brisas BBV24C01AG

Page 1: ...JAN21 0201 BBV24C01AG Single Zone Beverage Cooler EN Use Care and Installation Guide FR Guide d utilisation d entretien et d installation...

Page 2: ...2 BBV24C01AG Use Care and Installation Guide BEVERAGE COOLER SINGLE ZONE BRISAS...

Page 3: ...ification 15 Dimensions 15 Installation Instructions 16 19 Installation Clearance Requirements 16 Carbon Filter 17 Installing the Handle 17 Reversing the Door Swing of Your Appliance 18 Removing the W...

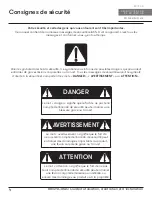
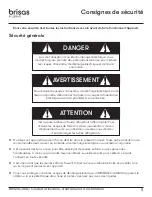
Page 4: ...ntial hazards that can cause severe bodily injury or death All safety messages will follow the Safety Alert Symbol and either the words DANGER WARNING or CAUTION DANGER WARNING CAUTION Danger means th...

Page 5: ...her damaging the refrigerant tubing or increasing the risk of a leak CAUTION Use this appliance only as described in this manual Other uses not recommended may cause fire electric shock or personal in...

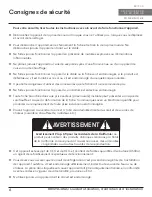
Page 6: ...place loose or worn outlet Prop 65 Warning for California Residents This product may contain chemicals known to the State of California to cause cancer birth defects or other reproductive harm WARNING...

Page 7: ...the appliance Failure to do so can result in back or other injury Never clean appliance parts with flammable liquids These fumes can create a fire hazard or explosion Never store or use gasoline or o...

Page 8: ...removing the plug cutting the power cable and removing or destroying any snap fastenings or bolts You will thus prevent children from locking themselves in the appliance during play risk of suffocati...

Page 9: ...isted below Installation of Your Appliance Do not store or install the appliance outdoors WARNING The appliances are designed for either built in or free standing installation Place your appliance on...

Page 10: ...eased cooling efficiency if air flow is restricted due to a fully loaded cabinet Install the beverage cooler in a well ventilated area where the ambient temperature is above 50 F and below 90 F Attent...

Page 11: ...exposed or dangling The appliance should always be plugged into its own individual electrical outlet which has a voltage rating that matches the rating label on the appliance This provides the best pe...

Page 12: ...ack of your unit and are needed to obtain warranty service You may also want to staple your receipt to this manual as it is the proof of your purchase and may also be needed for service under warranty...

Page 13: ...13 BBV24C01AG Use Care and Installation Guide List of Materials Door handle screws Door handle Reversible door hinge bracket User manual Quantity Part Left stopper...

Page 14: ...112 12oz cans or 133 12oz cans REFRIGERANT R600a TEMPERATURE RANGE 38 F 65 F DIMENSIONS HxWxD 33 7 8 X 23 7 8 X 23 1 2 GROSS WEIGHT lb 123 68lb OPTIONAL PRO HANDLE ACCESSORY PRHAN C001 OPTIONAL CONTE...

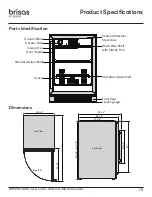
Page 15: ...mensions Seamed Stainless Steel Door Black Wire Shelf with Plastic Trim Control Panel Carbon Filter Internal Fan Door Handle Standard Glass Shelf Sensor Standard Glass Shelf Front Vent Leveling Legs T...

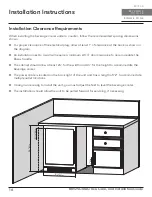
Page 16: ...am An installation next to a wall will require a minimum 2 1 4 door clearance to accommodate the Brisas handle The cabinet should allow at least 24 for the width and 34 for the height to accommodate t...

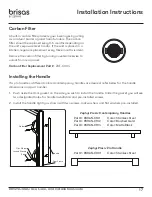
Page 17: ...F C004 Handle Door Frame Gasket Flat Washer Locked Washer Screw Zephyr Presrv Contemporary Handles Zephyr Presrv Pro Handle Part PRHAN C101 Part PRHAN C102 Part PRHAN C104 Color Stainless Steel Color...

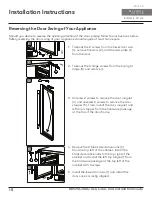
Page 18: ...oor 2 and the axis plate 1 from the door 2 Take out the 3 hinge screws from the top right hinge 3 and remove it 3 Unscrew 2 screws to remove the door magnet 4 and unscrew 2 screws to remove the door s...

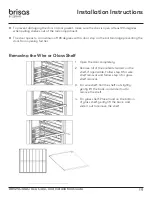
Page 19: ...e bottom hinge preventing the door from opening further Removing the Wire or Glass Shelf 1 Open the door completely 2 Remove all of the contents loaded on the shelf if applicable Follow step 3 for wir...

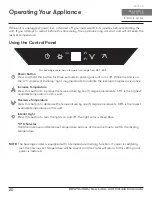
Page 20: ...minate to indicate the internal compressor is active Increase Temperature Press this button to increase the temperature by one 1 degree increments 65 F is the highest available temperature on this uni...

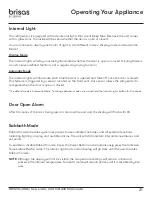
Page 21: ...this sensor allows the refrigerator to recognize when the door is open or closed The default mode is Automatic Mode To change between modes press and hold the Interior Lights button for 3 seconds Doo...

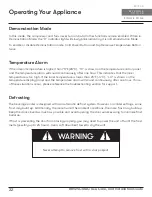
Page 22: ...nner temperature is too high If the inner temperature is lower than 25 F 4 C LO is shown on the temperature display panel and the temperature alarm will sound continuously after one hour If one of the...

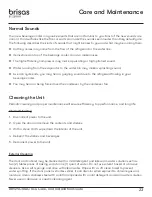
Page 23: ...e cooler You may hear air being forced over the condenser by the condenser fan Cleaning the Unit Periodic cleaning and proper maintenance will ensure efficiency top performance and long life Interior...

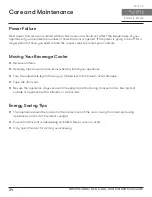
Page 24: ...Your Beverage Cooler Remove all items Securely tape down all loose items shelves inside your appliance Turn the adjustable leg all the way up clockwise to the base to avoid damage Tape the door shut B...

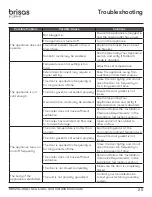
Page 25: ...emonstration mode may be enabled See the Operating Your Appliance section and verify if Demonstration mode is disabled The cooler does not have sufficient ventilation Read and follow the Installation...

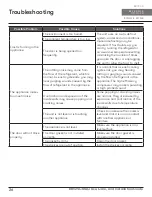
Page 26: ...e flow of refrigerant in the appliance It is normal that as each cooling cycle ends you may hearing ratting or gurgling sounds caused by the flow of refrigerant in the appliance The high efficiency co...

Page 27: ...27 BBV24C01AG Use Care and Installation Guide Notes...

Page 28: ...28 BBV24C01AG Use Care and Installation Guide BEVERAGE COOLER SINGLE ZONE BRISAS Notes...

Page 29: ...cial or government use of the Products or use otherwise inconsistent with its intended purpose d natural wear of the finish of the Products or wear caused by improper maintenance use of corrosive and...

Page 30: ...e take a moment to register your new Zephyr product at www zephyronline com registration Zephyr Ventilation 2277 Harbor Bay Pkwy Alameda CA 94502 1 888 880 8368 Prompt registration helps in more ways...

Page 31: ...JAN21 0201 BBV24C01AG Refroidisseur de boissons zone unique EN Use Care and Installation Guide FR Guide d utilisation d entretien et d installation...

Page 32: ...2 BBV24C01AG Guide d utilisation d entretien et d installation REFROIDISSEUR DE BOISSONS ZONE UNIQUE BRISAS...

Page 33: ...ication des pi ces 15 Dimensions 15 Instructions d installation 16 19 Espace libre requis pour l installation 16 Filtre charbon 17 Installation de la poign e 17 Inverser l ouverture de la porte de vot...

Page 34: ...rporelles ou la mort Tous les messages de s curit suivent le symbole d alerte la s curit et comportent les mots DANGER AVERTISSEMENT ou ATTENTION DANGER AVERTISSEMENT ATTENTION Le mot danger signifie...

Page 35: ...te lors de sa manutention de son d placement ou de son utilisation assurez vous d viter d endommager les tubes r frig rants ATTENTION N utilisez cet appareil que de la fa on d crite dans le pr sent ma...

Page 36: ...o tier est enlev ou endommag Toute fiche branch e dans une prise secteur prise murale instable peut pr senter un risque de surchauffe et causer la d formation de la fiche Communiquez avec un lectricie...

Page 37: ...e ou d explosion N utilisez et n entreposez jamais d essence ou d autres liquides ou vapeurs inflammables pr s de cet appareil ou de tout autre appareil Ces vapeurs peuvent pr senter un risque d incen...

Page 38: ...nlevez la fiche coupez le c ble d alimentation et retirez ou d truisez toute languette pression ou tout capuchon enclenchement Il sera ainsi difficile que des enfants s enferment dans l appareil en jo...

Page 39: ...otre appareil ci dessous Installation de votre appareil N entreposez pas ou n installez pas l appareil l ext rieur AVERTISSEMENT L appareil est con u pour tre encastr ou autoportant Installez votre ap...

Page 40: ...dos ou d autres blessures Le rendement du refroidisseur peut diminuer quelque peu si la circulation d air est restreinte parce que l appareil est rempli au maximum de sa capacit Installez le refroidi...

Page 41: ...e de l appareil ne pas tre expos et ne pas pendre librement L appareil doit toujours tre branch dans une prise lectrique individuelle et d di e dont la tension nominale correspond la tension indiqu e...

Page 42: ...la plaque signal tique situ e l arri re de l appareil Vous pouvez galement agrafer votre re u au manuel puisqu il s agit de la preuve d achat dont vous pourriez aussi avoir besoin pour obtenir du serv...

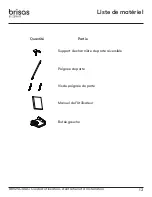
Page 43: ...C01AG Guide d utilisation d entretien et d installation Liste de mat riel Vis de poign e de porte Poign e de porte Support de charni re de porte r versible Manuel de l Utilisateur Quantit Partie But e...

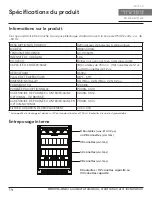
Page 44: ...de 750 ml 112 canettes de 12 oz ou 133 canettes de 12 oz R FRIG RANT R600a PLAGE DE TEMP RATURES 38 F 65 F DIMENSIONS HxLxP 33 7 8 po X 23 7 8 po X 23 1 2 po POIDS BRUT lb 123 68lb POIGN E PRO OPTIONN...

Page 45: ...e avec coutures Tablette en l noir avec garniture en plastique Tableaux de commande Filtre charbon Ventilateur interne Poign e de porte tag re en verre standard Capteur tag re en verre standard vent a...

Page 46: ...e installation c t d un mur n cessitera un d gagement de porte minimum de 2 1 4 po pour accueillir la poign e Brisas L armoire doit permettre au moins 24 po pour la largeur et 34 po pour la hauteur po...

Page 47: ...e plate Rondelle d arr t Vis Poign e Cadre de porte Joint Zephyr Presrv poign es contemporaines Zephyr Presrv pro handle Partie PRHAN C101 Partie PRHAN C102 Partie PRHAN C104 Couleur acier inoxydable...

Page 48: ...porte 2 et la plaque d axe 1 de la porte 2 Retirez les 3 vis de charni re de la charni re sup rieure droite 3 et retirez la 3 D vissez 2 vis pour retirer l aimant de porte 4 et d vissez 2 vis pour re...

Page 49: ...chant la porte de s ouvrir davantage Retrait de la tablette m tallique ou en verre 1 Ouvrez compl tement la porte 2 Retirez tout le contenu charg sur l tag re le cas ch ant Suivez l tape 3 pour le ret...

Page 50: ...lumer pour indiquer que cette fonction est active Augmentation de la temp rature Appuyez sur cette touche pour augmenter la temp rature d un degr Le r glage de temp rature le plus lev de cet appareil...

Page 51: ...orte est ouverte ou ferm e Le mode automatique est le mode par d faut Pour passer d un mode un autre tenez le bouton de l clairage int rieur enfonc pendant trois secondes Alarme de porte ouverte Si la...

Page 52: ...ure int rieure est trop lev e Si la temp rature int rieure est inf rieure 25 F 4 C LO s affiche sur le panneau d affichage de la temp rature et l alarme de temp rature retentit en continu apr s une he...

Page 53: ...oissons peut mettre des gargouillis Il est possible que vous entendiez le ventilateur pousser l air dans le condensateur Nettoyage et entretien Le nettoyage p riodique et l entretien ad quat de l appa...

Page 54: ...ez tous les l ments libres tag res se trouvant l int rieur de l appareil avec du ruban Pour viter tout dommage repliez la patte ajustable vers le haut en la faisant tourner dans le sens horaire Tenez...

Page 55: ...nt de porte n est pas desserr Le mode d monstration peut tre activ Consultez la section Fonctionnement de votre appareil et v rifiez si le mode de d monstration est d sactiv Le refroidisseur n a pas u...

Page 56: ...boissons peut mettre des gargouillis la fin de chaque cycle il est normal que le mouvement du liquide r frig rant dans votre refroidisseur de boissons produise des gargouillis Le compresseur haut ren...

Page 57: ...27 BBV24C01AG Guide d utilisation d entretien et d installation Remarques...

Page 58: ...28 BBV24C01AG Guide d utilisation d entretien et d installation REFROIDISSEUR DE BOISSONS ZONE UNIQUE BRISAS Remarques...
Page 59: ...ue par nous c utilisation commerciale ou gouvernementale des produits utilisation allant l encontre de l usage pr vu d usure naturelle du fini ou usure caus e par un entretien inad quat utilisation de...

Page 60: ...uvelle produit au www zephyronline com registration Zephyr Ventilation 2277 Harbor Bay Pkwy Alameda CA 94502 1 888 880 8368 Cet enregistrement rapide est utile bien des gards C EST IMPORTANT Il assure...

Reviews: