background image


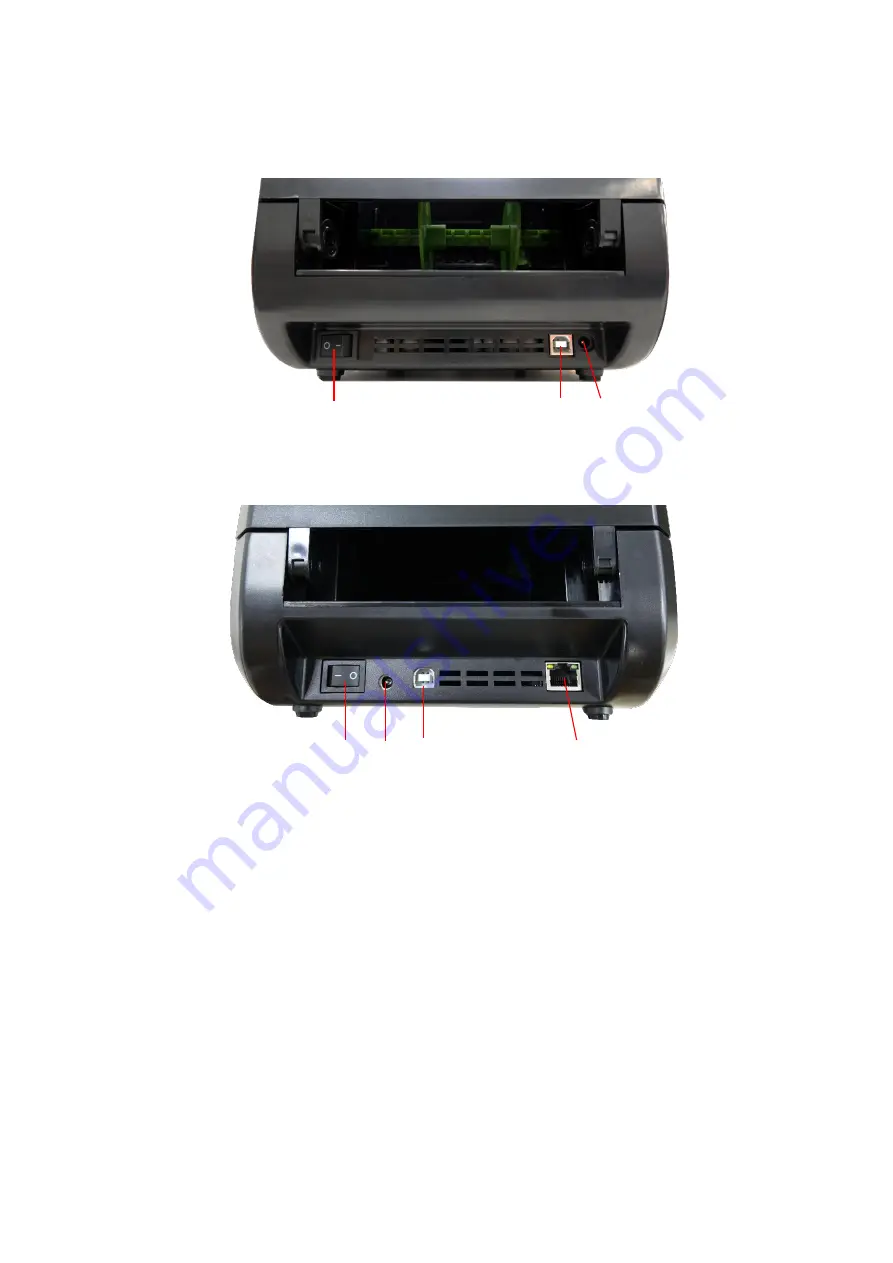
2.2.3 Rear View 


4T520/4T530 model 


4T520P/4T530P model 


1.

    Power switch 

2.

    USB interface (USB 2.0/Full speed mode) 

3.

    Power jack socket 

4.   

Ethernet interface (10/100 Mbps) 


Note: 

The interface picture here is for reference only. Please refer to the product specification for 

the interfaces availability. 


Summary of Contents for 4T520P Series

Page 1: ...i USER S MANUAL 4T520 4T530 Series 4T520P 4T530P Series THERMAL TRANSFER DIRECT THERMAL BAR CODE PRINTER...

Page 2: ...k of Microsoft Corporation All other trademarks are the property of their respective owners Information in this document is subject to change without notice and does not represent a commitment on the...

Page 3: ...d easily accessible 5 The unit must be protected against moisture 6 Ensure the stability when installing the device Tipping or dropping could cause damage 7 Make sure to follow the correct power ratin...

Page 4: ...gular Button Functions 14 4 3 Power on Utilities 14 4 3 1 Gap Black Mark Sensor Calibration 15 4 3 2 Gap Black Mark Calibration Self test and Dump Mode 16 4 3 3 Printer Initialization 19 4 3 4 Set Bla...

Page 5: ...r is built in the high quality and support various kinds of media With flexible firmware design users can also download the True Type Font from PC into printer memory for printing labels Besides the s...

Page 6: ...Min black mark size 2 mm x 8 mm Ribbon width 40 110 mm Ribbon 300 m long max OD 67 mm 1 core ink coated outside 110 m long max OD 40 mm 0 5 core ink coated outside Ribbon wound type Outside wound ink...

Page 7: ...to reship the printer Unpacking the printer the following items are included in the carton One printer unit One quick installation guide One power cord One external universal switching power supply O...

Page 8: ...4 2 2 Printer Overview 2 2 1 Front View 1 LED indicator Feed Pause button 2 Top cover open tab 3 Paper exit chute 3 2 1...

Page 9: ...int head release button 6 Ribbon rewind spindle 7 Fixing tab 8 Media supply spindle 9 Platen roller 10 Gap sensor 11 Black mark sensor 12 Media guide 13 Ribbon cover 14 Print head 15 Cutter optional W...

Page 10: ...el 1 Power switch 2 USB interface USB 2 0 Full speed mode 3 Power jack socket 4 Ethernet interface 10 100 Mbps Note The interface picture here is for reference only Please refer to the product specifi...

Page 11: ...the computer with the provided USB cable 3 Push the power switch on side to open the power of printer 4 If you would like to watch printer installation videos or download the firmware and software ple...

Page 12: ...de of the printer 1 core 0 5 core 2 Insert the paper core to the ribbon rewind spindle Note Please follow the direction when installing the ribbon rewind spindle 1 core 0 5 core 3 Insert the ribbon ro...

Page 13: ...he ribbon cover 6 Insert the ribbon rewind spindle with paper roll and ribbon supply spindle with ribbon to ribbon rewind hub and rewind spindle hub Note Insert right side of spindle marked R to hub f...

Page 14: ...f the ribbon onto the ribbon rewind paper core 8 Turn the ribbon rewind hub until the ribbon plastic leader is thoroughly wound and the blue section of the ribbon covers the print head 9 Close the pri...

Page 15: ...bs located on each side of the printer 2 Insert the paper roll into the media supply spindle and use two fixing tabs to fix the paper roll onto the center of the spindle If your paper width is 4 you c...

Page 16: ...e black mark sensor if using black mark label Note The black mark sensor position is moveable and the gap sensor is fixed Please make sure the gap or black mark is at the location where media gap blac...

Page 17: ...lose the print head mechanism with both hands and make sure the latches are engaged securely 9 Use Diagnostic Tool to set the media sensor type and calibrate the selected sensor Start the Diagnostic t...

Page 18: ...sh This illuminates a printing error such as head open paper empty paper jam ribbon empty or memory error etc 4 2 Regular Button Functions 1 Feed labels When the printer is at ready status Green Solid...

Page 19: ...uld be calibrated at the following conditions 1 A brand new printer 2 Change label stock 3 Printer initialization Please follow the steps below to calibrate the ribbon and gap black mark sensor 1 Turn...

Page 20: ...e button then turn on the power switch 3 Release the button when LED becomes amber and blinking Any amber will do during the 5 blinks The LED color will be changed as the following order Amber red 5 b...

Page 21: ...e F W version Firmware checksum Printer S N zenpert configuration file System date System time Printed mileage meter Cutting counter Print speed inch sec Print darkness Label size inch Gap distance in...

Page 22: ...18 RS232 serial port configuration Numbers of download files Total available memory space Print head check pattern...

Page 23: ...ower to resume printer for normal printing 4 3 3 Printer Initialization Printer initialization is used to clear DRAM and restore printer settings to defaults Printer initialization is activated by the...

Page 24: ...te the Black Mark Sensor Please follow the steps as below 1 Turn off the power switch 2 Hold on the button then turn on the power switch 3 Release the button when LED turns green amber after 5 green b...

Page 25: ...hen turning on printer power The AUTO BAS program can be interrupted without running the program by the power on utility Please follow the procedures below to skip an AUTO BAS program 1 Turn off print...

Page 26: ...to a printer With the aid of this powerful tool you can review printer status and settings in an instant which makes it much easier to troubleshoot problems and other issues 5 1 Start the Diagnostic...

Page 27: ...Ethernet Setup Setup the IP address subnet mask gateway for the on board Ethernet RTC Setup Synchronize printer Real Time Clock with PC Print Test Page Print a test page Reset Printer Reboot printer F...

Page 28: ...gap or black mark is at the location where media gap black mark will pass through for sensing 2 Turn on the printer power switch 3 Open Diagnostic tool and set interface The default setting is USB Th...

Page 29: ...fer to the steps on section 3 2 to re install the ribbon The printer status from DiagTool shows Out of Paper The LED shows Red blinking Running out of label The label is installed incorrectly Gap blac...

Page 30: ...th dust Check if label size is setup correctly Calibrate the sensor by Auto Gap or Manual Gap options Clear the GAP Black mark sensor by blower The printing position of small label is incorrect Media...

Page 31: ...27...

Page 32: ...a new label roll Platen Roller 1 Turn the power off 2 Rotate the platen roller and wipe it thoroughly with 100 ethanol and a cotton swab or lint free cloth Clean the platen roller when changing a new...

Page 33: ...29...

Page 34: ...30 Revise History Date Content Editor 2022 3 14 Add 4T520P 4T530P models Camille...

Page 35: ...td 2nd Floor Workshop Rongda Building No 51 the 9th Avenue Tianjin Economic and Technological Development Area Tianjin China 300457 TEL 86 22 5981 6661 FAX 86 22 5981 5312 E mail Sales_support zenpert...

Reviews: