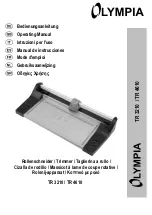
background image

GB-12

LRTZ2600

9. Maintenance

Every Every Every

25

50

100

       System/components

         Procedure

Before

hours hours hours                   Note

use

after

after

after

fuel leaks, fuel spillage

wipe out

fuel tank, air filter, fuel filter

inspect/clean

replace, if necessary

see adjusting

replace carburetor

idle adjusting screw

idling speed

if necessary

clean and readjust

GAP: .025 in (0.6 ~ 0.7 mm)

spark plug

plug gap

replace, if necessary

cylinder fins, intake air cooling vent

clean

muffler, spark arrester, cylinder exhaust port

clean, remove piled up carbon

throttle lever, ignition switch

check operation

replace if

cutting parts

something’s wrong

gear case, cutter case

grease

screws/nuts/bolts

tighten/replace

not adjusting screws

ENGINE

SHAFT

• Before cleaning, inspecting, or repairing the unit, make sure that the engine has stopped and is cool.
• Use protective gloves whenever inspecting, removing, sharpening, and installing the blades.

MAINTENANCE CHART

BLADES

• When refilling the tank or resting, it is often a good

idea to use the time to oil the cutting blades.

• If a gap exists between the upper and lower blades,

follow the procedure below to adjust them so that they
fit more closely together.

• Loosen lock nut (A) as shown in the diagram.
2. Tighten screw (B) fully, and then turn one-third to one-

half of a rotation backward.

3. While holding onto the screw to keep it in position,

tighten the lock nut.

4 .Check to make sure that the flat washer (C) is loose

enough so that it may be turned by pressing on it with
a finger.

 NOTE

• Screwing in the screw too tightly may make it impos-

sible for the blades to move.  Conversely, not screw-
ing in the screw tightly enough may make the blades
of the trimmer feel dull and cause leaves and branches
to become caught in the blades of the trimmer.

(1) Upper blade
(2) Lower blade

QUICK TIP

• If the blades become so worn down that it is no longer

possible to eliminate the gap between them, you
should contact the authorized ZENOAH servicing
dealer from which you purchased your ZENOAH trim-
mer to have the blades resharpened or replaced.

GEAR CASE

• The inside of the gear case should be lubricant using

ZENOAH-approved lubricant after every 25 hours of
use.

• When adding lubricant, use a grease gun to insert

lubricant into the three grease nipples located on the
gear case.

TYPE OF LUBRICANT TO BE USED

Always be sure to use #2 lithium heat-resistant lubricant.

(1) Grease fitting

Summary of Contents for LRTZ2600

Page 1: ...GB 1 G B LRTZ2600 LRTZ2600 G B OWNER S MANUAL LONG REACH TRIMMER 848A2N93A1 704 ...

Page 2: ...ol production The products referred are DESIGNATION HEDGE TRIMMER MODELS LRTZ2600 SERIAL NUMBERS 50100001 and up The company named above will keep on file the following technical documentation for any inspection furpose Operation instructions as confirmed Plans and Drawings Description of measures designed to ensure conformity Other technical documentation Specification sheet Inspection standard S...

Page 3: ...ed to read all such instructions carefully and follow them without fail WARNINGS IN THE MANUAL WARNING This mark indicates instructions which must be followed in or der to prevent accidents which could lead to serious bodily in jury or death IMPORTANT This mark indicates instructions which must be followed or it leads to mechanical failure breakdown or damage NOTE This mark indicates hints or dire...

Page 4: ...tion and maintenance symbols are carved in relief on the machine According to these indications please be careful not to make a mistake The port to refuel the MIX GASOLINE 2 Read owner s manual before op erating this machine 3 Wear head eye and ear protec tion 1 Warning Attention 4 Keep hands away from cutting blades Never modify your machine We won t warrant the machine if you use the remodeled t...

Page 5: ...r when you can t maintain a steady posture b At night at times of heavy fog or at any other times when your field of vision might be limited and it would be diffi cult to gain a clear view of the working area c During rain storms during lightning storms at times of strong or gale force winds or at any other times when weather conditions might make it unsafe to use the product WORKING PLAN 1 You sh...

Page 6: ...us burns or electrical shock 5 For safe operation BEFORE STARTING THE ENGINE 1 The area within a perimeter of 15 m 50 ft of the person using the product should be considered a hazardous area into which no one should enter If necessary yellow warning rope warning signs should be placed around the perimeter of the area When work is to be performed simulta neously by two or more persons care should a...

Page 7: ...mended for the unit 6 Under no circumstances should you ever take apart the product or alter it in any way Doing so might result in the product be coming damaged during opera tion or the product becoming un able to operate properly HANDLING FUEL 1 The engine of the ZENOAH prod uct is designed to run on a mixed fuel which contains highly flam mable gasoline Never store cans of fuel or refill the ta...

Page 8: ...r CONNECTING SWITCH WIRES Connect the switch wires between the engine and the main unit Pair the wires of the same color INSTALLING HANDLE Mount the handle to the shaft tube and clamp it at a location that is comfortable to you 6 Set up Bolt About 48cm ATTACHING THE TRIMMING MECHANISM 1 Remove the cap on the end of the main pipe 2 Remove the screw screwed into the end of the trim ming mechanism 3 ...

Page 9: ... WARNING 1 Select bare ground for fueling 2 Move at least 10 feet 3 meters away from the fueling point before starting the engine 3 Stop the engine before refueling the unit At that time be sure to sufficiently agitate the mixed gasoline in the container FOR YOUR ENGINE LIFE AVOID 1 FUEL WITH NO OIL RAW GASOLINE It will cause severe damage to the internal engine parts very quickly 2 GASOHOL It can...

Page 10: ...d Readjust with the cable adjuster as required ADJUSTING IDLING SPEED 1 When the engine tends stop frequently at idling mode turn the adjusting screw clockwise 2 When the cutting head keeps moving after releasing the trigger turn the adjusting screw counter clockwise NOTE Warm up the engine before adjusting the idling speed STARTING ENGINE WARNING The cutting head will start moving upon the engine...

Page 11: ... when not in use Falling branches may fall onto the face or into the eyes resulting in injuries scratches and cuts and for this reason you should always be sure to wear a helmet and face protector when using your trimmer NOTE The thickness of branches which may be cut using this trimmer is limited to up to approximately 4 8mm Never try to cut branches thicker than this as doing so may result in da...

Page 12: ...llow the procedure below to adjust them so that they fit more closely together Loosen lock nut A as shown in the diagram 2 Tighten screw B fully and then turn one third to one half of a rotation backward 3 While holding onto the screw to keep it in position tighten the lock nut 4 Check to make sure that the flat washer C is loose enough so that it may be turned by pressing on it with a finger NOTE...

Page 13: ...orrect type specified by ZENOAH REPLACEMENT PLUG IS A NGK CMR7A 9 Maintenance 9 Maintenance Fuel filter Air Filter TIGHTENING TORQUE 87 104 in lbs 9 8 11 8 N m 0 6 0 7 mm IMPORTANT Note that using any spark plug other than those des ignated may result in the engine failing to operate properly or in the engine becoming overheated and damaged To install the spark plug first turn the plug until it is...

Page 14: ...come overheated and that this in turn could cause the engine to catch on fire Always make sure that the muffler is clean and free of wood chips leaves and other waste before use Check the intake air cooling vent and the area around the cylinder cooling fins after every 25 hours of use for blockage and remove any waste which has attached itself to the machine Note that it is necessary to remove the...

Page 15: ... UNITS WHICH HAVE BEEN DAMAGED BY NEGLIGENCE OF IN STRUCTION LISTED IN THE OWNER OPERATOR MANUAL FOR PROPER USE AND MAINTENANCE OF THE UNITS ACCIDENT MISHANDLING ALTERATION ABUSE IM PROPER LUBRICATION USE OF ANY PARTS OR ACCES SORIES OTHER THAN THOSE SPECIFIED BY THE COM PANY OR OTHER CAUSES BEYOND THE COMPANY S CONTROL THIS WARRANTY DOES NOT COVER THOSE PARTS RE PLACED BY NORMAL WEAR OR HARMLESS ...

Reviews: