background image

12

Connection to an 

Connection to an 

Amplifier

Amplifier

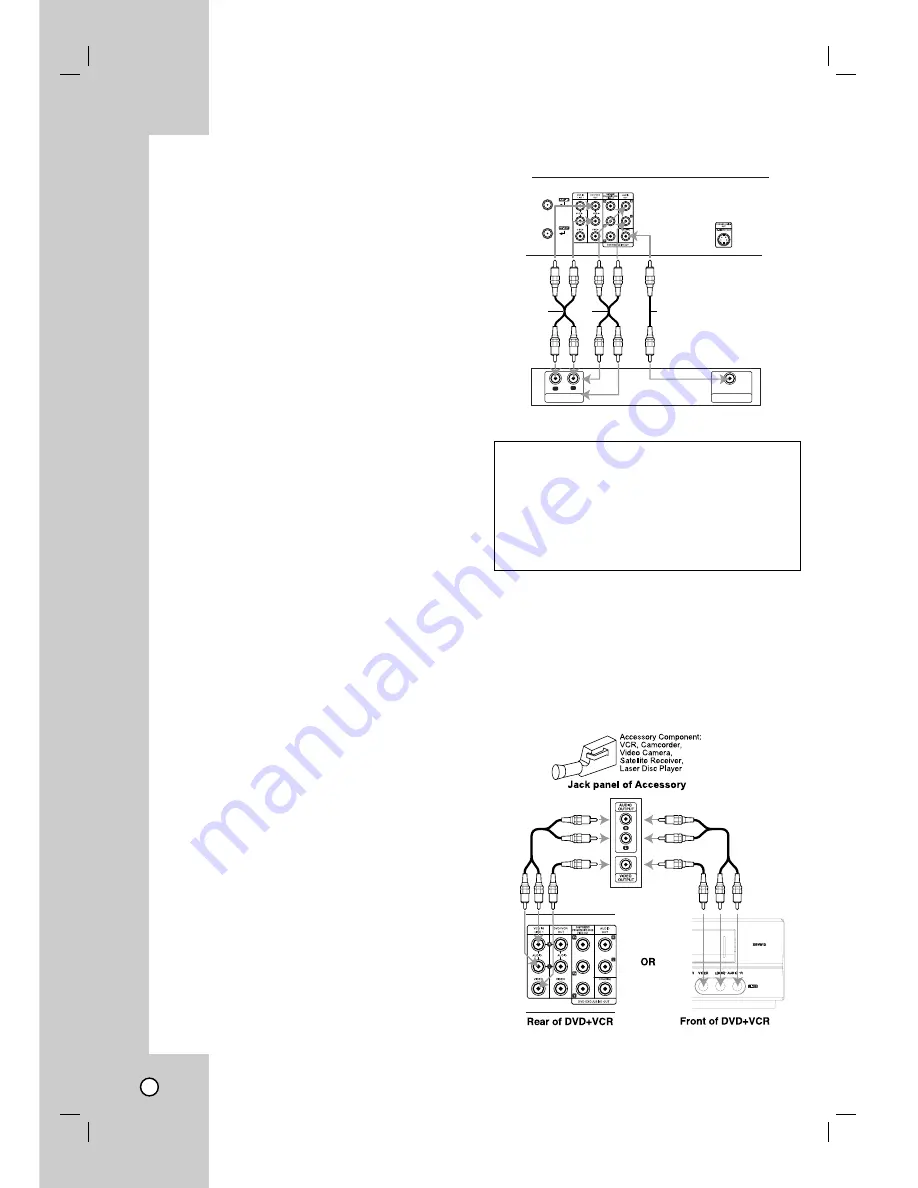
You can only listen to DVD playback using COAXIAL

(X)

and AUDIO OUT

(A2)

connections. The tuner and

VCR will still be heard through the RF.OUT

(R)

or

DVD/VCR AUDIO OUT

(A1)

jack. (See page 10.)

Connecting to an amplifier equipped with two
channel analog stereo or Dolby Pro Logic II/Pro
Logic

Connect the Left and Right AUDIO OUT (or
DVD/VCR AUDIO OUT) jacks on the DVD+VCR to
the audio left and right in jacks on your amplifier,
receiver, or stereo system using the audio cables

(A1, A2

) supplied.

Connecting to an amplifier equipped with two
channel digital stereo (PCM) or to an Audio/Video
receiver equipped with a multi-channel decoder
(Dolby Digital™, MPEG 2, or DTS)

1. Connect one of the DVD+VCR’s DIGITAL AUDIO

OUT jacks (COAXIAL

X

) to the corresponding in

jack on your amplifier. Use an optional digital 
(COAXIAL

X

) audio cable.

2. You will need to activate the DVD+VCR’s digital

output. (See “AUDIO” on page 17).

Digital Multi-channel sound

A digital multi-channel connection provides the best
sound quality. For this you need a multi-channel
Audio/Video receiver that supports one or more of the
audio formats supported by your DVD+VCR (MPEG
2, Dolby Digital and DTS). Check the receiver manual
and the logos on the front of the receiver.

Caution:

Due to the DTS Licensing agreement, the digital 
output will be in DTS digital out when DTS audio
stream is selected.

Notes:

If the audio format of the digital output does not match
the capabilities of your receiver, the receiver will pro-
duce a strong, distorted sound or no sound at all. 

Six Channel Digital Surround Sound via digital connec-
tion can only be obtained if your receiver is equipped
with a Digital Multi-channel decoder. 

To see the audio format of the current DVD in the on-
screen display, press AUDIO.

Accessory Audio/Video (A/V) Connections to
DVD+VCR

Connect the VCR IN LINE 1 or LINE 2 jacks on the
DVD+VCR to the audio/video out jacks on your
accessory component, using the optional audio/video
cables. (Refer to page 23 for “Recording from
External Components”.)

DIGITAL INPUT

COAXIAL

L

R

AUDIO INPUT

Rear of DVD+VCR

Amplifier (Receiver)

A2

A1

X

Manufactured under license from Dolby
Laboratories. “Dolby”, “Pro Logic”, and the
double-D symbol are trademarks of Dolby
Laboratories.

DTS and DTS Digital Out are trademarks of
Digital Theater Systems, Inc. 

Summary of Contents for XBV613 - DVD/VCR Combination

Page 1: ...Z NA1ULZ_ENG Installation and Operating Guide Warranty Model Number XBV613 DVD Player Video Cassette Recorder Copyright 2005 LG Electronics U S A Inc For service support Call Toll Free Number 1 800 24...

Page 2: ...de reasonable protection against harmful interference when the product is operated in a residential installation This product generates uses and can radiate radio frequency energy and if not installed...

Page 3: ...lug has two blades and a third grounding prong The wide blade or the third prong are provided for your safety If the provided plug does not fit into your outlet consult an electrician for replacement...

Page 4: ...SPLAY 16 AUDIO 17 OTHERS 17 LOCK Parental Control 18 Operations VCR 19 25 VCR Tape Playback 19 20 Basic Instructions 19 Auto Tracking 19 Manual Tracking 19 Search 19 Still Picture and Frame by Frame P...

Page 5: ...ng Discs Do not touch the playback side of the disc Hold the disc by the edges so that fingerprints do not get on the surface Never stick paper or tape on the disc Storing Discs After playing store th...

Page 6: ...by law to copy broadcast show broadcast via cable play in public or rent copyright ed material without permission This product features the copy protection function developed by Macrovision Copy prote...

Page 7: ...rent deck status Playback Pause etc g Remote Sensor Point the DVD VCR remote control here h Z Z VCR Ejects the tape in the VCR deck i m m DVD Skip to beginning of current chapter or track press twice...

Page 8: ...SKIP Go to next chapter or track Returns to beginning of current chapter or track or go to previous chapter or track STOP x x Stops playback or recording BACKWARD FORWARD m M DVD Search backward or f...

Page 9: ...ut on TV a b c d e f g h Preparation Depending on your TV and other equipment there are various ways you can connect the player Please refer to the manuals of your TV VCR stereo system or other device...

Page 10: ...ctor on the converter and a coaxial cable from the OUT connector on the convert er to the ANT IN on your DVD VCR This cable hookup permits both TV and DVD VCR operation To view or record a CATV channe...

Page 11: ...ions These connections support only DVD playback The tuner and VCR still output through the RF OUT R or DVD VCR OUT A V jacks S Video connection Connect the S VIDEO OUT jack on the DVD VCR to the S Vi...

Page 12: ...lti channel Audio Video receiver that supports one or more of the audio formats supported by your DVD VCR MPEG 2 Dolby Digital and DTS Check the receiver manual and the logos on the front of the recei...

Page 13: ...ormation broadcast in the signal channel Use b B to choose AUTO ON or OFF TIME ZONE You can set your local Time Zone manually If you choose AUTO the DVD VCR sets the clock using the first Coordinated...

Page 14: ...stem and standard NORMAL mono system The same audio is generally recorded on both systems The VHS Hi Fi system plays on separate left and right channels and the NORMAL system plays monaural sound The...

Page 15: ...menu you can make vari ous adjustments to items such as picture and sound You can also set a language for the subtitles and the Setup menu among other things For details on each Setup menu item see pa...

Page 16: ...lower portions of the screen Panscan Automatically displays the wide picture on the entire screen and cuts off the portions that do not fit Progressive Scan Progressive Scan Video provides the highes...

Page 17: ...of the audio output the difference between the loudest sounds and the quietest ones This allows you to listen to a movie at a lower volume without los ing clarity of sound Set DRC to On for this effe...

Page 18: ...f you set a rating for the player all disc scenes with the same rating or lower are played Higher rated scenes are not played unless an alternate scene is available on the disc The alternative must ha...

Page 19: ...ear due to scratches on the tape Manual Tracking To manually adjust the tracking use the CH TRK v V buttons on the remote control or CH v V on the front panel during playback Notes Vertical jitter req...

Page 20: ...r true stereo play back To experience the full and rich stereo sound available with Hi Fi recorded tapes we recommend the connection of this unit to a home stereo audio system 1 Set the AUDIO MODE opt...

Page 21: ...ote During the VCR recording mode you cannot change to the DVD mode To pause the recording 1 Press PAUSE STEP X to pause the tape during recording The REC indicator flashes in the display window 2 Whe...

Page 22: ...a mistake or want to change a set ting use v to select the option and correct it using b B If the program preset time is past the PAST TIME PROGRAMMED message appears on the TV screen Return to the i...

Page 23: ...ress REC ITR z once to check the recording time The recalled setting automatically returns to the TV screen after 6 seconds Extending the Recording Time The recording time can be extended anytime by p...

Page 24: ...play Every press of CLK CNT changes the TV screen as illustrated below Counter Memory This feature is useful if there is a section of tape you want to view immediately after recording or if you want t...

Page 25: ...ected after rewinding and the turns itself off automatically Note Auto power off does not function during regular DVD play mode DVD VCR power stays on S VHS Quasi Playback SQPB This DVD VCR can play b...

Page 26: ...repeatedly to play Frame by Frame SKIP During playback press SKIP or to go to the next chapter track or to return to the beginning of the cur rent chapter track Press SKIP twice briefly to step back...

Page 27: ...Additional features Additional features 3D Surround To produce a 3D surround effect that simulates multi channel audio from two stereo speakers instead of the five speakers normally required for mult...

Page 28: ...starts from the marked scene Or Press CLEAR and the marker number is erased from the list 4 You can play any marker by inputting its number on the marker search menu Last Scene Memory This player memo...

Page 29: ...LAY or ENTER OK to start Playback begins in the order in which you programmed the tracks Playback stops after all of the tracks on the Program list have played once 6 To resume normal playback from pr...

Page 30: ...ER OK Still Picture 1 Press PAUSE STEP X during slide show The player will now go into PAUSE mode 2 To return to the slide show press PLAY N or press PAUSE STEP X a gain Moving to another File Press S...

Page 31: ...about 3 seconds then press b B to select another language code until the subtitle is displayed properly DivX disc compatibility with this player is limited as follows Available resolution size of the...

Page 32: ...CPRM recordings can only be played on players that are specifically compatible with CPRM Maintenance and Service Maintenance and Service Refer to the information in this chapter before con tacting a...

Page 33: ...lorussian 6669 Cambodian 7577 Catalan 6765 Chinese 9072 Corsican 6779 Croatian 7282 Czech 6783 Danish 6865 Dutch 7876 English 6978 Esperanto 6979 Estonian 6984 Faroese 7079 Language Code Fiji 7074 Fin...

Page 34: ...ressive scan mode The Progressive Scan is set to On on the setup menu but is connected to a standard analog television with compo nent video input Correction Plug the power cord into the wall out let...

Page 35: ...tions ex PLAY Camcorder is off DVD VCR SOURCE SELECT is not set to LINE1 or LINE2 Clock in DVD VCR is not set to correct time Timer has been programmed incorrectly indicator light does not appear afte...

Page 36: ...4 Adjustable VCR Specifications Head system Four head helical scan azimuth system Timer 12 hour display type with AM PM Tape speed SP 33 35 mm sec LP 16 67 mm sec SLP 11 12 mm sec Tape width 12 7 mm M...

Page 37: ...37...

Page 38: ...24 hours a day 365 days per year and select an appropriate option from the menu to confirm the product is defective and to obtain a Return Authorization RA If the defect has occurred during the first...

Reviews: