background image

16

Before VCR Operation (Continued)
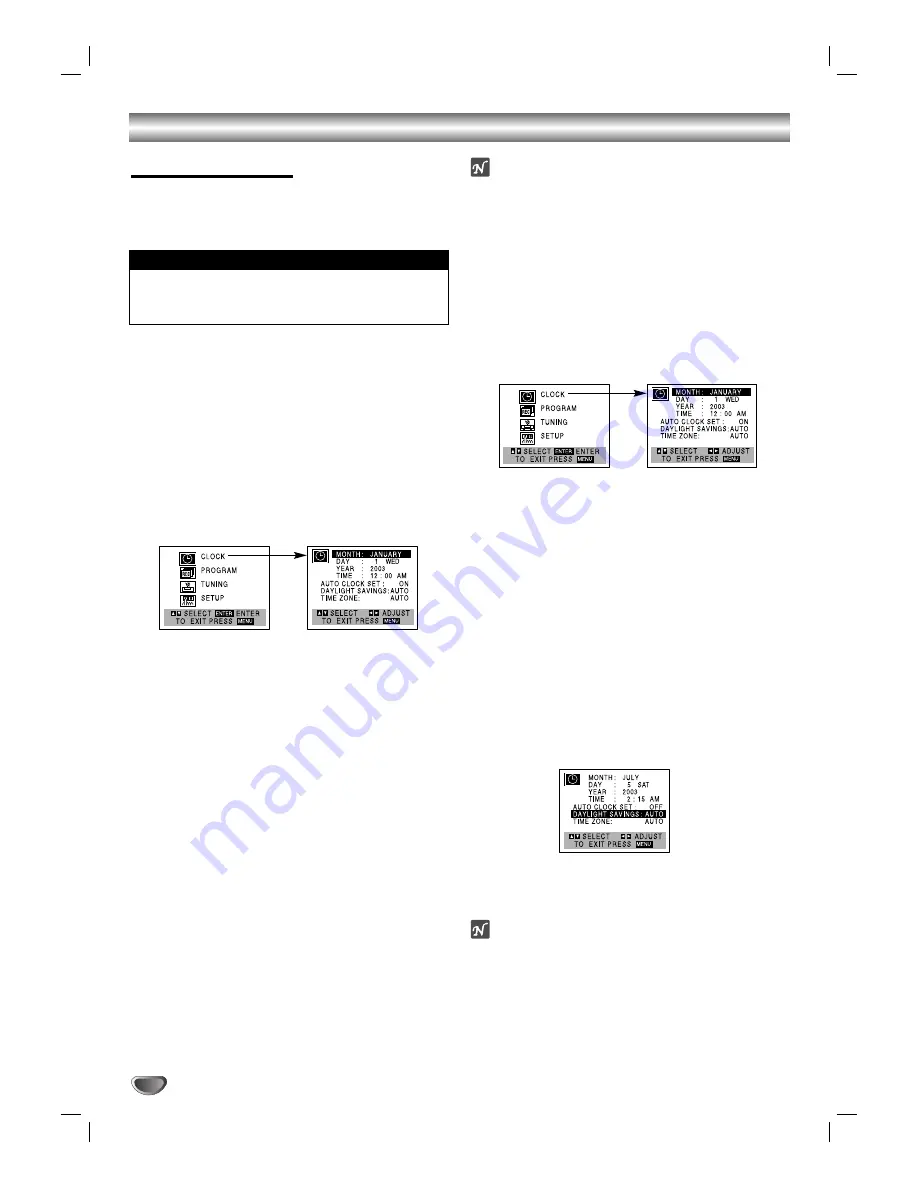
Setting the Clock

The DVD+VCR gives you two ways to set the time and
date: the Auto Clock Feature or manually. The Auto
Clock feature enables the DVD+VCR to set up the clock
while the DVD+VCR is turned off. 

Auto Clock Set

The Auto Clock Set feature is set to ON at the factory. In the
ON setting, the DVD+VCR looks for a channel carrying XDS
(Extended Data Services) information. XDS updates the clock
using the Coordinated Universal Time. 

The Auto Clock feature enables the DVD+VCR to set up
the clock when the DVD+VCR is turned off.

11

Press MENU and the MAIN menu will appear.

2

2

Use 

v

v

/

V

V

to choose the CLOCK menu.

Press SELECT/ENTER and the CLOCK menu
will appear.

3

3

Use

V

V

to choose the AUTO CLOCK SET option.

Use 

b

b

/

B

B

to choose ON.

The Auto Clock Set feature is set to ON at the factory. In
the ON setting, the DVD+VCR looks for a channel 
carrying XDS (Extended Data Services) information. XDS
updates the clock using the Coordinated Universal Time. 

4

4

Use 

E

E

to choose the DAYLIGHT SAVINGS

option. 
Use 

F

F

or 

G

G

to choose AUTO, ON or OFF.

If you choose AUTO, the VCR sets the clock using the
DST information broadcast in the signal (channel).
If you choose ON, the VCR sets the clock when the
Daylight Saving Time is started and ended.

5

5

Use 

E

E

to choose the TIME ZONE item.

Use 

F

F

or 

G

G

to choose the correct time zone

(AUTO, EASTERN, CENTRAL, MOUNTAIN,
PACIFIC, ALASKA or HAWAII).

If “AUTO” is selected as the time zone, the VCR sets the
clock using the first Coordinated Universal Time informa-
tion it finds in a broadcast signal. 

6

6

Use MENU when finished.

77

Turn off the DVD+VCR and the auto clock set
feature sets the time.

ote

There are cases where the TV station does not send or sends
wrong date and/or time information and the DVD+VCR sets the
incorrect time.
If this happens we recommend that you set the clock manually.

Manual Clock Set

11

Press MENU and the MAIN menu will appear.

2

2

Use 

v

v

/

V

V

to choose the CLOCK menu.

Press SELECT/ENTER and the CLOCK menu
will appear.

3

3

Use 

b

b

/

B

B

to choose the month.

4

4

Use 

V

V

to choose the DAY option.

Use 

b

b

/

B

B

to choose the date.

The day of the week will display automatically.

5

5

Use 

V

V

to choose the YEAR option.

Use 

b

b

/

B

B

to choose the year.

6

6

Use 

V

V

to choose the TIME option.

Use 

b

b

/

B

B

to choose the time.

Press and hold 

b

/

to advance clock 

continuously.

77

Use 

E

E

to choose the DAYLIGHT SAVINGS item. 

Use 

F

F

or 

G

G

to choose AUTO, ON or OFF.

If you choose AUTO, the VCR sets the clock using the
DST information broadcast in the signal (channel).
If you choose ON, the VCR adjusts the clock for Daylight
Saving Time.

8

8

Press MENU when finished.

ote

If setting the clock manually, “AUTO CLOCK SET” must
set to “OFF”.
If set to “ON”, an incorrect date and/or time will be
entered again when the DVD+VCR is turned off.

The  clock  uses  the  12-hour  system.  (Be  sure  to  set AM
and PM correctly.) (AM does not appear.)

The initial Clock Setting is 

JANUARY 1, 2003, 12:00 AM

.

Things to know before starting

Summary of Contents for XBV322

Page 1: ...Installation and Operating Guide Warranty Model Number XBV322 DVD Player Video Cassette Recorder Copyright 2003 Zenith Electronics Corporation...

Page 2: ...used in accordance with the instruction manual may cause harmful interference to radio communications However there is no guarantee that interference will not occur in a particular installation If th...

Page 3: ...wider than the other A grounding type plug has two blades and a third grounding prong The wide blade or the third prong are pro vided for your safety If the provided plug does not fit into your outle...

Page 4: ...6 DVD Operation 27 29 Playing DVDs 27 General Features 27 Selecting other TITLEs 27 Selecting other CHAPTERs 27 Slow Motion 27 Still Picture and Frame by Frame Playback 28 Search 28 Random 28 Repeat 2...

Page 5: ...before playing back such discs adjust the vol ume gradually and keep the volume level low To enjoy DTS Digital SurroundTM playback an external 5 1 chan nel Digital SurroundTM decoder system must be c...

Page 6: ...pose the disc to direct sunlight or sources of heat or leave it in a parked car exposed to direct sun light as there may be a considerable temperature increase inside the car Cleaning discs Fingerprin...

Page 7: ...layback of a disc or tape LINE 2 VIDEO IN AUDIO IN Left Right Connect the audio video output of an external source Audio system TV Monitor another VCR Cassette Compartment VCR deck Insert a video cass...

Page 8: ...s Recording a tape Indicates PM time AM is not displayed Lights when TV mode is active See page 22 A disc is loaded in the DVD deck Lights when a disc is loaded in the DVD deck and flashes when no dis...

Page 9: ...pecified segment twice RANDOM CM Skip Plays tracks in random order Fast forwards picture search through 30 seconds of recording A B SP SLP Repeats sequence Selects recording speed OPEN CLOSE EJECT Z Z...

Page 10: ...VHF UHF CATV antenna to this terminal DVD VCR OUT VIDEO AUDIO Left Right Connect to a TV with video and audio inputs AUDIO OUT Left Right DVD OUT Connect to a TV amplifier receiver or stereo system D...

Page 11: ...able connect it to a Antenna Adapter 300 ohm to 75 ohm not supplied and slip the Adapter onto the ANT IN jack The Adapter does not screw on to the DVD VCR it just slips over the jack Without Cable Box...

Page 12: ...Left and Right DVD VCR AUDIO OUT jacks on the DVD VCR to the audio left right in jacks on the TV A1 using the supplied audio cables ote If you use this connection set the TV s source selector to VIDE...

Page 13: ...channel sound A digital multi channel connection provides the best sound quality For this you need a multi channel Audio Video receiver that supports one or more of the audio formats supported by you...

Page 14: ...Data Service XDS signals press SELECT ENTER and the station ID will appear on the TV screen Press SELECT ENTER again and the program details will appear on the TV screen When viewing a tape recorded...

Page 15: ...IGHT Used during playback when AUDIO MODE HI FI NORMAL is in HI FI position for selecting the audio output signals from the AUDIO OUT terminals L ch and R ch and RF OUT This display setting should nor...

Page 16: ...PACIFIC ALASKA or HAWAII If AUTO is selected as the time zone the VCR sets the clock using the first Coordinated Universal Time informa tion it finds in a broadcast signal 6 6 Use MENU when finished...

Page 17: ...e otes Some discs may not provide all of the features on the on screen display example shown below If no button is pressed for 10 seconds the on screen display disappears OFF A B CHAPT TITLE Options T...

Page 18: ...t a language for the Setup menu This is the menu you see when you press SETUP Picture TV Aspect 4 3 Letterbox Select when a standard 4 3 TV is con nected Displays the picture with masking bars above a...

Page 19: ...ithout any further processing Others The DRC Vocal and Auto Play settings can be changed Use v V to select the desired option and press SELECT ENTER The options can be turned On or Off Dynamic Range C...

Page 20: ...g or a lower one If no suitable alternative is found playback will stop You must enter the 4 digit pass word or change the rating level in order to play the disc 5 5 Press SELECT ENTER to confirm your...

Page 21: ...period is needed to stabilize tape speed when re entering the PLAY mode Slight interference may be observed during this period Search This function lets you quickly and visually search for a desired t...

Page 22: ...ng first press PAUSE STEP X to put the unit in pause mode Then select the desired channel on the DVD VCR and press PAUSE STEP X again to resume recording Timer Recording This DVD VCR can be programmed...

Page 23: ...he converter determines what channel you view through your DVD VCR ip If you are finished programming and you want to set the DVD VCR to record the programs you have entered MAKE SURE YOU HAVE INSERTE...

Page 24: ...camcorder or another VCR recordings to this DVD VCR the rear or Front panel mounted Audio and Video A V input jacks make the connections quick and easy These direct A V jacks will also provide better...

Page 25: ...mmended MTS stereo bilingual TV sound system Multichannel TV Sound Indicator MTS Shows onscreen as illustrated below when SELECT ENTER is pressed One or both of the indicators will light depending on...

Page 26: ...ecording Instant Timer Recording playback or fast forward modes the DVD VCR automatically starts rewinding the tape at the end of the tape The cassette will stop at the beginning of the tape and be ej...

Page 27: ...he Region Code for this DVD VCR is 1 one Do not keep a fixed image displayed on the screen for a long time Screen Saver The screen saver picture appears when you leave the DVD VCR in stop mode for abo...

Page 28: ...e sequence press A B Time Search The Time Search function allows you to start playing at any chosen time on the disc 1 Press DISPLAY during playback The on screen dis play appears on the screen The Ti...

Page 29: ...ithdrawing the disc Special DVD Features Checking the contents of DVD Video discs Menus DVDs may contain menus that allow you to access spe cial features To use the disc menu press DISC MENU Then pres...

Page 30: ...f the MP3 format MP3 WMA Disc compatibility with this player is limited as follows 1 Sampling Frequency only at 44 1kHz MP3 22 05 44 1kHz WMA 2 Bit rate within 32 320kbps MP3 32 128kbps WMA 3 CD R phy...

Page 31: ...menu screen 3 To exit SEARCH mode press PLAY H Random 1 Press RANDOM during playback or in Stop mode The unit automatically begins Random Playback and RANDOM or RAND appears on the display window and...

Page 32: ...or to the previous file Still Picture 1 Press PAUSE STEP X during slide show The player will now go into PAUSE mode 2 To return to the slide show press PLAY H H or press PAUSE STEP X again To flip the...

Page 33: ...ayback press PROGRAM Select a track on the CD or MP3 WMA list and then press SELECT ENTER PROG indicator disappears from the display window Repeat Programmed Tracks All Off To repeat the track current...

Page 34: ...lug the power cord into the wall outlet securely Insert a disc or tape Check that the disc or tape indicator in the display window is lit Select the appropriate video input mode on the TV so the pictu...

Page 35: ...BROADCAST TYPE mode is set to SAP or MONO Correction Use CH ADD DEL to restore channels See Channel Selection on page 15 Tighten connections or replace cable Try all TUNING BAND options See Channel S...

Page 36: ...n 7579 Kurdish 7585 Laothian 7679 Latin 7665 Latvian Lettish 7686 Language Code Lingala 7678 Lithuanian 7684 Macedonian 7775 Malagasy 7771 Malay 7783 Malayalam 7776 Maltese 7784 Maori 7773 Marathi 778...

Page 37: ...Kuwait KY Cayman Islands KZ Kazakhstan LA Laos LB Lebanon Code Country LC Saint Lucia LI Liechtenstein LK Sri Lanka LR Liberia LS Lesotho LT Lithuania LU Luxembourg LV Latvia LY Libya MA Morocco MC M...

Page 38: ...R Specifications Head system Four head helical scan azimuth system Timer 12 hour display type with AM PM Tape speed SP 33 35 mm sec LP 16 67 mm sec SLP 11 12 mm sec Tape width 12 7 mm Maximum recordin...

Page 39: ...Notes 39...

Page 40: ...y 7 AM 8 PM CT and Saturday 8 AM 5 PM CT and select appropriate option from the menu to confirm the product is defective and to obtain Return Authorization RA If the defect has occurred during the fir...

Reviews: