background image

I N S TA L L AT I O N

P A G E   8

Some things
you must do

and others

you may

want to do

before you

can operate

your VCR

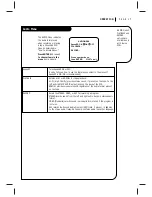
Before you operate your VCR

Press number keys

QUIT = exit

SETUP MENU

AUTO PROGRAM:

1

CH.  ADD/DEL:

2

SOURCE:

3

ON-SCREEN DISPLAY:

4

LANGUAGE SELECT:

5

Press number keys
then ENTER

QUIT = exit

SETUP MENU

SOURCE: TUNER (TV)

1

 TV

2

 CATV

3

 AUX

SETUP MENU

Press NUMBER

(1, 2, or 3) to select

the desired source

Press 3.

Set Date and Time for Clock

(Required) 

Set the clock in the VCR to

the current date and time. See CLOCK
Menu for details.

You must set the clock before
you can use any timer-con-
trolled VCR features, for exam-
ple, TIMER recordings.

Select Source for VCR

(Optional) 

Set the source of the VCR for

the type of program signal you have
connected to the ANT IN jack on the
back of the VCR. Choose TV if you have
an antenna connected to the VCR.
Choose CATV if you have a cable system
(with or without a cable box) connected
to the VCR. Choose AUX if you have an
accessory Audio/Video (A/V) connected
to the VCR. 

See SOURCE option on SETUP menu for
details.

Use Auto Program to Find
Channels

(Required)

Use AUTO PROGRAM to find

active channels in your broadcast area.
AUTO PROGRAM stores the active chan-
nels that you can access by using the
Channel Up/Down arrows. See AUTO
PROGRAM on the SETUP Menu for
details.

Use CH. ADD/DEL to Create
Favorite Channels

(Optional) 

Use CH. ADD/DEL to change

the list of active channels found when
using AUTO PROGRAM, so you can list
your favorites. See CH.ADD/DEL on the
SETUP Menu for details.

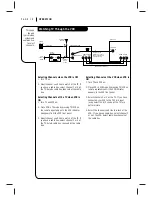
6

Press number keys

QUIT = exit

SETUP MENU

AUTO PROGRAM:

1

CH.  ADD/DEL:

2

SOURCE:

3

ON-SCREEN DISPLAY:

4

LANGUAGE SELECT:

5

QUIT = exit

SETUP MENU

AUTO PROGRAM:

 SEARCHING

SETUP MENU

Press 1.

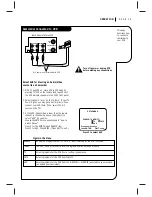
Press number keys

QUIT = exit

SETUP MENU

AUTO PROGRAM:

1

CH.  ADD/DEL:

2

SOURCE:

3

ON-SCREEN DISPLAY:

4

LANGUAGE SELECT:

5

Press number keys
then ENTER

QUIT = exit

SETUP MENU

CH.  ADD/DEL:  CH.    

2

  ADD

SETUP MENU

Press NUMBER

(0-9) then ENTER

Press 2.

7

8

5

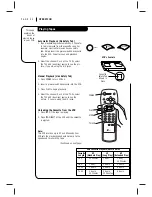
CLOCK MENU

AUTO DAYLIGHT SAVING:ON
                                

1

 ON  

2

 OFF

MANUAL CLOCK SET: 

3


Press number keys

QUIT = exit

CLOCK MENU

MONTH :  

1

  JANUARY

DAY

:  1  THU

YEAR

: 1998

TIME

: 12:00 PM

Press number keys
then ENTER

QUIT = exit

CLOCK MENU

Press NUMBER

(0-9) then ENTER to

set date and time

Press 3.

Summary of Contents for VRA211

Page 1: ...Operating Guide and Warranty for your new Zenith Entertainment Machine Models VRA211 VRA411 VRA421 thanks for choosing zenith ...

Page 2: ...t harmful interference when the equipment is operated in a residential installation This equipment generates uses and can radiate radio frequency energy and if not installed and used in accordance with the instruction manual may cause harmful interference to radio communications However there is no guarantee that interference will not occur in a particular installation If this equipment does cause...

Page 3: ...ds SP LP EP X X X Auto Playback System X X X Auto Manual Digital Tracking X X X Instant Recording X X X Timer Controlled Recording X X X Auto Playback Tape Speed Adjust X X X Forward Reverse Slow Motion N A X X Video 4 head VCR Variable 1 10 to 1 32 Variable 1 10 to 1 32 Pause Still Video Noise Clear Clear Real Time Tape Counter X X X Speed Search X X X CM Skip X X X English Spanish French Menus X...

Page 4: ... IN OUT OUT IN R L AUDIO VIDEO VHF UHF CATV ANT IN ANT IN OUT TO TV VHF UHF CATV VIDEO R AUDIO L OUT IN OUT CH3 CH4 IN Turn off power or unplug VCR before making any connections Back Panel of Typical Cable Box CH3 CH4 CABLE OUT IN Back Panel of Stereo VCR Back Panel of Typical TV IN IN OUT OUT R L AUDIO VIDEO VHF UHF CATV ANT IN Cable TV Wall Jack This cable is provided with your VCR ANT IN OUT TO...

Page 5: ...DIO VIDEO IN VHF UHF CATV A V cable is not provided with VCR ANT IN OUT TO TV VHF UHF CATV VIDEO R AUDIO L OUT IN OUT CH3 CH4 IN Back Panel of Typical Monaural TV Note If the back panel on your TV is different refer to the TV s operating guide ANT IN OUT TO TV VHF UHF CATV VIDEO R AUDIO L OUT IN OUT CH3 CH4 IN Back Panel of Stereo VCR OUT IN OUT IN R AUDIO L VIDEO Jack panel of Accessory A V cable...

Page 6: ...emote or on the VCR s front panel Do not plug the VCR into a switched power outlet Otherwise when the power is switched off the VCR turns off You may then have to reset the time and date and reprogram opera tional features Set Position of the CH3 CH4 Switch Required The CH3 CH4 switch on the VCR s back panel determines which channel the VCR uses to send video signals to your TV The TV must be tune...

Page 7: ...R menus and status dis plays See the LANGUAGE SELECT option on the SETUP menu for details Selects VCR tuner Chooses and modifies options power eject ch ch menu quit sp ep enter memory rec itr 1 2 3 4 5 6 7 8 9 tv vcr trk 0 cm skip pause stop play rew f fwd menu quit enter 1 2 3 4 5 6 7 8 9 tv vcr 0 Point remote toward VCR SpeakEZ CLOCK 1 TIMER 2 SETUP 3 AUDIO 4 Press number keys QUIT exit Press nu...

Page 8: ...he VCR See SOURCE option on SETUP menu for details Use Auto Program to Find Channels Required Use AUTO PROGRAM to find active channels in your broadcast area AUTO PROGRAM stores the active chan nels that you can access by using the Channel Up Down arrows See AUTO PROGRAM on the SETUP Menu for details Use CH ADD DEL to Create Favorite Channels Optional Use CH ADD DEL to change the list of active ch...

Page 9: ...enu for details Press number keys QUIT exit SETUP MENU AUTO PROGRAM 1 CH ADD DEL 2 SOURCE 3 ON SCREEN DISPLAY 4 LANGUAGE SELECT 5 Press number keys then ENTER QUIT exit SETUP MENU ON SCREEN DISPLAY ON 1 ON 2 OFF SETUP MENU Press NUMBER 1 or 2 to choose ON or OFF Press 4 SpeakEZ CLOCK 1 TIMER 2 SETUP 3 AUDIO 4 Press number keys QUIT exit CLOCK MENU AUTO DAYLIGHT SAVING ON 1 ON 2 OFF MANUAL CLOCK SE...

Page 10: ...sp ep ch stop eject z e n i t h LED Front Panel Indicators power cst in vcr rec timer A Cassette is in the VCR VCR is in Timer recording Remote Window Keep this area free of obstruction VCR is recording VCR is turned on VCR functions are available and channels are selected at VCR POWER On Off Button Cassette Compartment Channel Up Down Selector Stop Eject Selector PLAY REW Rewind F FWD Fast Forwar...

Page 11: ...isplay appears press ENTER repeatedly to see abbreviated displays as follows 1 Press ENTER to see Status Display 2 Press ENTER a second time to show only the tape counter position 3 Press ENTER a third time to show only the tape time remaining 4 Press ENTER repeatedly until all displays are removed PLAY HI FI VCR CH 11 SP ST SAP 15 MON 7 17 AM M 1 35 45 M 1 35 45 REM 1 35 Current mode of operation...

Page 12: ...tment Note All VCR operations and menu options can be accessed by using the remote control CH Changes favorite channel list Also selects AUX A V input channel CM SKIP Fast forwards picture search through 30 seconds of recording EJECT Ejects the tape in the VCR ENTER Programs menu options and shows VCR display F FWD Fast Forward Advances tape rapidly MEMORY Returns real time tape counter to zero M ...

Page 13: ...s QUIT exit How to Access Menus Menu operation is easy just follow the instructions shown at the bottom of the menu 1 Press MENU to see main menu 2 Press NUMBER 1 2 3 or 4 to see desired sub menu to be used 3 Press NUMBER to choose desired option to be changed 4 Press QUIT to exit menu or wait a few minutes and the VCR returns to normal operation Selects VCR tuner Chooses and modifies options powe...

Page 14: ...enu sets the clock in the VCR to the current date and time Notes The clock must be set before you can record by using the TIMER menu You may have to reset the clock if a power outage lasts for more than 3 seconds How to Set Clock 1 Press MENU to see Main Menu 2 Press 1 to see clock options 3 Press 3 to adjust your options 4 Press the NUMBER 0 9 then ENTER to specify current date and time 5 Press Q...

Page 15: ...s NUMBER 1 8 to select desired PROGRAM to be erased 3 Press 0 to erase the program 4 Press QUIT to exit the menu system SpeakEZ CLOCK 1 TIMER 2 SETUP 3 AUDIO 4 Press number keys QUIT exit PROGRAM 1 MONTH DAY START STOP CHANNEL SPEED REPEAT 1 8 to select program ENTER to adjust program PROGRAM 8 MONTH DAY START STOP CHANNEL SPEED REPEAT 1 8 to select program ENTER to adjust program Press 2 Month of...

Page 16: ... to select the channel to be edited e g to ADD channel 3 press 3 then ENTER Press ENTER to ADD or DEL Delete channels to create your own list of favorite channels SOURCE Selects TV CATV or AUX as the source of the program to watch or record Choose TV if you have an antenna connected to the VCR Choose CATV if you have a cable system with or without a cable box connected to the VCR Choose AUX if you...

Page 17: ...io format present on the tape RECORD Select the STEREO MONO or SAP for recording a program STEREO records sound from the left and right audio tracks in stereophonic format MONO Monaural records sound in monaural format even if the program is in stereo SAP records the Second Audio Program SAP track if present in addition to the stereo audio tracks SAP usually contains audio in another language The ...

Page 18: ...cable box Selecting Channels at the VCR when VCR is ON 1 Turn TV and VCR on 2 Place VCR in VCR mode by pressing TV VCR on remote repeatedly until the VCR indicator appears in the VCR front panel 3 Select channels 3 or 4 at the TV If you have connected your VCR to the TV s A V input jacks select the A V source at the TV for a better picture 4 Select the channel you d like to watch at the VCR If you...

Page 19: ...he VCR Channel Down lower than the lowest channel or Channel Up above the highest to select AUX Or you may Choose the SETUP menu as described in How to Access Menus Press 3 for the SETUP menu s SOURCE item Press 3 for AUX then ENTER Press QUIT to exit Turn off power or unplug VCR before making any connections Press number keys then ENTER QUIT exit SETUP MENU SOURCE TUNER TV 1 TV 2 CATV 3 AUX Press...

Page 20: ...r 4 at the TV Or select the TV s AUX Auxiliary source to see the picture if you are using the A V jacks Unloading the Cassette from the VCR 1 Press STOP if the tape is playing 2 Press STOP EJECT at the VCR until the cassette is ejected Note This VCR records only in SP and EP speeds Your VCR sets the playback speed automatically to the speed used to record the tape Continued on next page Cassette S...

Page 21: ...WD or REW to control slow speed during slow motion Press PLAY to resume normal tape playing Note When the reverse slow mode continues for more than 30 secondes the VCR will automati cally change to play mode Tape Rewind and Fast Forward While in Stop mode Press and release REW or F FWD Fast Forward as desired Press STOP when tape reaches desired location Reverse Forward Search While in Play mode P...

Page 22: ... box select the cable box output channel usually 3 or 4 at the VCR Select cable box channels at the cable box 5 Insert a VHS cassette tape into the VCR 6 Press SP EP to select recording speed if desired Recording speed is always SP unless you select EP 7 Press REC ITR until recording begins REC indi cator appears in the VCR front panel Recording continues until you reach the end of the tape or unt...

Page 23: ...panel Select channel 3 or 4 at the TV If you have connected your VCR to the TV s A V input jacks select the A V source at the TV for a better picture Select the channel to be watched and recorded at the VCR If you have a cable box select the cable box output channel usually 3 or 4 at the VCR Select cable box channels at the cable box Insert a VHS cassette tape into the VCR Press SP EP to select re...

Page 24: ...Insert a VHS cassette tape into the VCR Press SP EP to select recording speed if desired Recording speed is always SP unless you select EP Press REC ITR until recording begins REC indicator appears in the VCR front panel Recording continues until you reach the end of the tape or until you press STOP to stop recording Place VCR in TV mode by pressing TV VCR on remote to turn off VCR indi cator in t...

Page 25: ...annel to be recorded Keep your cable box on when using the Timer to record Enable the Timer by pressing POWER to turn off the VCR The TIMER indicator appears in the VCR front panel to indi cate the VCR is in the TIMER recording mode MAIN MENU TIMER MENU for Program 1 TIMER MENU for Program 8 VCR TIMER VCR OPERATION POWER STATUS On Off Off On or set Disables timer controlled recording if an event i...

Page 26: ...ce on TV to Audio Video In or tune TV to Channel 3 or 4 as appropriate Press TV VCR on remote repeat edly to choose VCR mode VCR indicator appears in VCR front panel Disconnect VCR power cord for three 3 seconds Reset clock and other features as necessary Playing Tapes Playback Problems Observed Condition Tape will not rewind or fast forward Mechanical sound is audible during playback Tape playbac...

Page 27: ...s is normal indication that the VCR is in TIMER mode If needed disable TIMER by turning VCR on Channel Tuning Problems Observed Condition Some channels are skipped over when using Channel Up Down Picture and sound are weak or missing Possible Cause Those channels were deleted with the CH ADD DEL option Antenna or cables are loose Wrong SOURCE option is being used Probable Solution Use CH ADD DEL t...

Page 28: ... a dry type head cleaning system It may seriously damage the VCR and cassettes used in the VCR Snow streaking in picture and horizontal pulling indicate the need for professional video head cleaning See your Zenith approved service center for cleaning Cabinet Cleaning Clean the outside surfaces of the VCR with a soft lint free cloth as required Use care not to scratch the VCR during cleaning Moist...

Page 29: ... 16 Clock Set 8 14 Features Chart 3 Front Panel Diagram 10 Instant Recording 22 24 Language Menu 16 Main Menu 13 Maintenance 28 Playing Tapes 20 21 Remote Control 12 Safety Information 2 Setup Menu 16 SpeakEZ Function 7 Timer Menu 15 Timer Controlled Recording 25 Troubleshooting 26 28 VCR Status Displays 11 Warranty 32 Watching TV 18 ...

Page 30: ...ound Sound compatible TV These speakers create a sound so real it s as if you were part of the action The convenient space saving shelf design make these speakers an ideal addition to any Home Theater System The contemporary black finish complements any room ONLY 39 95 CV5000 ONLY 224 95 PLUS 4 95 SHIPPING HANDLING PLUS 17 95 SHIPPING HANDLING STEREO SURROUND SOUND SPEAKERS REPLACEMENT REMOTE ORDE...

Page 31: ...NOTES P A G E 3 1 Use this page to makes notes Notes ...

Page 32: ...ow to adjust the customer controls Carry In Service The video product must be taken to a U S or Canadian Zenith authorized service center for warranty service and must be picked up by the owner TV Set Performance It is the owner s responsibility to maintain the TV receiver with which the video product is used and the associated antenna system in proper operating condition Important Product Registr...

Reviews: