background image

Timer Recording

RECORDING

41

This VCR/DVD Recorder can be programmed to record
up to 8 programs within a period of 1 month. For unat-
tended recording, the timer needs to know the channels
to be recorded, the starting time and length.

11

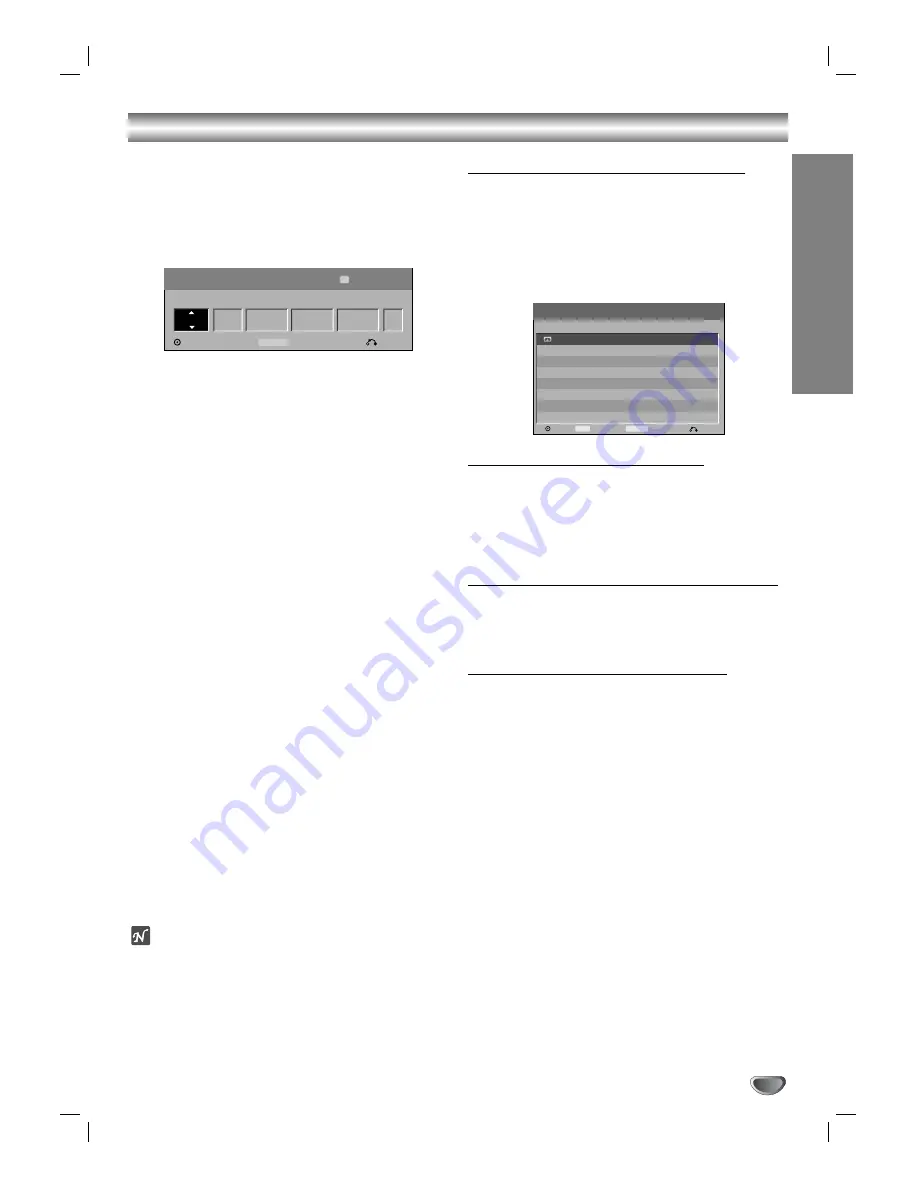
Press TIMER REC.

The Timer Record menu will appear.

Media

– Choose a media (DVD or VCR).

Ch.

– Choose a channel (2-69 or 1-125 for anten-

na or cable channels respectively, excluding skip
channels), or one of the external inputs from
which to record.

Date

– Choose a date up to 1 month in advance,

or select a daily or weekly program.

Start Time

– Set the recording start time.

End Time

– Set the recording end time.

Mode

– Choose a record mode.

DVD: SP, LP, XP, or AT (Auto)
VCR: SP, SLP, AT (Auto)
AUTO mode determines how much time is avail-
able on the disc or tape and switches record
mode, if necessary, to complete recording the
program.

22

Enter the necessary information for your timer
recording(s).

/

(left/right) – move the cursor left/right

/

(up/down) – change the setting at the cur-

rent cursor position

• Press RETURN to exit the Timer Record menu.
• Press ENTER after filling in all the program infor-

mation.

• Press TIMER REC to display Timer Record List.

33

Press ENTER, the program will be memorized
by the VCR/DVD Recorder.

To check the programming, the Timer Record List
will appear.

44

Press RETURN to exit the Timer Record List.

55

Make sure that you load a recordable disc.

ote

• The timer indicator lights in the display window. If the

indicator blinks, it means that there is no disc loaded,
or the disc loaded is not recordable.

• The recorder will record the audio according to the

current TV tuner setting (Stereo, Mono or SAP).
Use the AUDIO button to set the audio as you want
before switching the recorder into standby.

• You must press 

STOP

to stop the timer recording. 

Checking Timer Recording Details

Programming can be checked whenever the VCR/DVD
Recorder is turned on. Press TIMER REC twice.
• Use 

v

V

to select a timer recording.

• Press 

ENTER

to edit the selected program.

Timer Record menu appears.

• Press 

CLEAR

to delete the selected program 

from the Timer Record List.

Canceling a Timer Recording

You can clear a timer setting anytime before the record-
ing actually starts.

Use 

v

V

to select a program you want to erase on

the Timer Recorder List. If you want to erase the 
program, press CLEAR.

Stopping a Timer Recording in Progress

After a timer recording has started, you can still cancel
the program.

Press 

STOP

.

Timer Recording Troubleshooting

Even though the timer is set, the recorder will not
record when:

• There is no disc loaded.
• A non-recordable disc is loaded.
• Disc Protect is set to ON in the Disc menu 

(see page 24).

• There are already 99 titles recorded on the disc.

You cannot enter a timer program when:

• A recording is already underway.
• The time you’re trying to set has already passed.
• There are already 8 timer programs set.

If two or more timer programs overlap:

• The earlier program takes priority.
• When the earlier program finishes, the later program

starts.

• If two programs are set to start at exactly the same

time, the program entered first takes priority.

Confirmation is not possible when:

• Disc Protect setting is set to ON.
• There are already 99 titles recorded on the disc.

If the disc is damaged, the recording may not complete
successfully. In this case even though the Check field
shows “Rec. OK”, it may not be.

Media

Ch.

Date

Start Time

End Time

Mode

Timer Record

OK

Timer Rec List

Close

198   min Free

Ch.11

DVD

10/16 Thu

10:07 AM

11:00 AM

SP

TIMER REC

SP

Media

Start Time

Duration

Date

Ch.

Mode

Check

Timer Record List

Edit

Close

Delete

CLEAR

10/19 Sun

Ch.11

18:07 AM

30min

SP

Rec. OK

Timer Rec

TIMER REC

Summary of Contents for RC59000M

Page 1: ...Copyright 2003 Zenith Electronics Corporation Installation and Operating Guide Warranty Model Number RC59000M VCR DVD Recorder CD R RW...

Page 2: ...modification is made REGULATORY INFORMATION FCC Part 15 This product has been tested and found to comply with the limits for a Class B digital device pursuant to Part 15 of the FCC Rules These limits...

Page 3: ...wider than the other A ground ing type plug has two blades and a third ground ing prong The wide blade or the third prong are provided for your safety If the provided plug does not fit into your outl...

Page 4: ...Connections 14 17 Connecting Antenna Cable TV to VCR DVD Recorder 14 Connecting to a TV 15 Connecting to Optional Equipment 16 Accessory Audio Video A V Connections to VCR DVD Recorder 17 Connecting...

Page 5: ...VCR to DVD 39 Timer Recording 40 Checking Timer Recording Details 40 Canceling a Timer Recording 40 Stopping a Timer Recording in Progress 40 Timer Recording Troubleshooting 40 Recording from an Exte...

Page 6: ...e a region code label even though their play back is prohibited by area limits otes on DVDs and Video CDs Some playback operations of DVDs and Video CDs may be intentionally fixed by software manufact...

Page 7: ...uts and playback suddenly stopping Our company cannot take responsibility for problems playing discs recorded on this recorder in other players Is editing a DVD like editing a video tape No When you e...

Page 8: ...udio Restrictions on video recording You cannot record copy protected video using this recorder Copy protected video includes DVD Video discs and some satellite broadcasts If copy protected material i...

Page 9: ...he front of the remote sensor Angle About 30 in each direction of the front of the remote sensor Remote Control Battery Installation Detach the battery cover on the rear of the remote control and inse...

Page 10: ...tton and indicator Switches the VCR DVD Recorder ON and OFF Lights green when the VCR DVD Recorder is turned on STOP x Stops playback COPY Press to copy DVD to VCR or VCR to DVD Cassette Compartment V...

Page 11: ...rs Indicates clock total playing time elapsed time remaining time title number chapter track number channel etc REPEAT Indicates repeat mode REC The recorder is recording Indicates when the recorder i...

Page 12: ...deo image OPEN CLOSE EJECT Opens and closes the disc tray Ejects the tape in the VCR deck COPY Press to copy DVD to VCR or VCR to DVD CLEAR Removes a mark on the Marker Search menu TITLE Displays the...

Page 13: ...her equipment with audio inputs VIDEO OUT AUDIO OUT Left Right Connect to a TV with video and audio inputs COMPONENT PROGRESSIVE SCAN VIDEO OUT Y Pb Pr Connect to a TV with Y Pb Pr inputs AV 1 VIDEO I...

Page 14: ...it to an Antenna Adapter 300 ohm to 75 ohm not supplied and slip the Adapter onto the ANT IN jack The Adapter does not screw on to the the unit it just slips over the jack Cable Service Without Cable...

Page 15: ...t right in jacks on the TV using the audio cables A Component Video Color Stream connection 1 1 Connect the COMPONENT VIDEO OUT jacks on the VCR DVD Recorder to the corresponding in jacks on the TV us...

Page 16: ...you need a multi channel Audio Video receiver that supports one or more of the audio formats supported by your VCR DVD Recorder MPEG 2 Dolby Digital and DTS Check the receiver manual and the logos on...

Page 17: ...nect a DV digital camcorder or video deck or DVD R RW recorder and digitally transfer DV tapes or DVD R RW discs to DVD R RW Use a DV cable not supplied to connect the DV in out jack of your DV camco...

Page 18: ...Use v V to select the Tuning Band option 5 5 Press B to move to the third level 6 6 Use v V to select the tuning band option TV or CATV then press ENTER Remember TV is for the air antenna reception C...

Page 19: ...for a channel carrying XDS Extended Data Services information XDS updates the clock using the Coordinated Universal Time 7 7 Use B to choose the Timezone option Use v V to choose your Time Zone You c...

Page 20: ...nalog TV or monitor Factory Setting If you need to you can reset the recorder to all its factory settings Select SET then press ENTER Once the setting for Factory Setting is entered Initialize menu ap...

Page 21: ...decoder Sampling Freq Frequency If your receiver or amplifier is NOT capable of handling 96 kHz signals select 48 kHz When this choice is made this unit will automatically convert any 96 kHz signals...

Page 22: ...n scenes not suit able for children If you set a rating for the recorder all disc scenes with the same rating or lower will be played Higher rated scenes will not be played unless an alternative scene...

Page 23: ...g the v V buttons 8 8 Shift the cursor using B buttons and select the second character using v V buttons 9 9 Press ENTER to confirm your country code selection then press SETUP to exit the menu Record...

Page 24: ...d a completely blank DVD RW disc Disc ini tialize menu will appear to select a desired Recording Mode to initialize the disc 1 1 Press SETUP The Setup menu appears 2 2 Use v V to select the Disc optio...

Page 25: ...disc how much is recorded on the disc and the number of titles on the disc A disc recorded can take up to 3 4 minutes to finalize ip If you load a DVD RW that has already been finalized on a different...

Page 26: ...finish Cancel Deletes all the characters inputted Space Inserts a space at the cursor position Delete Deletes the character at the cursor s pre vious position b B Moves cursor to left or right Remote...

Page 27: ...rmation displayed on screen e g when DVD RW in Video mode is inserted Changing TV Channels If no disc is playing you can change TV channels using the number or CH v V buttons on the remote con trol or...

Page 28: ...Title 1 4 Chapter 3 28 0 06 32 2 12 10 DVD Shows the current title chapter number and total number of titles chapters Shows the Current mode Shows the elapsed playing time and total time Menu Options...

Page 29: ...eed recording tape information and the elapsed playing progress bar Shows the Current mode Before Operation Continued VHS Video Track PBC 0 06 32 2 12 10 DVD Shows the current title chapter number and...

Page 30: ...r will not play discs that have a region code different from your recorder The region code for this recorder is 1 one ote Unless stated otherwise all operations described use the remote control Some f...

Page 31: ...DVD Karaoke discs or video CDs without PBC On a Video CD with PBC you must set PBC to OFF in the General menu to use the Random function See page 20 Repeat DVD Video Discs Repeat Chapter Title Off 1 T...

Page 32: ...o six points can be memorized To enter a mark follow these steps 1 During disc playback press MARKER when playback reaches the spot that you want to memorize The Marker icon will appear on the TV scre...

Page 33: ...se b B to select 3D SUR 2 To turn off the 3D Surround effect select NORM Subtitles Press SUBTITLE then press b B repeatedly during playback to see the different subtitle languages Finding Locations on...

Page 34: ...is audio data compressed by using the MPEG1 audio layer 3 file coding scheme We call files that have the mp3 file extension MP3 files The recorder can not read an MP3 file that has a file extension ot...

Page 35: ...es not play repeatedly no display Random 1 Press RANDOM during playback or when playback has stopped The unit automatically begins Random Playback and RANDOM appears on the menu screen 2 Press RANDOM...

Page 36: ...g the last programmed track on the program list 8 8 To resume normal playback from pro grammed playback select a track on the List then press ENTER PRG indicator disappears from the display window Rep...

Page 37: ...t the options Object Selected file or All files Speed Selects Slide Show speed Slow Normal Fast 3 Select START icon then press ENTER to start slide show Notes on JPEG Recordings Depending on the size...

Page 38: ...he tape is ejected or the power cord is unplugged for more than 3 sec onds Special Effect Playback Special effects playback notes Horizontal lines noise bars will appear on the TV screen This is norma...

Page 39: ...mer Recording Instant Timer Recording allows you to make a recording easily of a preset length without using the program timer 1 1 Follow steps 1 4 as shown left Basic Recording from a TV 2 2 Press RE...

Page 40: ...nds Copying from VCR to DVD This unit allows you to copy the contents of a VHS to a DVD R or a DVD RW using COPY button ote If the VHS video tape you are attempting to copy is copy protected you will...

Page 41: ...order into standby You must press STOP to stop the timer recording Checking Timer Recording Details Programming can be checked whenever the VCR DVD Recorder is turned on Press TIMER REC twice Use v V...

Page 42: ...the second DVD from this one You can t control this unit remotely from a component connected to the DV IN jack You can t record date and time information from a DV cassette 1 1 Make sure your digital...

Page 43: ...the recording may occur if the source component pauses playback or plays an unrecorded section of tape or if the power fails in the source component or the DV cable becomes discon nected Although DV R...

Page 44: ...l and Playlist contents 1 1 Play the title Original or Playlist 2 2 At the point you want to start a new chapter press CHP MARK A chapter marker icon appears on the TV screen You can also put chapter...

Page 45: ...the chapter to the Playlist page 46 5 5 Press RETURN repeatedly to exit Original Chapter menu Using Playlist Title menu 1 1 Press LIST repeatedly to display the Playlist Title menu 2 2 Use v V b B to...

Page 46: ...select a character then press ENTER to confirm your selection English Latin Capital Switches the keyboard upper case characters English Latin Small Switches the keyboard to lower case characters Symb...

Page 47: ...TER The new title appears in the updated Playlist Program All chapters of the title are added to the Playlist Program Adding Additional Title Chapters to the Playlist You can add an Original title cha...

Page 48: ...nu Combining Two Chapters Into One Use this function to combine two adjacent Playlist or Original chapters into one otes This function is not available if there is only one chapter within the title 1...

Page 49: ...Playlist Title 3 3 Use v V to select Delete Part from the options then press ENTER Title Edit menu appears on the TV screen and the recorder will now go into PAUSE mode Start Point icon is highlighte...

Page 50: ...tion If you erase a title from a DVD R disc the title will dis appear from the Title List but the available recording time will not increase When erasing a title from a DVD RW disc the remaining time...

Page 51: ...7579 Korean 7585 Kurdish 7679 Laothian 7665 Latin 7686 Latvian Lettish Code Language 7678 Lingala 7684 Lithuanian 7775 Macedonian 7771 Malagasy 7783 Malay 7776 Malayalam 7784 Maltese 7773 Maori 7782 M...

Page 52: ...ds KZ Kazakhstan LA Laos LB Lebanon Code Country LC Saint Lucia LI Liechtenstein LK Sri Lanka LR Liberia LS Lesotho LT Lithuania LU Luxembourg LV Latvia LY Libya MA Morocco MC Monaco MD Moldavia MG Ma...

Page 53: ...channel source option is being used Camcorder is off VCR DVD Recorder s source is not set to AV1 AV2 or DV IN Solution Plug the power cord into the wall outlet securely Select the appropriate video in...

Page 54: ...emote sensor of the VCR DVD Recorder The remote control is too far from the VCR DVD Recorder There is an obstacle in the path of the remote control and the VCR DVD Recorder The batteries in the remote...

Page 55: ...range More than 95 dB Inputs ANTENNA IN Antenna or CATV input 75 ohms VIDEO IN 1 0 Vp p 75 ohms sync negative RCA jack x 2 AUDIO IN 0 dBm more than 47 kohms RCA jack L R x 2 DV IN 4 pin i LINK IEEE 13...

Page 56: ...rating problems that result from shipping installation adjustment of user controls calibration maintenance or failure to maintain or separate system components and 2 Damages or operating problems that...

Reviews: