


12
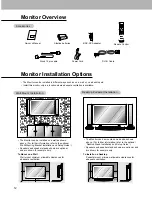
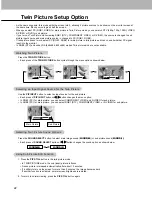
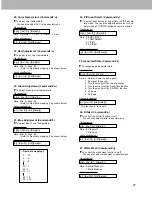
Monitor Installation Options
• The Monitor can be installed in different ways such as on a wall, or on a desktop etc.
• Install this monitor only in a location where adequate ventilation is available.
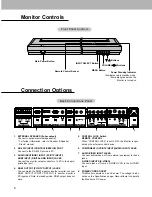
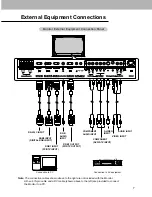
Monitor Overview
D-sub 15 pin cable
Owner’s Manual
1.5V
1.5V
Alkaline batteries
BNC-RCA adapter
Power Cord
1
2
3
4
5
6
7
8
0
9
POWER
SLEEP
INPUT SELECT
APC
DASP
ARC
AUTO CONFIG.
ZOOM -
ZOOM +
SPLIT ZOOM
MENU
MUTE
OK
VOL
POWER
STOP
PLAY
FF
REC
REW
P/STILL
PIP
TWIN PICTURE
PIP POSITION
PIP STILL
SOUND SELECT
PIP INPUT
VOL
KEY LOCK
Remote Control
DVI-D Cable
Accessories
Accessories
2 inches
4 inches
2.36 inches
4 inches
4 inches
4 inches
4 inches
4 inches
4 inches
2 inches
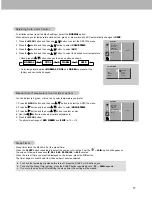
To Mount on a Wall
Wall mount minimum allowable clearances for
adequate ventilation.
To Install on a Desktop
Pedestal mount minimum allowable clearances for
adequate ventilation.
W
W
all Mount Installation
all Mount Installation
Desktop Pedestal Installation
Desktop Pedestal Installation
;;;;;;
;;;;;;
;;;;;;
;;;;;;
;;;;;;
yyyyyy
yyyyyy
yyyyyy
yyyyyy
yyyyyy
• The Monitor can be installed on a wall as shown
above. (For further information, refer to the optional
‘Wall Mounting Bracket Installation and Setup Guide’.)
• Speakers and speaker stands shown are optional,
and are shown for example only.
• The Monitor can be mounted on a desk as shown
above. (For further information, refer to the optional
‘Desktop Stand Installation and Setup Guide’.)
• Speakers and speaker stands shown are optional, and
are shown for example only.


