Zenith LXG-120 User Manual Download Page 41

41

Supported Monitor Display

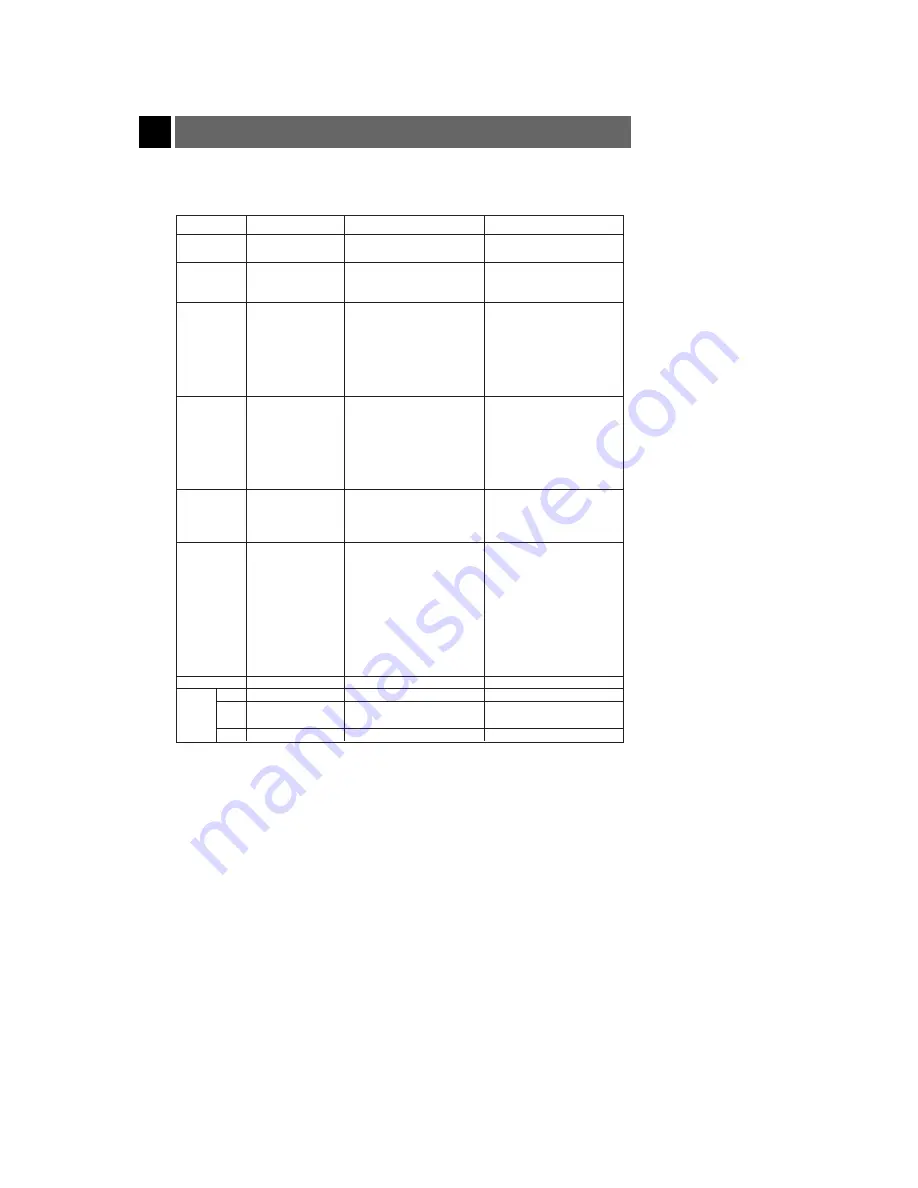
The projector displays images at a resolution of 1024 x 768 pixels. To display higher resolution images 

(1152 x 864 mode, 1280 x 1024 mode), the projector compresses it to 1024 x 768. The following table lists the
display formats supported by the projector.

If the projector does not support the input signal, the OUT OF RANGE message will appear on the screen.

The projector supports DDC1/2B type as Plug & Play function.(Auto recognition of PC monitor)

Sources

Format

Vertical Freq.(Hz)

Horizontal Freq. (kHz)

VGA/EGA

640X350

70.090Hz

31.468kHz

640X350

85.080Hz

37.861kHz

PC98 / VGA text

640X400

85.080Hz

37.861kHz

720X400

70.082Hz

31.469kHz

720X400

85.039Hz

37.927kHz

VGA

640X480

59.940Hz

31.469kHz

640X480

66.667Hz

35.00kHz

640X480

72.800Hz

37.861kHz

640X480

75.00Hz

37.500kHz

640X480

85.008Hz

43.269kHz

640X480

100.040Hz

53.011kHz

640X480

120.00Hz

64.062kHz

SVGA

800X600

56.250Hz

35.156kHz

800X600

60.317Hz

37.879kHz

800X600

72.188Hz

48.077kHz

800X600

75.00Hz

46.875kHz

800X600

85.061Hz

53.674kHz

800X600

90.00Hz

56.00kHz

800X600

100.00Hz

64.016kHz

XGA

1024X768

60.004Hz

48.363kHz

1024X768

70.069Hz

56.476kHz

1024X768

75.029Hz

60.023kHz

1024X768

84.997Hz

68.677kHz

SXGA 1152X864

60.053Hz

54.348kHz

1152X864

70.016Hz

63.995kHz

1152X864

75.00Hz

67.500kHz

1152X864

85.057Hz

77.487kHz

1280X960

60.00Hz

60.00kHz

1280X960

75.00Hz

75.00kHz

1280X960

85.002Hz

85.938kHz

1280X1024

60.020Hz

63.981kHz

1280X1024

75.025Hz

79.976kHz

1280X1024

85.024Hz

91.146kHz

UXGA

1600X1200

60.00Hz

75.00kHz

MAC  16

"

832X624

74.550Hz

49.725kHz

19

"

1024X768

60.004Hz

48.363kHz

1024X768

75.029Hz

60.023kHz

20

"

1152X870

75.062Hz

68.681kHz

Summary of Contents for LXG-120

Page 1: ......

Page 2: ......

Page 3: ...igned to provide reason able protection against harmful interference when the equipment is operated in a residen tial installation This equipment generates uses and can radiate radio frequency energy...

Page 4: ...ed 3 Retain Instructions The safety and operating instructions should be retained for future refer ence 4 Heed Warnings All warnings on the product and in the operating instructions should be adhered...

Page 5: ...ith a polar ized alternating current line plug a plug having one blade wider than the other This plug will fit into the power outlet only one way This is a safety feature If you are unable to insert t...

Page 6: ...n to restore the prod uct to its normal operation e If the product has been dropped or the cabinet has been damaged f If the product exhibits a distinct change in performance 19 Replacement Parts When...

Page 7: ...onnector Panel Rear Connector Panel Rear remote control sensor Handle Foot adjusting button Indicators Front remote control sensor Horizontal leveler Focus ring Lens cover Foot Computer Audio Computer...

Page 8: ...Button Up Down Buttons Selects menus and items in the menus MENU Button Selects or closes menus SOURCE Button Switches to PC or AV mode VOLUME Left Right Buttons Adjusts volume level and functions of...

Page 9: ...DRAG Button BLANK Button RESIZE Button AUTO TRACKING Button Slide the battery cover in the direction of the arrow to remove VOLUME Button MENU Button R MOUSE Button Zoom in Button ENTER Button LASER...

Page 10: ...electing menus controls selecting and adjusting functions with the direction of up down left right Moves the screen with the direction of up down left right on zoom function Moves and releases the sel...

Page 11: ...our dealer to purchase other items When applying a ceiling mount use only the ceiling mount for this unit contact your dealer Remote Control Batteries 2 size AA Power Cord Audio Video Cable Audio Cabl...

Page 12: ...y system cable as below For the detailed installation and use of the Kensington Security System refer to the user s guide attached to the Kensington Security System set For further information contact...

Page 13: ...n flashing Orange Red Red flashing Green flashing Orange Red Red flashing Standby In Operation Power Off Indicates Lamp is warming up Projection lamp will expire within 100 hours of operation Replace...

Page 14: ...is at a right angle to the screen If the projector is not at a right angle the screen image will not be square At this time adjust position of image Refer to page 35 4 4 Connect the cables of the proj...

Page 15: ...the monitor cable from the PC monitor to Computer Out of the projector in order to see the pro jected image on a PC monitor c Connect the audio cable from the PC LINE OUT sound port to Computer Audio...

Page 16: ...In of the projector b Connect the audio cable from the PC to Computer Audio of the projector c Connect the PS 2 mouse for IBM PC or compatible cable 6 pin to the Mouse of the projector Computer Out AC...

Page 17: ...sktop adapter to the resolution you want to use and connect the adapter to the Macintosh Refer to page 18 19 d Connect the computer cable to the Macintosh desktop adapter e Connect the audio cable fro...

Page 18: ...t 1 6 to OFF status and 7 9 to ON status on the dip switches Select the adjusting letter which is correct to the Macintosh and the monitor Refer to page 19 b Notes for Connecting to the Macintosh Powe...

Page 19: ...5 60 N N N N N N N N N N N N N N N N N N output resolution horizontal frequency KHz vertical frequency Hz code letter 13 x14 RGB 640x480 35 66 J J J J J J J J J J J J J J J J J J 15 Portrait 640x870...

Page 20: ...nect the adapter to the Macintosh PowerBook Refer to page 18 19 c Connect the other end of the computer cable to the Macintosh desktop adapter d Connect the audio cable from the PC to the Computer Aud...

Page 21: ...the projector to S Video output port of A V source with S Video cable For better picture quality use the S Video connection rather than the A V connection If you connect S Video cable and Video cable...

Page 22: ...ing up of the lamp An image appears after the green power indicator has flashed for some time 3 2 Adjust volume level Press Volume buttons to increase or decrease sound level 5 24 Do not shut off the...

Page 23: ...or by pushing foot adjuster as shown below 1 Carefully press the foot adjuster button while you support the other side of the projector This unlocks the foot and allows it move freely Be careful not t...

Page 24: ...rface that is not stable or flat the projected image shape will be distorted PO WE R M E N U S O U R C E B LA N K E N T E R V O L V O L Horizontal leveler To correct this condition adjust the projecto...

Page 25: ...in SPECIAL menu and TRACKING menu are not displayed The sub menus for the VIDEO menu in AV mode are different from those in the PC mode Refer to page 38 2 exit move enter Menu G VIDEO G POSITION G SPE...

Page 26: ...BASIC FUNCTIONS 26 Selecting source mode Press the SOURCE button 1 Each press of the SOURCE button changes the display as shown below 2 PC AV...

Page 27: ...27 Using Still function Press the STILL button You can freeze the input image from a PC or AV source 1 To return to normal video press the STILL button again 2 Moving Image Still Image...

Page 28: ...the Language item Move the POINTER button left or right to select the language you want to use On Screen Display OSD will change to the language chosen To exit the menu display press the MENU button r...

Page 29: ...Use this function when projecting from behind onto a transparent screen being viewed from the opposite side exit move enter Menu G VIDEO G POSITION G SPECIAL G TRACKING exit move enter Menu G VIDEO G...

Page 30: ...r side of the projected image When you hang the projector upside down from the ceiling you must reverse all the sides left right upper lower of the image exit move enter Menu G VIDEO G POSITION G SPEC...

Page 31: ...s function blanks the Video and mutes the Audio Press the BLANK button The screen will blank and the audio is muted You can choose the background color Refer to page 32 1 To exit the blank status pres...

Page 32: ...up or down to select the Blank Image item 2 Move the POINTER button left or right to select the color you want to use Background color changes to the selected color To exit the menu display press the...

Page 33: ...ton up or down to select the Lamp Time item 2 The elapsed lamp time is displayed in hours When the lamp time has reached 1400 hours the lamp indicator changes to an orange color exit move enter Menu G...

Page 34: ...the POINTER button up or down to select the VGA Text item 2 Move the POINTER button left or right to select the screen size you want to use 3 a Selecting 720X400 If the input signals are 720X400 70Hz...

Page 35: ...djusts the upper and lower width of the projected image to prevent the image shape from appearing skewed This can occur if the screen and projector are not perpendicular to one another 2 Press the POI...

Page 36: ...USE or R MOUSE button to adjust the zoom level L MOUSE button makes the image look smaller R MOUSE button makes the image look larger 3 Move the POINTER button to the position you wish to see enlarged...

Page 37: ...ion only in SVGA 800x600 mode You can also use this function by using the MENU button POWER MEN U SOU RCE BLA NK ENT ER VOL VOL Press the RESIZE button Each press of the button changes the display as...

Page 38: ...nal image condition select the Reset item and press ENTER To exit the menu display press the MENU button repeatedly 4 Press the ENTER button 2 PC Mode PC Mode AV Mode AV Mode exit move adjust Menu E V...

Page 39: ...adjusting are automatically performed Press the AUTO TRACKING button You can also access this function by using the MENU button Perform this function while on a stationary image because you may not g...

Page 40: ...ING menu 1 Press the ENTER button and move the POINTER button up or down to select the Clock or Phase item 2 exit move adjust Menu G VIDEO G POSITION G SPECIAL E TRACKING Auto Tracking Clock Phase 0 C...

Page 41: ...z 640X480 66 667Hz 35 00kHz 640X480 72 800Hz 37 861kHz 640X480 75 00Hz 37 500kHz 640X480 85 008Hz 43 269kHz 640X480 100 040Hz 53 011kHz 640X480 120 00Hz 64 062kHz SVGA 800X600 56 250Hz 35 156kHz 800X6...

Page 42: ...t or dust wipe the casing with a soft dry lint free cloth To remove stubborn dirt or stains moist en a soft cloth with water and a neutral detergent and then wipe the casing Do not use alcohol benzene...

Page 43: ...n Remove lens cap Source not selected off Select correct source turn source on Unit warming up Lamp at full power after 40 seconds Menu will not appear Source not connected Connect source 15 22 26 NO...

Page 44: ...44 TITLE Memo 206 3671...

Reviews: