background image

Installer Overview

P A G E   4 1

Following is the Commercial Mode Operation Setup. 

Operating Installer Menu

To set up the controls for the TV you will need to know how to enter
the L26W58HA Installer menu and make changes to the default values
as required. If necessary, familiarize yourself with the L26W58HA
Installer menu and how to make and save changes in the menu.

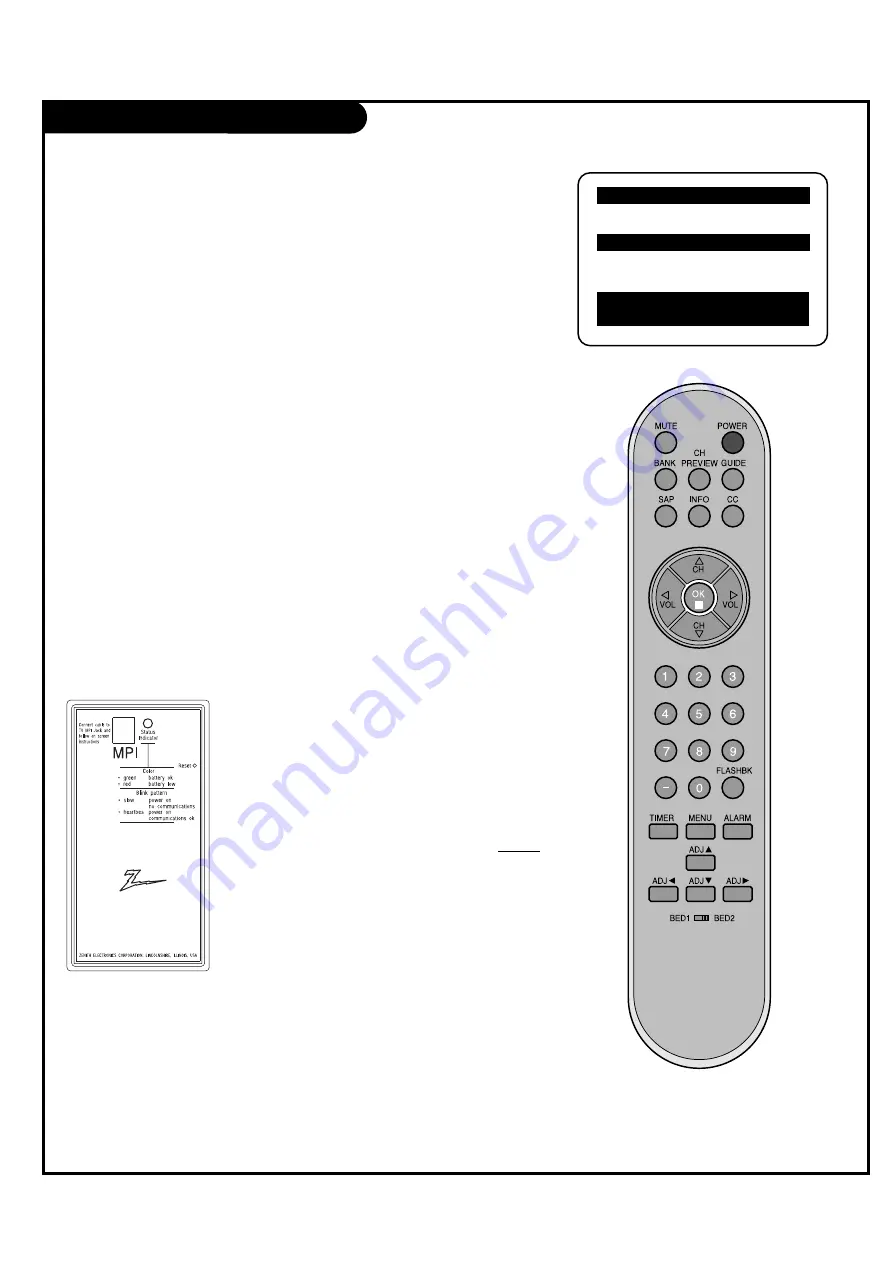
Optional Installer Remote

You will need an 

Installer remote

control similar to the one

shown to the right. 

The TV’s clonable features need to be set up before 2-5-5 + Menu is done. 
This is a critical step.
If the Master TV display panel’s clonable features like: Clock Set, adding channel
icons and channel labels, etc. are not done properly, then the cloned L26W58HA TVs
will all have problems. For example, do not do 2-5-5 + Menu more than once or the
TV setup will become corrupted. If you need to start the procedure over, then begin
by setting installer item 117 to 001, and pressing Enter to reset the TV to default
values in the installer menu. You can do 2-5-4 + Menu mode more than once but
this mode is limited to only editing channel icons and channel labels.

Refer to the appropriate section in the Manual for other TV features: Picture, Sound
etc.

LT2002 Clone Programmer

As the cloning procedure is being performed, specific steps need to

be done at the indicated times to achieve the desired
rresult. Be sure to do each cloning task as indicated.
If a procedure or step is left out or not performed
correctly, then the TV setup will be wrong and cloning may
notwork. At each step, pay attention to assure the TV
screen shows the proper message(s) when cloning. If the
message indicated does not appear, there is a problem
with that step and cloning may not be successful. Cloning
is only possible when the signal source is an Analog
channel, not a digital channel.

L26W58XX PTC INSTALLER MENU

000

INSTALLER SEQ

000

UPN

000-000-000-000

FPGA 09F1

PTC V1.00.000

CPU V1.01.00

Typical Installer Menu

QuickSet II Programmer

LT2002

¤

Summary of Contents for L26W58HA and

Page 1: ...nstallation and Operating Guide Warranty Model Number L26W58HA LCD TV Monitor page 5 t a b l e o f c o n t e n t s page 63 installer quick setup guide Zenith and the lightning Z logo are registered tr...

Page 2: ...found to comply with the limits for a Class B digital device pursuant to Part 15 of the FCC Rules These limits are designed to provide reasonable protection against harmful interference when the equip...

Page 3: ...at patients will not be able to touch this product 3 This product should only be mounted on a wall CLEANING AND DISINFECTION Clean the exterior of this television by removing dust with a lint free clo...

Page 4: ...o avoid injury from tip over 13 Unplug this apparatus during lightning storms or when unused for long periods of time 14 Refer all servicing to qualified service personnel Servicing is required when t...

Page 5: ...56 L26W58HA Aux Input Configuration Troubleshooting 57 Troubleshooting 58 Reference Cloning Procedure Troubleshooting 59 Clone Troubleshooting Flow Chart 60 TV Operating Check 61 Glossary of Terms 62...

Page 6: ...able Yes___ No___ End User Remote Control Will a remote control be provided to the end user to operate the TV No remote is included with the TV Yes___ No___ End User Menu Access Will the end user have...

Page 7: ...sed to connect to pillow speaker 12V DC 40mA SPEAKER OUTPUT SWITCH Used to select the speaker output Switch Note If Pillow Speaker is selected no Sound will be heard from TV speakers NORMAL SPEAKER or...

Page 8: ...oice for a location to attach the wall mount The wall mount location chosen should be appropriate for drilling holes and have available the required power source as well as antenna cable and other equ...

Page 9: ...icking out on the other end 1 2 3 Locate the Antenna Cable jack on the back of the LCD TV Monitor Connect the antenna wire Flat or Round that runs from the wall to this jack according to one of the di...

Page 10: ...e service provider Each end looks like a hex shaped nut with a wire sticking through the middle and it screws onto the threaded jack on the back of the TV A small device that connects a two wire 300 o...

Page 11: ...om the wall jack to the VCR Connect other wires according to the diagram to the right After all connections are complete plug in the TV The LCD TV Monitor is designed to operate on AC power 1 2 3 Conn...

Page 12: ...o the right After all connections are complete plug in the TV The LCD TV Monitor is designed to operate on AC power 1 2 3 Connect cable service and a VCR to the LCD TV Monitor For cable box operation...

Page 13: ...he S Video source to display the DVD image on the TV 1 2 3 Locate the component out jacks on the DVD player Connect component video cables between the DVD player and Component 1 or 2 In on the TV Make...

Page 14: ...nment audio and nurse call system may be connected here All lines are isolated from the AC power line and earth ground Opto isolators isolate the control lines and a transformer isolates the audio The...

Page 15: ...r is designed to operate on 120V AC power Locate the AC Power Cord input socket on the back of the LCD TV Monitor Insert the AC power cord connector into the AC Socket on the TV as shown below 1 2 Con...

Page 16: ...o adjust the sound level to your preference On Screen Displays See descriptions on page 18 On screen displays will appear when the feature is active or the function is being used Remote Control Sensor...

Page 17: ...32 Chooses analog and digital captioning options SOUND MENU 34 Sets up the sound Options are Mode Balance Digital Output Auto Volume Multi Track Internal Speaker PICTURE MENU 36 Sets up the picture a...

Page 18: ...t options Alarm Timer Current Time 11 17 AM Exit Adjust Move OK Hr Off Min Alarm Display Press the ALARM Set a time for the TV to turn itself on Channel Channel List 1 1 ANALOG 14 ANALOG 15 ANALOG 16...

Page 19: ...menu Optional Patient Remote Control POWER Turns TV On or Off TV FM Down arrow for navigating menus VOLUME Decreases increases sound level NUMBER KEYPAD Selects channels directly and enters numerical...

Page 20: ...ls Select on screen menu items and change menu values NUMBER BUTTONS Use for direct channel entry ADJ D E F G User ADJ adjust Up Down menu arrows Left Right to change the selected option BED 1 BED 2 S...

Page 21: ...to Program highlighted press the OK Enter button Press the OK Enter button to start the channel search After finding all available channels a display appears briefly showing the number of analog and d...

Page 22: ...and off If the check mark appears next to the channel number the channel appears in the channel scan Press the MENU button repeatedly to remove the menus 1 2 3 4 After the channel search remove unwan...

Page 23: ...e Tune Signal Strength Note If you add channel labels to existing channels then re run Auto Program the labels will all be deleted Press the MENU button and then use the D E ADJ button to select the C...

Page 24: ...Setup Set the On Off Timers using the procedures described above Note If you intend to use the On Off Timers it is best to set the clock manually 3 4 5 2 1 Use the D E F GADJ buttons to set the year m...

Page 25: ...and minutes used to enter the current time when setting the clock or wake up alarm HOURS First two digits that are entered when setting the clock or the wake up alarm MINUTES The last two digits that...

Page 26: ...ttings 1 2 Press the MENU button and then use the D E ADJ button to highlight the Setup menu Press the OK Enter button to highlight Time Press the OK Enter button to highlight Clock Manual or Auto wil...

Page 27: ...nd set the Menu Language English Spanish or French Press the MENU repeatedly to remove the menus 1 2 3 Choose a language for the on screen menus 4 5 Setup Time V Chip PC Menu Language English G Menu T...

Page 28: ...Entering a PIN Password This option sets up or changes the password for blocking program ratings Setup Time G V Chip PC Menu Language English Transparent 96 Menu Transparency Set ID 11 20 PM Sep 11 2...

Page 29: ...ns TV G General audience This contains little or no violence no strong language and little or no sexual dialog or situations TV Y7 Directed for older children Themes and elements in this program may i...

Page 30: ...dance suggested Children under 13 should be accompanied by an adult R Restricted Viewers should be 17 or older NC 17 Not classified Viewers should be 17 or older X Adults only MPAA ratings The selecte...

Page 31: ...ht arrows buttons to choose and set up the menu options for Canadian French Rating Press the MENU button several times to remove the menus 1 2 3 4 5 Canadian French Ratings Canadian French Ratings E E...

Page 32: ...l is from an RF channel or external equipment input Note Pressing CC on the remote selects a captions option Mini glossary CAPTIONS The term for the words that scroll across the bottom of the TV scree...

Page 33: ...he menus Note If the digital options custom settings are to be cloned all menu options should be set to any option other than Default If Default is left set for any one option then all the options wil...

Page 34: ...U button several times to remove the menus Sound Balance Setup Sound Mode Setup 3 4 5 Press the MENU button and then use the D E ADJ button to highlight the Sound menu Press the OK Enter button Use th...

Page 35: ...udio Language Settings Press the MENU button and then use the D E ADJ button to highlight the Sound menu Press the OK Enter button Use the Up Down arrow button to highlight Internal Speaker press the...

Page 36: ...button to highlight the Picture menu Press the OK Enter button Use the Up Down arrow button to highlight Mode press the OK Enter button Use the F F G G ADJ buttons to choose Manual and use Up Down Lef...

Page 37: ...buttons to choose Warm Cool or Normal When finished press the OK Enter button Press the MENU button several times to remove the menus 1 2 3 4 5 Color Temperature Settings Press the MENU button and th...

Page 38: ...anks 1 2 3 and 4 Note Be advised that running Auto Program overwrites any custom channel setups removes Blanked Deleted 2 Select a channel bank with an installer remote press SOURCE BANK and repeat CH...

Page 39: ...A D D A A D D D A D D A A D D A A Purpose Channel Number 1 2 3 4 5 6 7 8 9 10 11 12 13 14 15 16 17 18 19 20 21 22 23 24 25 A Active Channel was found during AUTO PROGRAM D Delete Channel was deleted...

Page 40: ...ber 26 27 28 29 30 31 32 33 34 35 36 37 38 39 40 41 42 43 44 45 46 47 48 49 50 B A N K 1 2 3 4 Purpose Channel Number 51 52 53 54 55 56 57 58 59 60 61 62 63 64 65 66 67 68 69 70 71 72 73 74 75 B A N K...

Page 41: ...in by setting installer item 117 to 001 and pressing Enter to reset the TV to default values in the installer menu You can do 2 5 4 Menu mode more than once but this mode is limited to only editing ch...

Page 42: ...them Add familiar Channel Icons like ABC CBS NBC etc to the channel on screen display Add identifiable labels for the end user to readily know what common networks are available In the Channel menu se...

Page 43: ...ferent master setups WARNING Copying a blank or incorrect memory into a TV STB or other device will cause the TV STB or other device to operate erratically or become inoperable Use an Installer s remo...

Page 44: ...s time cannot be set directly the current time needs to be copied from a Zenith LG TV equipped with M P I input capability After the time is copied to the Clone programmer the current time can then b...

Page 45: ...MPLETE message is displayed press any key to return to the Clone menu then press ON OFF POWER or ENTER If finished detach M P I cable from the target newly cloned L26W58HA Disconnect L26W58HA Power fo...

Page 46: ...auto shut Off 002 AC ON 0 1 0 Set to 1 to enable auto turn On at power up 003 BAND AFC 0 3 1 Selects Tuning Band 0 Broadcast 1 CATV 2 HRC 3 IRC 004 STRT CHANNEL 0 125 126 127 255 255 Channel at turn o...

Page 47: ...2 0 255 255 User programmable number most significant byte 2 081 UPN LSB 0 255 255 User programmable number least significant byte 082 CHKSM ERROR 0 1 0 Enforces rigid M P I checksum 083 HANDSHK TIME...

Page 48: ...K Channel Lock CHAN LOCK is ideal if the system must always be on the same channel Changing channels with Channel Up Down or keypad numbers is impossible Channel Lock is inactive if set to 0 default G...

Page 49: ...ble the Alarm function Note Clock must be set before the Alarm function will work Installer should leave item 20 FEATURE LEVEL set to 1 default 020 FEATURE LEVEL Default set to ZEN 1 for Zenith IR rem...

Page 50: ...073 CH NOT AVBLE Channel Not Available If set to 1 and item 028 CHANNEL OVERRIDE is set to 0 NOT AVAILABLE message is displayed when directly accessing a channel not in the channel scan list availabl...

Page 51: ...ect ratio at power up see settings below 102 ATSC BAND Sets up TV to receive different types of incoming signals 0 Broadcast 1 CATV 2 HRC 3 IRC 4 Same as NTSC 103 ATSC TUNE MODE Selects ATSC tuning mo...

Page 52: ...de Sound Mode Treble Bass Balance Auto Volume Multi Track Internal Speaker Setup Time Clock Auto Off V Chip TVPG Rating MPAA Rating Menu Language SET ID Caption On Off Analog Mode Digital Mode Digital...

Page 53: ...the index number of the ICON if known OK Enter Select Changes the ICON after the number has been entered TV AV Changes the Aux input label This key is located on side of set and on Installer remote c...

Page 54: ...r the L26W58HA installer menu a Reset the internal controller to factory default by accessing installer menu item 117 FACT DEFAULT set it to 1 and press ENTER The value will change back to 0 after the...

Page 55: ...be checked by accessing the INSTALLER MENU To do this press the MENU button at least 10 times until the menu display ceases to respond to MENU key presses Then press 9 8 7 6 OK Enter Select Typical I...

Page 56: ...ommands are not direct access tuning com mands and they are also ignored CAMPORT Operation PPV The operation will be similar to that of the Stand Alone mode However the PPV providers may send differen...

Page 57: ...URCE R DATA STATUS TYPE 0X0D AUX SOURCE R MPI DATA STATUS AUX SOURCE ASSIGNMENT Troubleshooting Symptoms Possible Cause s Possible Solution s See Page s TV not functioning properly Virtual and Physica...

Page 58: ...select TV puts remote into L26W58HA mode Not aimed at IR remote sensor Point remote at TV s IR receiver on TV Remote too far from IR sensor Move remote closer to TV s IR receiver or darken room IR pat...

Page 59: ...hroughout clone operations After cloning be sure to disconnect power from the target TV for about 15 seconds Problem Possible Cause s Possible Solution s Remote does not operate clone Wrong Installer...

Page 60: ...r by removing and re connecting the AC power cord Observe the POWER LED and TV screen as soon as AC power is re applied Bad TV Did DTV Board POWER LED Turn On Momentarily No Check to see if TV is in C...

Page 61: ...al Did you get a response Bad TV Yes No Did TV stop responding or continue to respond TV is in Commercial Mode Stopped responding TV is not in Commercial Mode Call Technical Support for Assistance Con...

Page 62: ...ing three color video signals COMPONENT VIDEO Uses three wires for transporting three color video signals The end result is usually better video quality DELETED Lets you remove channels from the list...

Page 63: ...which no Icons are available for 7 Transfer the TV setup After all menu options and features are set to your requirements enter the installer menu Press 2 5 5 MENU to start the transfer of the TV s se...

Page 64: ...United States by LG Electronics U S A Inc 2000 Millbrook Drive Lincolnshire IL 60069 Copyright 2006 LG Electronics U S A Inc Warranty Service New or remanufactured replacements for factory defective...

Reviews: