background image

7. ADVANCED PROGRAM GUIDE

7-9.  Searching Programs by Category

You can search for specific programs by their categories.  The category information of each program is provided

by the APG so that you can choose one of them to search for matching programs.  You can also set a search range

to One Day or Three Days, (within 24 hours and 72 hours from now, respectively).  In the search result one pro-

gram may have multiple showings in different channels and/or in different time slots. 

To search programs by Category :

1.

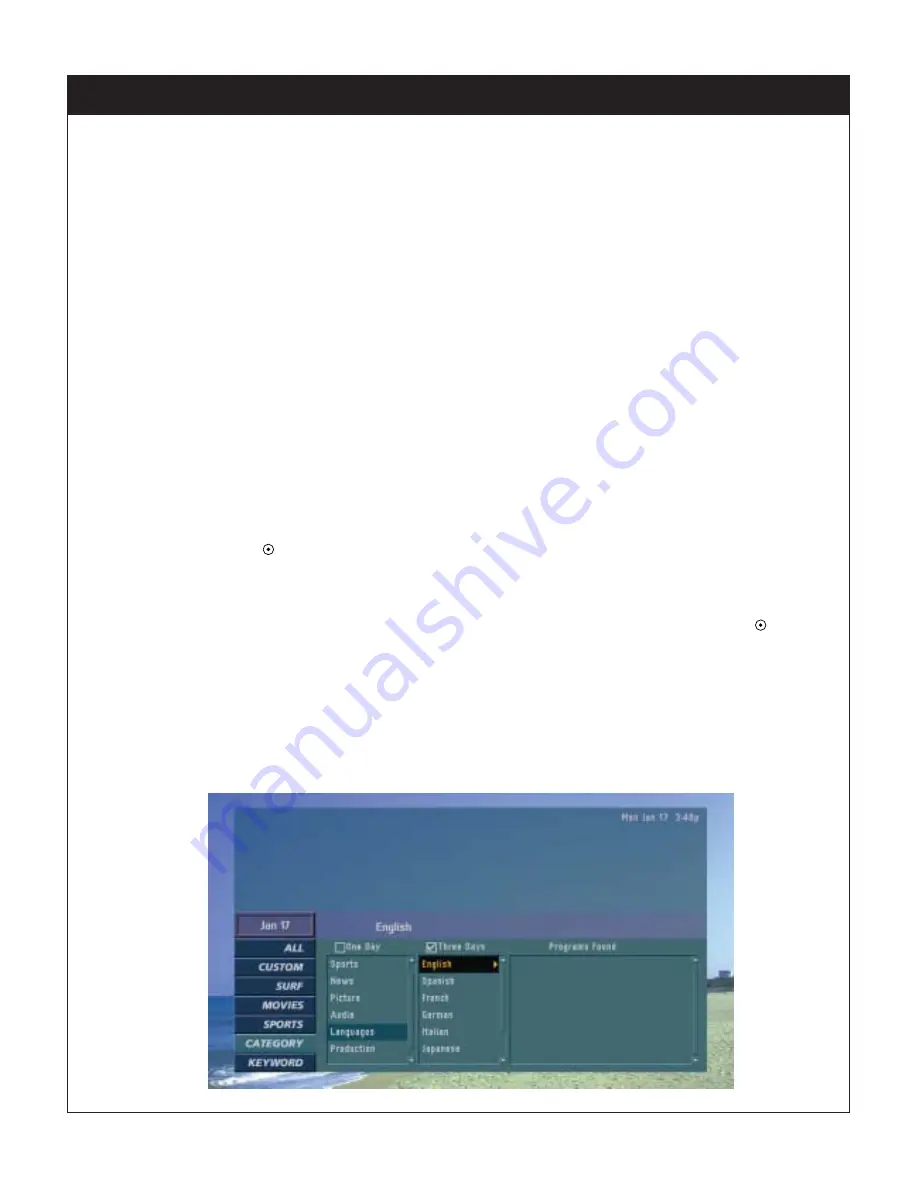
Highlight the CATEGORY in the guide menu. You will see currently applicable categories in a two-level structure.

The Category Search screen consists of three columns: the first column from the left shows the top-level categories,

the middle column shows the second-level categories that belong to the same top-level category, and the right-most

column lists programs resulting from a category search.

2.

Move the highlight to a top-level category. You will see its second-level categories, if any in the middle column.  By

moving the highlight around and viewing available categories, you can select any of them, top-level or second-level,

and press “

” for searching.

3.

The program resulting from the search will be listed in the right-most column.  The highlight goes to the top program

on the list and its program information will be displayed at the top region of the guide screen.  You can see program

information on each program by moving the highlight using “

DE

”.  If you choose a program and press “

”, you will

be asked to select one of the available showings of that program.  Once a choice is made, ALL channel listings will

replace the Category Search screen and the highlight will go to the specified showing.

55

206-3813

Summary of Contents for HD-SAT520

Page 1: ...Copyright 2002 Zenith Electronics Corporation Operating Guide Warranty Model Number HD SAT520 DIRECTV High Definition Receiver...

Page 2: ...iscontinuance of service may be required But if advance notice isn t practical the telephone company will notify the customer as soon as possible Also you will be advised of your right to file a compl...

Page 3: ...ttention Mr H S Lee General Manager Digital Media Standards Group We here by declare that the equipment bearing the trade and model number specified above was tested conforming to the applicable FCC R...

Page 4: ...ct it from over heating The openings should never be blocked by placing the product on a bed sofa rug or other similar surface This product should not be placed in a built in instal lation such as a b...

Page 5: ...ition capable DIRECTV High Definition Receiver and High Definition television Satellite Dish Antenna Sold Separately Activation of programming may be subject to credit approval and requires valid serv...

Page 6: ...Connecting to Antennas 3 5 TV Connection 3 6 VCR Connection 3 7 Audio Connection 4 1 Using the Front Panel of the DIRECTV High Definition Receiver 4 2 Using the Remote Control 4 3 Programming the Remo...

Page 7: ...er View Programs 7 9 Searching Programs by Category 7 10 Searching Programs by Key word 8 1 The Structure of the On screen Menu 8 2 The On screen Menu 8 3 Previewing the Remind List 8 4 Managing Progr...

Page 8: ...HD Receiver delivers a variety of programs from DIRECTV and has a built in HDTV Receiver that serves as a digital receiver that makes it possible to view digital programs even on your analog TV The A...

Page 9: ...d EZ DVI modes HD Formatted On Screen Display Advanced look and feel for the on screen display menu and Advanced Program Guide Software Upgrade Software upgrading from DIRECTV ANT CABLE Only Mode View...

Page 10: ...of TV signal formats analog often called NTSC format National Television System Committee and digital ATSC format Advanced Television System Committee Digital formats are classified into three catego...

Page 11: ...interlaced format half of the pic ture updates every sixtieth of a second The 480p and 480i formats are called the SD formats and 480i is roughly equivalent to a nor mal analog TV picture The 720p an...

Page 12: ...follows In EZ DVI mode the output display format is automatically adapted depend ing on the type of monitor that is connected Display Format modes 1080i 720p 480p 480i Input Signal format Output Displ...

Page 13: ...Aspect Ratio Standard Definition 4 3 Standard Definition Output Format 4 3 No Adjustment Required High Definition 16 9 WHEN YOU SET THE DISPLAY FORMAT TO SDTV 480i 480p Letter box Choose when you wan...

Page 14: ...e edges of a normal picture to fill a wide screen Zoom1 Choose when you want to fill the entire screen with the picture The image will be altered both horizontally stretched and vertically cropped The...

Page 15: ...audio system externally HD digital signals use the Dolby Digital audio encoding system the same digital sound used in many movie theaters on DVDs and in many home theater systems When you tune to a ch...

Page 16: ...ts are activated by setting the Analog Mode in the Audio menu to Stereo If you set the Analog Mode to SAP Second Audio Program you can hear the program s dia log in another language such as French or...

Page 17: ...ATSC If you do not subscribe to DIRECTV program ming you will not be able to see the APG Main Menu You can adjust the setup through a user friendly on screen menu using the remote control While viewin...

Page 18: ...ed EZ Help that describes highlighted menu item to help you understand the features Press and hold the Help button to display the EZ Help Once you release the button the EZ Help menu disappears from t...

Page 19: ...ormat info menu guide select exit 1 2 3 4 5 6 7 8 9 0 power sat vcr aux tv dvd mute signal sd hd flashbk cc date menu help record stop skip pause rew play ff exit guide surf info vol ch pg up pg dn ra...

Page 20: ...udio mono connect it to the left white L mono audio jack on the DIRECTV HD Receiver RF Radio Frequency Jacks and Coaxial Cables F type RF jacks are necessary for reception of over the air broadcasts c...

Page 21: ...20 206 3813 3 2 Back Panel of the DIRECTV High Definition Receiver...

Page 22: ...nitor Either a RGB port for a RGB monitor or a DVI HDTV port for a DVI HDTV monitor need to be connected and the TYPE switch must be set to right position Note This output is not available when the 48...

Page 23: ...better picture than RCA type video or RF connections Does your TV have RCA type A V connectors but no S video jack Use your TV s A V connectors to connect your components An A V connection provides be...

Page 24: ...No Dish Receiving Signals 1 Connect the Antenna to the ANT IN jack on the DIRECTV High Definition Receiver using a coaxial RF cable 2 Connect the cable TV signal to the CABLE IN jack on the DIRECTV H...

Page 25: ...fer to the Installer s Guide provided with your satellite dish antenna 4 Connect the Phone Wall Jack to PHONE JACK on the DIRECTV HD Receiver using a phone cable Cable TV wall jack LNB Sat A Dish Jack...

Page 26: ...installation refer to the Installer s Guide provided with your satellite dish antenna 4 Connect the Phone Wall Jack to PHONE JACK on the DIRECTV HD Receiver using a phone cable Antenna LNB Sat B LNB...

Page 27: ...o the Installer s Guide provided with your satellite dish antenna 4 Connect the Phone Wall Jack to PHONE JACK on the DIRECTV HD Receiver using a phone cable Phone wall jack LNB Sat B LNB Sat C LNB Sat...

Page 28: ...on your TV using a coaxial RF cable 2 Connect the AUDIO OUT and VIDEO OUT jacks on the DIRECTV HD Receiver to the A V IN jack on your TV using RCA type cables Note These connections are only available...

Page 29: ...he COMPONENT IN jacks of your TV using RCA type cables The TYPE switch must be set toward the Y PB PR jacks 3 Connect the L R AUDIO OUT jacks on the DIRECTV HD Receiver to the L R AUDIO IN jacks on yo...

Page 30: ...ECTV High Definition Receiver to the ANT IN jack on your TV using a coaxial RF cable 2 Connect the RGB OUT jack on the DIRECTV HD Receiver to the RGB IN jack of your TV using VGA type connector The TY...

Page 31: ...ng RCA type cables Note The DVI HDTV OUT jack is available when 480p 720p or 1080i display format is selected Note For the best access to high definition programming at the highest available resolutio...

Page 32: ...Recording 1 Connect the OUT TO TV jack on the DIRECTV High Definition Receiver to the ANT IN jack on your VCR using a coaxial RF cable 2 Connect the AUDIO OUT and VIDEO OUT jacks on the DIRECTV HD Re...

Page 33: ...Audio System Dolby AC 3 Connection 1 Connect the DIGITAL AUDIO OUT jack on the DIRECTV High Definition Receiver to the SPDIF IN jack on your Dolby Digital decoder using a digital optical cable A digit...

Page 34: ...dio connection Analog Hi Fi System Hi Fi System Connection 1 Connect the Left and Right AUDIO OUT jacks of the DIRECTV High Definition Receiver to the Left and Right INPUT jacks on your Hi Fi audio sy...

Page 35: ...on the screen You can return to normal viewing by pressing the Exit button Guide Shows the DIRECTV Advanced Program Guide screen that shows you a program schedule containing a list of current and futu...

Page 36: ...9 Allows you to enter channel numbers for direct tuning or to scroll to the designated page of the program list on the Guide menu Digit buttons can be used to enter numerical values wherever required...

Page 37: ...ver the air antenna SD HD Sets the output resolution to one of SD 480i format and pre selected HD 480p 720p 1080i native hybrid 1 and hybrid 2 formats If you want to use VCR recording set to the STD f...

Page 38: ...while you are in normal viewing The Help button also serves when you are in an on screen menu To see the help description of the selected option in the menu press and hold the Help button Navigation...

Page 39: ...ode button on the remote control 3 Press the Power button and the Mute button simultaneously The remote control is now ready to program the code for the component 4 There are two ways to find the righ...

Page 40: ...bishi 109 024 124 001 004 040 116 146 028 042 MTC 101 130 134 001 040 016 024 056 007 019 Brands Codes Nikei 043 OnKing 043 Onwa 043 Optonica 019 081 Panasonic 034 080 092 056 164 Philco 003 024 056 0...

Page 41: ...4 040 Multi Tech 024 034 NEC 012 023 043 048 039 Nordmende 043 Optonica 053 054 Panasonic 066 070 083 145 133 140 074 Pentax 013 020 031 033 063 Philco 031 033 034 067 Philips 031 067 034 101 054 033...

Page 42: ...032 035 Fisher 113 122 138 140 168 GE 209 Hitachi 133 166 JVC 117 196 227 228 KENWOOD 105 110 113 118 144 154 155 198 200 216 217 Luxman 108 123 153 173 Magnavox 127 135 172 179 180 Mcs 111 147 156 1...

Page 43: ...sh you should select NO This means you can receive only off air broadcast analog digital This setup process will be displayed only once This means that you can change your selec tion at any time in th...

Page 44: ...information banners To remove the banner press Info again or wait for 10 seconds The icons in the Channel Banner represent the status or availability of important features The icons will be highlighte...

Page 45: ...e mail icon will appear in the channel banner to indicate that a new mail message has arrived or there are unread messages in the box HD Icon Indicates that the current program is in the HD format DD...

Page 46: ...instead You can easily move the highlight on the surf list using DEF G on the remote control The next page is accessible by using Pg Up Dn button on the remote You can tune to a favorite channel by p...

Page 47: ...e The APG provides program listings and information on analog and digital channels from over the air local stations as well as DIRECTV channels You can easily navigate and tune to hundreds of channels...

Page 48: ...y find spe cific programs by using the CATEGORY search of KEYWORD search functions An explanation of each channel list is described in Section 7 2 You can bring up the APG in two ways and exit from it...

Page 49: ...nnels from the All Channel List that you do not wish to view Shows program listings only for those channels on the SURF channel list You can generate a FAVORITE channel list which is a short list of c...

Page 50: ...me slots or channels that are currently hidden from the screen using the arrow buttons DEF G Move horizontally to reach other time slots and move vertically to reach other channels Page Scrolling You...

Page 51: ...ching If you select Remind in the dialog box this program is put on the Remind List and you will be reminded by a message at the top left corner of the screen 10 seconds before its airing time Current...

Page 52: ...trol 2 Press the Info button on the remote control to display the available additional information 3 If you want to check any other broadcasting schedules for this same program move the highlight to t...

Page 53: ...enu item is for and how it works while you are in the APG just press and hold the Help button on your remote control A quick help screen with brief and focused descriptions will appear at the right si...

Page 54: ...ar for your information 3 Move the highlight to the Remind option in the dialog box and press to confirm The program name will be preceded by the mark If you want to cancel any reservation execute the...

Page 55: ...ow you other time schedules for the program 2 Move the highlight to the right to Buy in the dialog box and press Another pop up box will be displayed to verify your purchase 3 If the price to record t...

Page 56: ...s the second level categories that belong to the same top level category and the right most column lists programs resulting from a category search 2 Move the highlight to a top level category You will...

Page 57: ...the screen keyboard and press to execute searching 5 The receiver first searches for candidate keywords that include the word or the partial word you entered You can select one of the candidate keywo...

Page 58: ...level can be displayed by pressing If a menu has more than three levels the pop up dialogue box can be displayed as the fourth or fifth level For navigating the menu levels you will see or G on the r...

Page 59: ...n Manual Ch Add Surf List Ch Edit EZ Hook up Clock Advanced Digital Output Audio Mode Audio Variable Audio Language TV Aspect Ratio Closed Caption Output Channel Out to TV Digital TV Input EZ Demo Loc...

Page 60: ...display the on screen menu 2 Select the DIRECTV menu by pressing on the remote control 3 Scroll down to Remind List using E 4 Move the highlight to the right with G to select a program from the list...

Page 61: ...ased program 1 Press the Menu button on the Remote Control to display the on screen menu 2 Select the DIRECTV menu by pressing on the remote control 3 Scroll down to Future Purchase using E 4 Move the...

Page 62: ...l down to the Purchase List using E 4 Move the highlight to the right with G to scroll the purchase list 5 Press F to return to the previous level or press the Exit button on the remote control to ret...

Page 63: ...remote control 3 Scroll down to the Mail List option using E 4 Move the highlight to the right with G to select a mail item from the list 5 Press and the full text of the mail will be displayed in the...

Page 64: ...To receive HD programming you should install and select the Oval dish type Oval dish Sat A B or Oval dish Sat A B C in the Select Dish menu Auto Detection is used to enable access to additional DIRECT...

Page 65: ...een menu 2 Select the DIRECTV menu by pressing on the remote control 3 Scroll down to Initial Setup using E 4 Move the highlight to the right with G to select Your Location 5 Press and the pop up dial...

Page 66: ...TV and retransmits them to your dish The DIRECTV High Definition Receiver is capable of displaying the signal strength of most transponders by using the following method To see the signal strength 1 P...

Page 67: ...nnel Setup 5 Press and the pop up dialogue box will be displayed to ask if you want to add off air digi tal and analog channels to your guide If you select NO you don t need to do the following proces...

Page 68: ...to display the on screen menu 2 Scroll down using E on the remote control 3 Select the Setup menu by pressing 4 EZ Channel Scan will be automatically highlighted 5 Move the highlight to the right wit...

Page 69: ...d in your channel list 1 Press the Menu button on the remote control to display the on screen menu 2 Scroll down using E on the remote control 3 Select the Setup menu by pressing 4 Scroll down to Manu...

Page 70: ...roll down using E on the remote control 3 Select the Setup menu by pressing 4 Scroll down to Surf List Ch Edit using E 5 Press G to display the channel editing screen To create a custom list 1 Use DEF...

Page 71: ...8 7 Managing Channels 206 3813 70...

Page 72: ...Press the Menu button on the remote control to display the on screen menu 2 Scroll down using E on the remote control 3 Select the Setup menu by pressing 4 Scroll down to EZ Hook up using E 5 Press G...

Page 73: ...on the remote control 3 Select the Setup menu by pressing 4 Scroll down to Clock using E 5 Move the highlight to the right with G 6 Select your time zone between Eastern and Hawaii by pressing G conti...

Page 74: ...screen menu 2 Scroll down using E on the remote control 3 Select the Setup menu by pressing 4 Scroll down to Clock using E 5 Move the highlight to the right with G 6 Use DE to move the highlight in th...

Page 75: ...banner time out period and advanced digital closed captioning settings To set advanced Setup Menu 1 Press the Menu button on the Remote Control to display the on screen menu 2 Scroll down using E on t...

Page 76: ...utput other than Dolby Digital and PCM may create a high pitched noise and cause damage To set the digital audio mode 1 Press the Menu button on the Remote Control to display the on screen menu 2 Scro...

Page 77: ...ed to the Digital Output SPDIF in PCM mode Dolby Digital Dolby Digital formally known as AC 3 for Audio Coding 3rd Generation or 5 1 channel audio is a coding technique that provides five independent...

Page 78: ...program s sec ond audio program is broadcast in mono if provided To Set the Analog Audio Mode 1 Press the Menu button on the Remote Control to display the on screen menu 2 Scroll down using E on the...

Page 79: ...g DE repeatedly to select the desired language To set the digital audio language 1 Press the Menu button on the Remote Control to display the on screen menu 2 Scroll down using E on the remote control...

Page 80: ...ress the Menu button on the Remote Control to display the on screen menu 2 Scroll down using E on the remote control 3 Select the Audio menu by pressing 4 Scroll down to Audio Variable using E 5 Move...

Page 81: ...oom1 or Zoom2 Refer to section 2 4 Normal and Wide Format Signals Choosing the screen format of your TV 1 Press the Menu button on the Remote Control to display the on screen menu 2 Scroll down using...

Page 82: ...r squeezed to fit the 4 3 ratio mon itor Modes for viewing normal image 4 3 on a wide TV 16 9 display when output display format is 720p or 1080i mode Normal Use for a picture with an original 4 3 asp...

Page 83: ...aption will appear only when it is provided by the broadcaster To set Closed Caption 1 Press the Menu button on the Remote Control to display the on screen menu 2 Scroll down using E on the remote con...

Page 84: ...cial non synchronous caption service that does not need to be in sync with the sound and may provide simplified captioning usually delayed Text1 4 Text1 4 usually display information at the bottom pos...

Page 85: ...V HD Receiver s display format is set at 480i To set the channel number of the DIRECTV HD Receiver 1 Press the Menu button on the Remote Control to display the on screen menu 2 Scroll down using E on...

Page 86: ...standby mode default signal source 1 Press the Menu button on the Remote Control to display the on screen menu 2 Scroll down using E on the remote control 3 Select the Preference menu by pressing 4 Sc...

Page 87: ...m sent via the designated input To set the Digital TV signal source 1 Press the Menu button on the Remote Control to display the screen menu 2 Scroll down using E on the remote control 3 Select the Pr...

Page 88: ...emote Control to display the on screen menu 2 Scroll down using E on the remote control 3 Select the Preference menu by pressing 4 Scroll down to EZ Demo using E 5 Press G to display the EZ Demo scree...

Page 89: ...the remote control 3 Select the Lock menu by pressing 4 If unlocked Lock System will be automatically highlighted otherwise requires a password To lock the system 1 Move the highlight to the right wi...

Page 90: ...ing E 5 Press G to display the Block Channel screen 6 Use DEF G to move the highlight in the channel editing screen 7 Toggle Blocked or Unblocked using The screen shown at the top left will indicate i...

Page 91: ...ntrol to display the on screen menu 2 Scroll down using E on the remote control 3 Select the Lock menu by pressing 4 Scroll down to Movie Rating using E 5 Select the level you want using DE and press...

Page 92: ...nu button on the Remote Control to display the on screen menu 2 Scroll down using E on the remote control 3 Select the Lock menu by pressing 4 Scroll down to TV Rating Children using E 5 Select Age or...

Page 93: ...on age or content 6 Select the level you want using DE and press to return to the previous level 7 Press the Exit button on the remote control to return to TV viewing NOTE TV Rating for General Progr...

Page 94: ...ed off and then turned back on the lock will be reactivated To set the spending limit of each PPV program 1 Press the Menu button on the Remote Control to display the on screen menu 2 Scroll down usin...

Page 95: ...ing E on the remote control 3 Select the System menu by pressing 4 System Test will be automatically highlighted 5 Move the highlight to the right with G 6 Press to activate the system test It will ru...

Page 96: ...replace the card 1 Press the Menu button on the Remote Control to display the on screen menu 2 Scroll down using E on the remote control 3 Select the System menu by pressing 4 Scroll down to Replace...

Page 97: ...ersion will be seen if DIRECTV plans to upgrade the software 6 Press the Exit button on the remote control to return to TV viewing The DIRECTV HD Receiver is able to receive upgrades or modifications...

Page 98: ...lp button on your remote control if you want information about the highlighted item The information will be dis played on the right side of the TV screen Simply press and hold to see the helpful infor...

Page 99: ...instructive note about the Menu and the Advanced Program Guide The see the EZ Help feature 1 Press the Help button on the remote control to display the EZ Help screen 2 Scroll up and down to select E...

Page 100: ...Loop out 1 DIRECTV RF DIRECTV RF Antenna in Smart Card Slot on the back OUTPUTS Dolby Digital Optical Output 1 A V output A V 525 480i 2 RGB Out 15 Pin connector 1 DVI HDTV Out DVI Connector 1 Compon...

Page 101: ...onsumption 100Watts Max 120VAC Standby Power 35 Watts 120VAC 17Watts typ Power line 90 VAC to 137 VAC Environment Operation Temperature 0 to 40 degrees Celsius 32 to 104 degrees Fahrenheit Humidity 0...

Page 102: ...onent type is selected If the DIRECTV HD Receiver is connected to your monitor or TV via Y PB PR port on the back panel the TYPE switch must be flipped to the left Otherwise you may not be able to see...

Page 103: ...he EZ Channel Scan in the SETUP menu see section 8 7 Aspect ratio depends on both the incoming program format and the Display Format button on the front panel Once the button for the format is set to...

Page 104: ...our unit will be repaired or replaced with a new substitute model or factory reconditioned unit Zenith may add a fee for labor charges If repaired parts may be new or remanufactured Repair Parts and R...

Reviews: