background image

INITIAL SETTINGS   PAGE 37

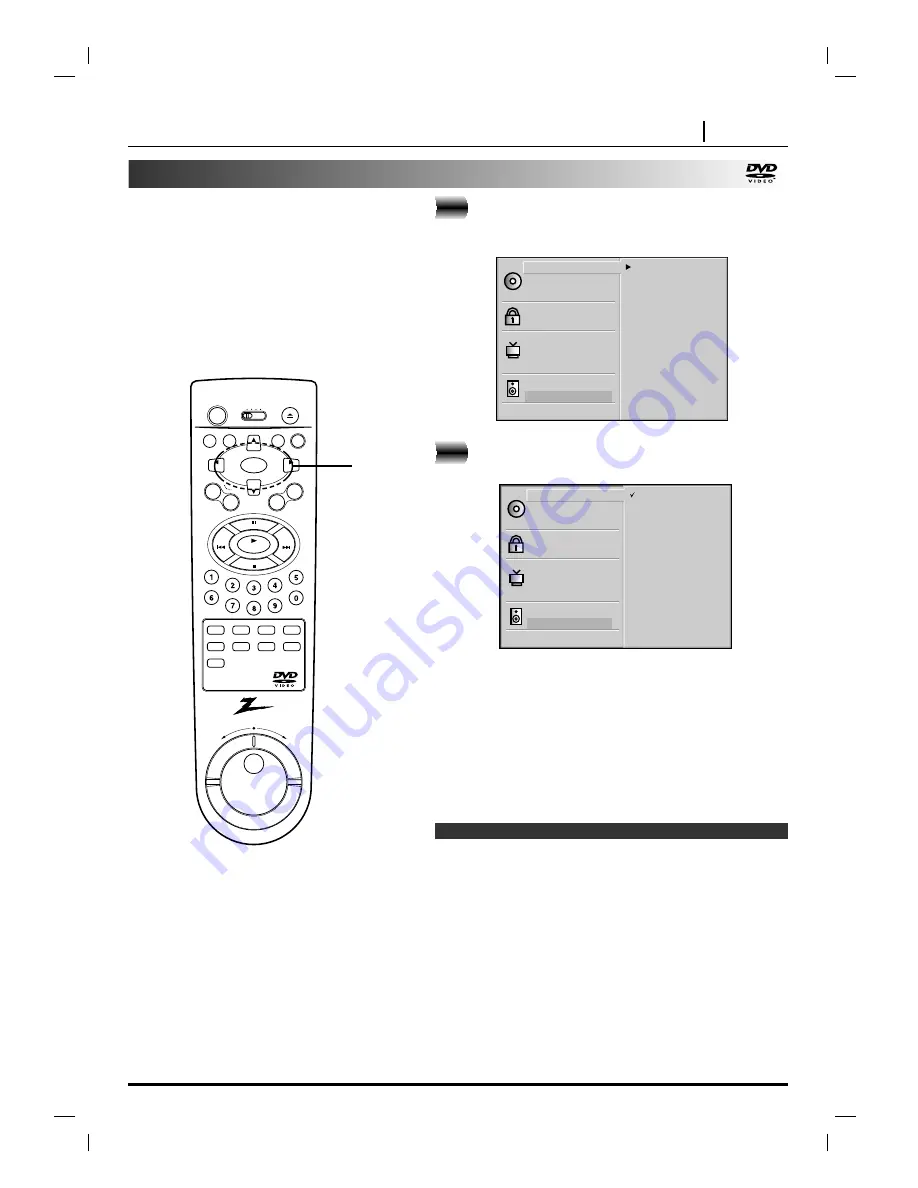
Selecting disc languages

At the setup screen, press 

D

D

/

E

E

to select

“Disc Audio” and press 

G

G

.

Press 

D

D

/

E

E

to select the desired language and

then press SELECT/ENTER.

Original :The original language of each disc will be selected.
English : The English will be Selected.
Other :

Another language can be selected. You can input 
4-digit language code. (Refer to the language
codes on page 45. Press CLEAR if an incorrect lan-
guage code is entered.)

The “Disc Subtitle” and “Disc Menu” are selected by the same
method.

If the language selected is not available on the disc, the original
language designated by each disc will be selected.

This is to select the audio soundtrack language,
subtitle language and the language used in title
menus or DVD menus which will always be used
for every disc to be played back.

When you play back a DVD video disc, the DVD
player automatically displays the pre-selected
subtitle language if it is included on the disc.

Note

2

1

Disc Subtitle

Disc Menu

Rating

Password

TV Aspect

Menu Language

Progressive Scan

Digital Audio Output

5.1 Speaker Setup

Others

Disc Audio

Original

Spanish

English

Chinese

Polish

Hungarian

Russian

French

German

Italian

Other  — — — —

Disc Subtitle

Disc Menu

Rating

Password

TV Aspect

Menu Language

Progressive Scan

Digital Audio Output

5.1 Speaker Setup

Others

Disc Audio

Original

Spanish

English

Chinese

Polish

Hungarian

Russian

French

German

Italian

Other  — — — —

marker

searc

h

power

display

open / close

play

pause/step

stop

title

menu return

tv input

setup

subtitle

audio

program

repeat

a - b

random

angle

clear

rev

slow/scan

fwd

dvd vcr catv tv

ch

ch

vol

vol

select /

enter

skip

skip

zo

om

sou

nd /mu

te

1, 2

Summary of Contents for DVD2381

Page 1: ...machine number DVD2381 E N J O Y T H E V I E W o p e r a t i n g g u i d e w a r r a n t y...

Page 2: ...a residential installation This equipment generates uses and can radiate radio frequency energy and if not installed and used in accordance with the instructions may cause harmful interference to rad...

Page 3: ...Tracks Forward or Back 22 HDCD Playback 22 To Scan at Fast Forward or Fast Reverse Playback 23 Various Speed Playback with Shuttle Ring 24 Operation Using GUI Menu Icons General Information about GUI...

Page 4: ...product and to protect it from overheating These openings must not be blocked or covered The openings should never be blocked by placing the product on a bed sofa rug or other similar surface This pr...

Page 5: ...y cause hearing damage 20 Laser Beam Do not look into the opening of the disc tray or venti lation opening of the product to see the source of the laser beam It may cause sight damage 21 Disc Do not u...

Page 6: ...irty or worn down the picture quality becomes poor To obtain a clear picture we recommend regular inspection and maintenance cleaning or parts replacement every 1 000 hours of use depending on the ope...

Page 7: ...t cloth Always keep the disc clean If you cannot wipe off the dust with a soft cloth wipe the disc lightly with a slightly moistened soft cloth and finish with a dry cloth Do not use any type of solve...

Page 8: ...indicator Chapter Track number indicator Title number indicator Angle icon indicator Total playing time elapsed time indicators MP3 indicator HDCD indicator power standby open close play pause step st...

Page 9: ...ks COMPONENT VIDEO OUT PROGRESSIVE SCAN jacks VIDEO OUT jack POWER CORD Connect to an AC 120V 60Hz outlet only COAXIAL DIGITAL AUDIO OUT jack VIDEO OUTPUT SELECT Switch OPTICAL DIGITAL AUDIO OUT jack...

Page 10: ...n AUDIO button RANDOM button SLOW SCAN Shuttle Ring Directional arrow buttons up down left right for use in highlighting a selection on a GUI menu screen TITLE and MENU screen Press and hold button fo...

Page 11: ...HI 119 131 132 JC PENNEY 102 115 124 130 133 JVC 109 141 KMC 131 KTV 115 130 131 138 LG GOLDSTAR 115 122 130 131 133 146 LODGENET 113 LOGIK 113 LXI 104 116 123 124 125 131 139 MAGNAVOX 100 106 107 109...

Page 12: ...quid from the battery compartment then insert new batteries The batteries should last about one year with normal use This section shows you how to use the remote control Point the remote control at th...

Page 13: ...TV be sure to turn off the power and unplug both units from the wall outlet before making any connections Connect the DVD player to your TV directly If you connect the DVD player to a VCR the playback...

Page 14: ...OUT AUDIO OUT1 AUDIO OUT2 L R COMPONENT PROGRESSIVE SCAN S VIDEO Y To COMPONENT VIDEO OUT PROGRESSIVE SCAN Pb Pr Y VIDEO OUTPUT SELECT switch To AUDIO OUT L R Audio cable Supplied To component video i...

Page 15: ...y connections If you place the DVD player near a tuner or radio the radio broadcast sound might be distorted In this case move the DVD play er away from the tuner and radio The output sound of the DVD...

Page 16: ...yer to a 6 channel receiver equipped with a Dolby Digital decoder or Dolby Digital processor Refer to the owner s manual of your audio equipment as well Before you connect the DVD player to other equi...

Page 17: ...the DIGITAL OUT jack of this DVD player to an AV decoder that has the Dolby Digital decoding function High volume sound may damage your hearing as well as the speakers Refer to Selecting Digital Audio...

Page 18: ...le 2 Channel Digital Stereo You can enjoy the dynamic sound of 2 Channel Digital Stereo by connecting this DVD player to a receiver equipped with a digital audio input and speaker system right and lef...

Page 19: ...ins If the disc is placed in upside down and it is a single sided disc NO DISC or DISC ERROR appears on the TV screen If you insert an audio CD the CD indicator lights up in the DVD display The title...

Page 20: ...during playback Doing so may damage the disc and the DVD player Use the OPEN CLOSE button on the remote control or DVD player to open and close the disc tray Do not push the disc tray while it is mov...

Page 21: ...stored in memory for use any time Switching of the audio mode etc is automatic on some discs This player does not memorize if you switch off the player when a DVD or title menu appears on the TV scree...

Page 22: ...h special ly encoded HDCD discs and standard CD audio discs When an HDCD encoded disc is playing the special decoder is automatically activated and the HDCD Indicator lights No user intervention is re...

Page 23: ...the button is released To return to normal playback press PLAY The DVD player does not play back sound during the high speed reverse and forward playback of DVD video discs However the DVD player pla...

Page 24: ...t fast forward or fast reverse The DVD player does not play back sound during slow motion playback the high speed reverse and forward playback of DVD video discs However the DVD player plays back soun...

Page 25: ...llow frame on its GUI menu icons Press F F G G to select the desired setting When numbers are displayed e g title number the numeric buttons can also be used for setting instead of F F G G For some fu...

Page 26: ...D and to change the setting To show the current track number and to jump to the desired track number To show the elapsed time Display only To show the current audio STEREO LEFT RIGHT and to select to...

Page 27: ...menu recorded on it the TITLE button can be used to select the movie title The details of operation differ depending on the disc used Selecting a title may not be possible on certain DVD discs Some DV...

Page 28: ...sc the disc s priority language appears Notes Changing subtitle language 2 1 OFF 1 ENG Changing audio soundtrack language It is possible to change the audio soundtrack language or encoding method chan...

Page 29: ...wo speakers be positioned approximately 8 to 10 apart and the listening position should be 8 to 10 away from the speakers Notes 1 2 NORM 1 2 1 2 3 3D SUR Producing a 3D SURROUND effect Some DVDs may c...

Page 30: ...ram play To return to normal play Press REPEAT several times until OFF is displayed Repeating sections between two specific points A B repeat Press A B during play at the point where repeat play is to...

Page 31: ...a marker Or press CLEAR to clear a marker Play resumes from the point corresponding to the selected marker or the selected marker is cleared These operations work only with discs for which the elapse...

Page 32: ...setup subtitle audio program repeat a b random angle clear ch ch vol vol select enter skip skip z o om s ound m u t e 1 3 Note This function only works with karaoke DVD and Audio CD Random does not wo...

Page 33: ...D E E F F G G and press the numeric button s to select the desired track number Repeat step 2 to select another track Up to 20 tracks can be programmed Press PLAY to exit the screen The selected trac...

Page 34: ...only displayed in English If there is an impossible code to display it will be displayed underlined _ instead of English This unit can play up to 256 files per disc A disc recorded with more than 256...

Page 35: ...2 3 1 4 Program MP3 1 MP3 Clear All TRACK 2 mp3 TRACK 2 mp3 TRACK 3 mp3 TRACK 4 mp3 TRACK 6 mp3 TRACK 6 mp3 TRACK 7 mp3 TRACK 7 mp3 TRACK 8 mp3 TRACK 9 mp3 TRACK 9 mp3 TRACK 5 mp3 E TRACK 1 mp3 Clear...

Page 36: ...tive page When the alternate setting is selected the screen returns to the Initial Settings display To exit SETUP menu Press SETUP RETURN or PLAY Once the initial settings have been completed the play...

Page 37: ...n title menus or DVD menus which will always be used for every disc to be played back When you play back a DVD video disc the DVD player automatically displays the pre selected subtitle language if it...

Page 38: ...layers are equipped with a password designed to prevent children from changing the level Disc Subtitle Disc Menu Rating Password TV Aspect Menu Language Progressive Scan Digital Audio Output 5 1 Speak...

Page 39: ...Clear and press SELECT ENTER To change the rating level password follow the steps on page 38 39 again 2 3 1 2 3 1 Disc Subtitle Disc Menu Rating Password TV Aspect Menu Language Progressive Scan Digit...

Page 40: ...Select when a wide screen TV set is connected Played in FULL size Setting the wide screen TV to FULL mode is also necessary Each screen shows an example when the video material for a wide screen is pl...

Page 41: ...uage Progressive Scan Digital Audio Output 5 1 Speaker Setup Others Disc Audio English Spanish French Disc Subtitle Disc Menu Rating Password TV Aspect Menu Language Progressive Scan Digital Audio Out...

Page 42: ...tible with a pro gressive scan signal set the Progressive mode to On The Progressive function only works when VIDEO OUTPUT SELECT switch on the rear panel is set to COMPONENT PROGRESSIVE SCAN Warning...

Page 43: ...V receiver or surround processor is capable of handling 96kHz signals select the 96kHz option When this choice is made this unit will pass each type of signal through without any further processing 2...

Page 44: ...c When playing karaoke connect appropriate audio equipment such as an amplifier to the DVD video player 2 1 The DRC and Vocal settings can be changed Disc Subtitle Disc Menu Rating Password TV Aspect...

Page 45: ...577 Cambodian 7578 Kannada 7579 Korean 7583 Kashmiri 7585 Kurdish 7589 Kirghiz 7665 Latin Code Language 7678 Lingala 7679 Laothian 7684 Lithuanian 7686 Latvian Lettish 7771 Malagasy 7773 Maori 7775 Ma...

Page 46: ...tected and any recordings made from these discs will be distorted This product incorporates copyright protection technology that is protected by method claims of certain U S patents and other intellec...

Page 47: ...yer There is an obstacle in the path of the remote control and the DVD player The batteries in the remote control are exhausted Correction Plug the power cord into the wall outlet securely Insert a di...

Page 48: ...AJ Harmonic distortion audio 0 008 Wow and flutter Below measurable level less than 0 001 W PEAK EIAJ Operating conditions Temperature 41 F to 95 F Operation status Horizontal Video output 1 0 V p p 7...

Page 49: ......

Page 50: ...NOTES PAGE 50 NOTES...

Page 51: ...NOTES NOTES PAGE 51...

Page 52: ...your DVD Player and how to adjust the customer controls Carry In Service The video product must be taken to a U S or Canadian Zenith authorized service center for warranty service and must be picked...

Reviews: