CM4
821
automatic coffee maker
AUTOMATYCZNY EKSPRES
DO KAWY
ZCM4821B
INSTRUKCJA UŻYTKOWANIA
AUTOMATYCZNY EKSPRES DO KAWY
USER MANUAL
AUTOMATIC COFFEE MAKER
PL
EN
2–22
23–42
Page 1: ...CM4821 automatic coffee maker AUTOMATYCZNY EKSPRES DO KAWY ZCM4821B INSTRUKCJA UŻYTKOWANIA AUTOMATYCZNY EKSPRES DO KAWY USER MANUAL AUTOMATIC COFFEE MAKER PL EN 2 22 23 42 ...
Page 2: ...poważne zagrożenia dla użytkownika W razie wystąpienia usterek zwróć się do specjalistycz nego punktu serwisowego Nie próbuj smarować urządzenia Nie jest wymagane wykonywanie żadnych dodatkowych prac konserwacyj nych oprócz czyszczenia ekspresu Nie demontuj nie rozkręcaj obudowy urządzenia Zawsze upewnij się czy w zbiorniku jest woda przed przystąpieniem do użycia ekspresu Nie zanurzaj ekspresu do...
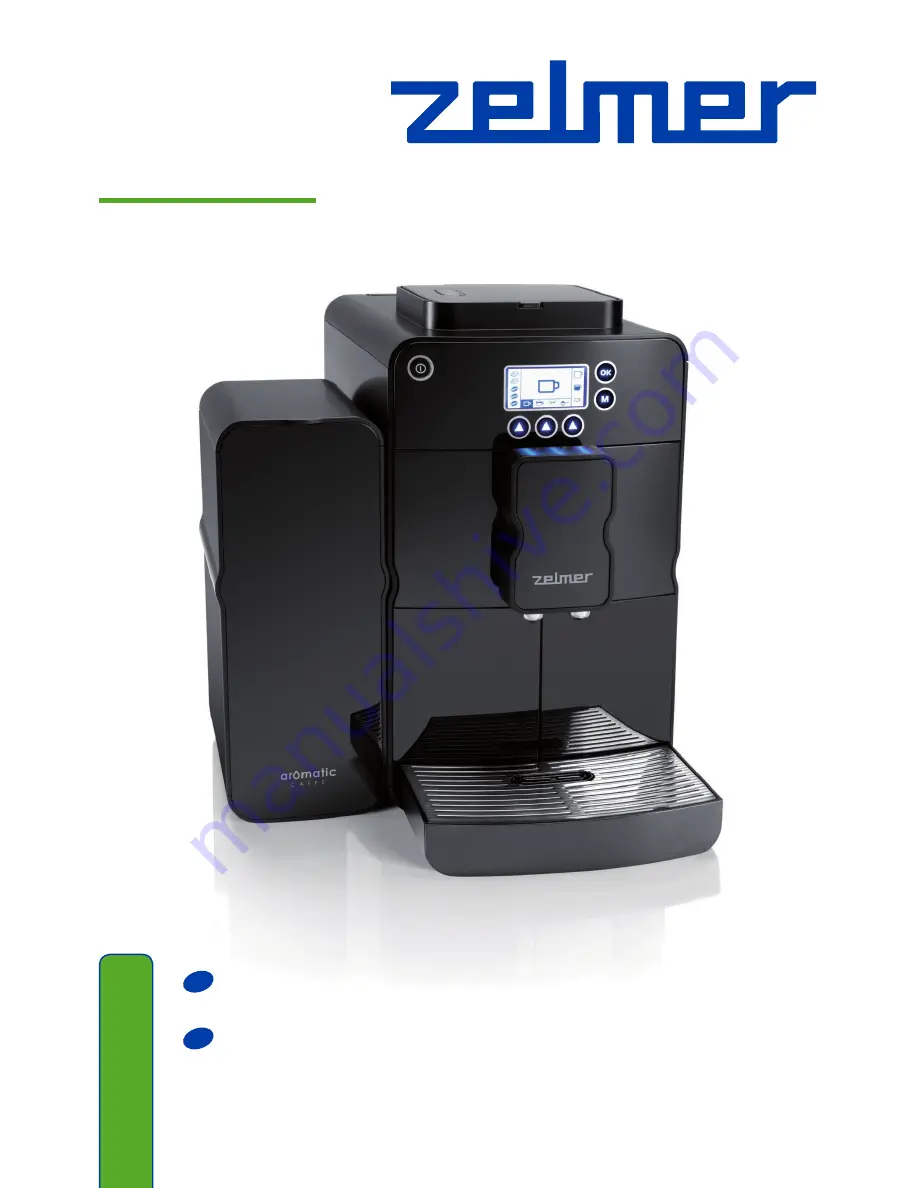
Page 3: ...no znakiem CE na tabliczce znamionowej Deklaracja zgodności CE znajduje się na stronie www zelmer pl Ekspres do kawy opis urządzenia 1 Przycisk ON OFF 2 Wyświetlacz wielofunkcyjny 3 Moduł dozujący z regulowaną wysokością i zintegrowanym wylotem mleka 4 Wylot kawy 5 Pojemnik na odpady fusy 6 Podstawka do Latte Macchiato 7 Przycisk 8 Przycisk Menu Przycisk Wróć 9 Przyciski wyświetlacza A B C 10 Zbio...
Page 4: ...ożu wystar czająco wytrzymałym aby móc utrzymać jego ciężar Umiejscowienie powinno uniemożliwiać dzieciom dostęp do gorących powierzchni urządzenia Ekspres nie jest przeznaczony do instalacji w zamkniętych miejscach na przykład w szafce Gniazdko zasilania musi być łatwo dostępne tak aby w razie sytuacji awaryjnej móc w łatwy sposób wyciągnąć wtyczkę z gniazdka PODŁĄCZENIE DO SIECI Aby urządzenie m...
Page 5: ...j się że regulatory grubości mielenia znajdują się w tym samym położeniu Zamontuj pokrywę b pojemnika na kawę mieloną w zaczepach pojemnika i zamknij ją Załóż z powrotem pokrywę a pojemnika na kawę ziarnistą W tym celu wprowadź zawias pokrywy w wycięcie pojemnika i dociśnij b a PODŁĄCZANIE MODUŁU MLECZNEGO Moduł mleczny musi być podłączony w celu przygotowania specjalnych rodzajów kawy z dodatkiem...
Page 6: ...ży uzupełnić wodę w zbiorniku przed przygotowaniem następnego napoju w przeciw nym wypadku wszystkie funkcje urządzenia zostaną zatrzymane Przed ponownym włożeniem zbiornika do ekspresu upewnij się że jego zewnętrzna strona jest sucha Wytrzyj także kanał zbiornika przed ponow nym umieszczeniem zbiornika w ekspresie Zapoznaj się również ze wska zówkami zawartymi w rozdziale REGULARNE CZYSZCZENIE NA...
Page 7: ...e Gdy ekspres jest włączany lub wyłączany za każdym razem wykonuje operację automatycznego płukania Niewielkie ilości kawy mogą dostać się do pojemnika na odpady podczas każdego procesu płukania To normalne zjawisko i nie świadczy o usterce urządzenia Naciśnij i przytrzymaj przycisk ON OFF aby włączyć urządzenie Podczas pod grzewania około 45 sekund na wyświetlaczu widoczny będzie komunikat Kiedy ...
Page 8: ...niu Aby ustawić żądany stopień grubości mielenia postępuj według następujących wskazówek Umieść filiżankę pod wylotem kawy Naciśnij przycisk aby przygotować kawę Dostosuj stopień grubości mielenia za pomocą regulatora grubości mielenia podczas gdy młynek pracuje Kawa zostanie przygotowana a stopień grubości mielenia ustawiony Możliwe są następujące pozycje regulatora drobne mielenie kawa mocna śre...
Page 9: ...ju filiżanki zostały zapisane Powtórz tę procedurę jeśli chcesz zmienić ustawienia dla innych rodzajów filiżanek Wprowadzone w ten sposób ustawienia zostaną zapamiętane nawet po wyłączeniu ekspresu Jeżeli chcesz zmienić rozmiar filiżanki możesz dosto sować poziom jej wypełnienia indywidualnie w każdej chwili lub zresetować poziom napełnienia za pomocą funkcji Reset Resetowanie ustawień opi sane je...
Page 10: ... ok 190 ml Filiżanka kawy ok 120 ml Filiżanka espresso ok 40 ml Aby zredukować straty cieplne oraz wyeliminować ryzyko rozpryskiwania się kawy ustaw odpowiednią do podstawionego naczynia wysokość modułu dozującego prze suwając go ku górze lub ku dołowi Jeżeli moduł dozujący przesuwa się opornie należy go oczyścić Zapoznaj się ze wskazówkami postępowania w rozdziale WYJMOWANIE I CZYSZ CZENIE MODUŁU...
Page 11: ...NIU NAPOJU Z DODATKIEM MLEKA Po przygotowaniu specjalnych rodzajów kawy z mlekiem w lewym górnym rogu wyświe tlacza pojawi się symbol Wyświetlony symbol ma na celu przypominanie o koniecz ności czyszczenia modułu mlecznego Na wyświetlaczu pojawią się następujące symbole Jeżeli przygotowano kilka napojów z dodatkiem mleka należy niezwłocz nie oczyścić moduł mleczny W przeciwnym wypadku urządzenie b...
Page 12: ...u Parametry urządzenia pojawi się do wyboru Na wyświetlaczu pojawią się następujące symbole Naciśnij przycisk B lub przycisk w celu wybrania menu Parametry urządzenia Naciskaj przycisk A lub C aż menu Temperatura kawy pojawi się do wyboru Na wyświetlaczu pojawią się następujące symbole Naciśnij przycisk B lub przycisk aby przejść do menu Temperatura kawy Na wyświetlaczu pojawią się następujące sym...
Page 13: ... operacyjnego naciśnij dwukrotnie przycisk lub odczekaj ok 30 sekund aż ekspres sam powróci do trybu operacyj nego Fabrycznie urządzenie ma ustawione automatyczne wyłączenie po 9 minu tach co oznacza że ekspres po upływie 9 minut od ostatniego użycia wyłączy się USTAWIANIE PODŚWIETLENIA FILIŻANKI Możliwe są następujące ustawienia Podświetlenie filiżanki włączone Podświetlenie filiżanki wyłączone P...
Page 14: ...nia i konserwacji urządze nia Dbaj regularnie o czystość ekspresu aby zapewnić jego właściwie funkcjonowanie i wysoką jakość przygotowywanych napojów REGULARNE CZYSZCZENIE Należy regularnie czyścić zewnętrzne powierzchnie urządzenia za pomocą lekko wil gotnej miękkiej szmatki Wyjmij z urządzenia pojemnik na odpady oraz zbiornik wody i umyj je ciepłą wodą z dodatkiem delikatnego płynu do naczyń Wyt...
Page 15: ...ia rozpoznana Może to prowadzić do sytu acji w której ekspres zacznie sygnalizować konieczność opróżnienia pojem nika na odpady po przygotowaniu pierwszej kawy tuż po uruchomieniu Pojemnik na odpady powinien być opróżniany i oczyszczany codziennie jeżeli ekspres jest używany codziennie Urządzenie będzie przypominało o konieczności wykonania tej czynności wyświetlając komunikat WYJMOWANIE I CZYSZCZ...
Page 16: ...gotowywano kawę Zanim przystąpisz do czyszczenia zaparzacza zawsze odczekaj aż ostygnie Aby oczyścić zaparzacz postępuj według następujących wskazówek Przyciśnij lewą stronę drzwiczek aby zwolnić zatrzask a następnie pociągając drzwiczki z lewej strony aby je otworzyć Naciśnij przód pojemnika na odpady aby go odblokować następnie wyciągnij pojem nik na odpady wysuwając go z urządzenia Nie pociągaj...
Page 17: ...ią się następujące symbole Naciśnij przycisk B lub przycisk w celu wybrania programu Na wyświetlaczu pojawią się następujące symbole Wybrany program można anuować naciskając przycisk dopóki na wyświetlaczu widoczny jest symbol Naciśnij przycisk B lub przycisk w celu uruchomienia programu Na wyświetlaczu pojawi się następujący komunikat Wyciągnij zbiornik wody napełnij go świeżą zimną wodą Ponownie...
Page 18: ...dy lekarskiej gdy doszło do kontaktu z oczami Kontakt ze środkiem odkamieniającym może spowodować uszkodzenie delikatnych powierzchni Należy natychmiast usunąć chyba jedna spacja za dużo rozlany środek Aby uruchomić program odkamieniania postępuj według poniższych wskazówek Naciśnij przycisk Na wyświetlaczu pojawią się następujące symbole Naciśnij przycisk A lub C aż menu Odkamienianie pojawi się ...
Page 19: ...c automatycznie do ostatniego aktywnego programu parzenia Na wyświetlaczu pojawią się następujące symbole W przypadku przerwy w zasilaniu podczas odkamieniania należy urucho mić ponownie program gdy zasilanie powróci CZYSZCZENIE DYSZY SPIENIACZA DO MLEKA Aby oczyścić dyszę spieniacza do mleka postępuj według poniższych wskazówek Przyciśnij lewą stronę drzwiczek aby zwolnić zatrzask a następnie poc...
Page 20: ...NIE WODĄ Wyświetlacz Przyczyna Rozwiązanie Pojemnik na odpady jest zapełniony Opróżnij i wyczyść pojemnik na odpady patrz rozdział OPRÓŻNIANIE POJEMNIKA NA ODPADY Brak pojemnika na odpady Zainstaluj pojemnik na odpady Ilość wydanych kaw przypomina o czyszczeniu Uruchom program czyszczenia patrz rozdział AUTOMATYCZNY PRO GRAM CZYSZCZENIA Ilość wydanych kaw przypomina o odkamie nianiu Uruchom progra...
Page 21: ...awia się komunikat Pusty zbiornik wody chociaż zbiornik jest pełny Zapowietrzenie systemu Spuść niewielką ilość gorącej wody zapoznaj się ze wskazówkami zawartymi w rozdziale PRZYGOTO WANIE WRZĄTKU Zablokowany system wodny Jako środek zaradczy przeprowadź operację czyszczenia lub odkamie niania zapoznaj się ze wskazówkami zawartymi w rozdziałach AUTO MATYCZNY PROGRAM CZYSZCZENIA i PRO GRAM ODKAMIE...
Page 22: ...dź operację odkamieniania Podczas automatycznego płukania przy włączaniu i wyłączaniu ekspresu woda spływa do pojem nika na odpady zamiast przez wylot kawy Niewłaściwie zainsta lowany lub zablokowany zaparzacz Wyreguluj zaparzacz Patrz również Ekspres do kawy wyłącza się po przepłukaniu lub wydaniu kawy Ciśnienie w zaparzaczu jest zbyt wysokie Wyjmij i wyczyść zaparzacz Jeśli zaparzacz jest zamkni...
Page 23: ...ing the appliance Never immerse the coffee machine itself the mains cable or the mains plug into water or other liquids CAUTION Not observance can result in damage to possessions Always place the unit on a flat level surface Do not use your coffee maker with empty water tank Always fill the water tank with fresh cold and clean water Using warm hot water or other liquids may damage the appliance or...
Page 24: ...tton 9 Display buttons A B C 10 Water tank 11 Retractable and removable drip tray with stainless steel grate 12 Plug in card with quickstart instructions 13 Coffee powder shaft for previously ground coffee 14 Coffee bean container 15 Lever for setting the grinding fineness 16 Measuring spoon with cleaning brush and tool function 17 Test strip for determining the water hardness 18 Aroma box OK M A ...
Page 25: ...d spaces such as a built in cupboard The plug socket must be easily accessible so that the mains plug can be easily pulled out in an emergency ELECTRICAL CONNECTION For safe and trouble free operation of the coffee machine the following instructions on electrical connection must be observed Before connecting the coffee machine compare the connection data voltage and frequency on the rating plate w...
Page 26: ...dispensing unit to open it Push the straight cut end of the milk hose through the side opening of the coffee machine from the outside to the inside 1 1 3 2 Insert the end of the milk hose into the opening on the upper left of the milk frother 2 until it stops and press the milk hose into the guide 3 If you only wish to dispense hot water e g for tea the hose may not be connected Close the door wit...
Page 27: ... from the warranty Fill the coffee bean container only with pure coffee beans without sugar coatings or aromatised constituents To fill the coffee bean container proceed as follows Fold back the lid of the coffee container Fill the container with fresh coffee beans Then close the container again Multifunction display In this section you will find an overview of the menus and the symbols used requi...
Page 28: ...ne It will then perform a rinsing cycle The following appears on the display If you have also prepared a coffee speciality with milk milk froth the coffee machine will prompt you to also clean the milk system after rinsing Details for this can be found in section MILK SYSTEM CLEANING PROGRAMME Milk system cleaning should be carried out otherwise time consuming cleaning of the milk frother will bec...
Page 29: ...d in section REMOVING AND CLEANING THE COFFEE DISPENSING UNIT Select the desired cup size by pressing the button C The following selections are possible Coffee mug approx 190 ml Coffee cup approx 120 ml Espresso cup approx 40 ml The set cup filling level remains stored even when the coffee machine is switched off The coffee machine is set for standard quantities for each cup size by default If you...
Page 30: ...he display Open the lid of the coffee bean container and the coffee powder shaft Pour in the fresh coffee powder Then close both lids again Ensure that powder does not clog the container and that no foreign matter gets into the container Never fill the container with more than one level measuring spoon of coffee powder The filling container is not a storage container the powder must be transported...
Page 31: ... cups to heat them Do not use soya or rice milk because good frothing results are not possible with these products The milk type of milk used can influence the milk froth quality Select the coffee specialities function by pressing the button B The following appears on the display Select the desired coffee speciality by pressing the button C The following selections are possible Latte Macchiato Cap...
Page 32: ...s The following illustrates the possibilities using Café Latte as an example The first setting affects the cup filling quantity The filling quantity can set from 50 to 150 Press the buttons A or C repeatedly until the desired coffee filling quantity is displayed Press the button B or the button to store the settings The stored filling quantity briefly appears on the display After you have set and ...
Page 33: ...display Press the button B or the button to select the Device parameters Press the A or C buttons repeatedly until the Heating menu appears for selection The following appears on the display Press the button B or the button to select the Temperature menu The following appears on the display Press the button A repeatedly until the desired heating setting is set Store the input by pressing the butto...
Page 34: ...ously changed values to their original factory settings The following settings and stored values are affected Water hardness Programming of cup filling level Ground coffee quantity to cup filling level setting Coffee temperature Shut off time Heating system Settings for coffee filling quantity milk coffee proportion and froth quantity for coffee specialities To reset the coffee machine to the fact...
Page 35: ...nto the drip try The following appears on the display The cleaning process is completed automatically The following appears on the display Empty the receptacle with the cleaning solution rinse it and fill it again with 250 ml of fresh water for rinsing Insert the milk tube into the receptacle The slanted end of the tube must reach the bottom of the receptacle Press the button B or the button to co...
Page 36: ...h the spring push the hose and spring onto the connector C A A B B C D A C The spring must be evenly pulled over the half of the hose and the funnel shaped end of the hose D must face upwards Now insert both sleeve ends with the hoses into the dispensing tubes 2 and press them in until they snap in properly Push the connecting piece into the fixing slot 1 and subsequently push the hoses to the rig...
Page 37: ...ning programme enables intensive cleaning of otherwise inaccessible areas The cleaning programme must be started when the following symbol appears on the display The cleaning process takes approx 8 minutes and should not be interrupted Before running the cleaning programme the metal sieves in the brewing unit must be clean and wiped dry The cleaning water is collected in the drip tray Alternativel...
Page 38: ...2 phases takes approx 10 minutes and should not be interrupted The frequency of descaling depends on the hardness of the water in your region Therefore please do not forget to determine the water hardness and to set the corresponding hardness for the coffee machine Please refer to sections DETERMINING THE WATER HARDNESS and SETTING AND STORING THE WATER HARDNESS for instructions on this Damage to ...
Page 39: ...icated on the display or place the receptacle under the spout again Press the button B or the button to complete the descaling process The following appears on the display and flashes 3x to confirm The descaling programme has completed Clean the brewing unit as described in chapter CLEANING THE BREWING UNIT Residues of descaler may cause damage to the brewing unit in the long run It is imperative ...
Page 40: ... should be located at the upper position otherwise the milk tube will be jammed Recommended cleaning agents accessories The following accessories are available Milk sludge remover Urnex Rinza Descaling liquid tablets Durgol Swiss Espresso BSH service accessories No 00311556 Cleaning tablets BSH service accessories No 00310575 Troubleshooting This section contains important information on localisin...
Page 41: ...n of coffee beans Set ground coffee quantity higher Vary grinding fineness Try a different coffee sort Coffee type changed setting changed Take the automatic grinding quantity correction into consideration see section PREPARING COFFEE WITH WHOLE COFFEE BEANS under Notes Very loud noise during grinding Grinding mechanism clogged by foreign matter Send the coffee machine to customer service for insp...
Page 42: ...e mains plug Coffee dispensing unit not installed Install coffee dispensing unit Brewing unit not fitted Install brewing unit Brewing unit was not pushed in completely Push the brewing unit in until it stops Coffee dispensing is very uneven or only one sided Spout is clogged or blocked by foreign bodies e g coffee bean or similar Pull the coffee spout upwards and clean the inside or remove the for...
Page 43: ...ZCM4821 001_v01 ...
Page 44: ...żanki 4 Łatwa obsługa i zwarta konstrukcja zbiornik na wodę i pojemnik na fusy dostępne są z przodu ekspresu 1 Design milk carton holder elegant look and cool milk for up to 10 hours 2 Prepare various beverages espresso latte macchiato cappuccino hot milk and water 3 Height adjustable coffee outlet for various types of cups and glasses 4 Compact and easy to use water tank and waste container are a...