93
HC1000-001_v03
Handling and operation
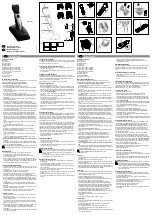
PLACING, REMOVING & REPLACING ATTACHMENTS
●
Select appropriate attachment for your desired hair length.
1
Slide the attachment comb into the side guides of the hair clipper housing.
2
At the bottom of the attachment comb there is a retaining plate for setting the position
of the attachment. Press the bottom of the retaining plate and slide the attachment to the
desired position.
Before hair trimming, always make sure the attachment comb is firmly
locked.
3
To replace / remove the attachment comb , press the bottom of the retaining plate and
pull the attachment off the side guides of the hair clipper housing.
USE OF THE APPLIANCE
To cut the hair even, the attachment / blade must move freely through the
hair. Do not force the hair clipper quickly.
Cut the hair to the desired length stepwise, staring with the longest
attachment comb.
1
Place your selected attachment on the appliance (see section
PLACING, REMOVING
& REPLACING ATTACHMENTS
).
2
Set the position of the attachment comb to the desired length of haircut. The set value
will be visible in a small window in the attachment comb.
Before hair trimming, always make sure the attachment comb is firmly
locked.
3
Switch on the appliance by turning the ON/OFF switch to ON.
Point the blade of the appliance against the natural direction of hair.
Move the clipper slowly through the hair, cutting a small portion of hair at
each stroke.
Always start the cutting at the base of the neck and gradually work your
way upward to the top of the head. Alternatively, start with the forehead
and temples and move toward the top of the head.
E
F
Summary of Contents for HC1000
Page 2: ...WARIANT KOLORYSTYCZNY colour variant...
Page 3: ...A 3 HC1000 001_v03 1 2 3 B 8 7 9 1 10 11 12 13 14 15 16 2 3 4 6 5...
Page 4: ...4 HC1000 001_v03 1 2 3 1 2 3 D C 1 2 3 F 1 2 3 E...
Page 5: ...5 HC1000 001_v03 1 2 3 1 2 1 4 5 6 I G H 2 3 4...
Page 56: ...56 HC1000 001_v03 Zelmer Zelmer RU...
Page 57: ...57 HC1000 001_v03 8 100 240 50 60...
Page 58: ...58 HC1000 001_v03 30 A II ZELMER 1275 2008...
Page 60: ...60 HC1000 001_v03 12 10 Ni MH 12 2 3 1 2 3 10 10 B...
Page 61: ...61 HC1000 001_v03 50 1 2 3 10 10 50 C...
Page 62: ...62 HC1000 001_v03 1 2 3 I 1 1 2 D E...
Page 63: ...63 HC1000 001_v03 3 1 2 3 I F...
Page 64: ...64 HC1000 001_v03 1 2 1 2 1 2 3 4 G H...
Page 65: ...65 HC1000 001_v03 1 2 3 1 2 4 5 6 I...
Page 66: ...66 HC1000 001_v03 Zelmer Zelmer BG...
Page 67: ...67 HC1000 001_v03 8 100 240 V 50 60 Hz...
Page 68: ...68 HC1000 001_v03 RCD 30 mA II ZELMER 1275 2008...
Page 70: ...70 HC1000 001_v03 12 10 Ni MH 12 2 3 1 2 3 10 10 B...
Page 71: ...71 HC1000 001_v03 50 1 2 3 10 10 50 C...
Page 72: ...72 HC1000 001_v03 1 2 3 I 1 1 2 D E...
Page 73: ...73 HC1000 001_v03 3 1 2 3 I F...
Page 74: ...74 HC1000 001_v03 1 2 1 2 1 2 G H...
Page 75: ...75 HC1000 001_v03 3 4 click 1 2 3 1 2 4 5 6 PE I...
Page 76: ...76 HC1000 001_v03 Zelmer Zelmer UA...
Page 77: ...77 HC1000 001_v03 8 100 240 V 50 60 Hz...
Page 78: ...78 HC1000 001_v03 RCD 30 mA II ZELMER WE 1275 2008 LVD 2006 95 EC EMC 2004 108 EC...
Page 80: ...80 HC1000 001_v03 Ni MH 12 1 2 3 10 10 50 B...
Page 81: ...81 HC1000 001_v03 1 2 3 10 10 50 1 2 3 C D...
Page 82: ...82 HC1000 001_v03 1 1 2 3 E...
Page 83: ...83 HC1000 001_v03 1 2 3 F...
Page 84: ...84 HC1000 001_v03 1 2 1 2 1 2 3 4 G H...
Page 85: ...85 HC1000 001_v03 1 2 3 1 2 4 5 6 PE I...