91
HC1000-001_v03
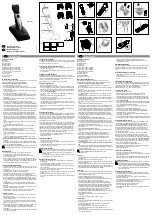
RECHARGING THROUGH THE CHARGING PORT ON
THE APPLIANCE
1
Make sure the appliance is OFF.
2
Insert the adaptor connector into the charging port.
To prevent damage to the appliance, make sure the charging port is dry
before inserting the adaptor connector.
3
Insert the adaptor plug into a suitable mains supply outlet (see the rating plate on the
adaptor).
– Charging of the battery takes approximately 10 hours.
– The charging process may be terminated earlier than 10 hours by the
overcharge protection circuit.
– The charge indicator glows red when charging.
– When the battery is fully charged, the charge indicator light turns green.
●
Unplug the adaptor from the mains after charging.
To unplug the adaptor, never pull on the power cord as this may damage
the unit. Hold the adaptor firmly and pull it out of the power outlet.
A fully charged appliance has a cordless operating time of up to 50
minutes.
CHARGING WITH THE CHARGING STAND
Charging in horizontal position
●
Check if the appliance is OFF.
1
Insert the adaptor connector into the charging port on the stand.
To prevent damage to the appliance, make sure the charging port is dry
before inserting the adaptor connector.
2
Place the appliance (without any attachments) on the charging stand. Make sure the
charging port on the appliance rests safely on the charging connector on the stand.
3
Connect the adaptor plug into a suitable mains supply outlet (see the rating plate on
the adaptor).
– Charging of the battery takes approximately 10 hours.
– The charging process may be terminated earlier than 10 hours by the
overcharge protection circuit.
B
C
Summary of Contents for HC1000
Page 2: ...WARIANT KOLORYSTYCZNY colour variant...
Page 3: ...A 3 HC1000 001_v03 1 2 3 B 8 7 9 1 10 11 12 13 14 15 16 2 3 4 6 5...
Page 4: ...4 HC1000 001_v03 1 2 3 1 2 3 D C 1 2 3 F 1 2 3 E...
Page 5: ...5 HC1000 001_v03 1 2 3 1 2 1 4 5 6 I G H 2 3 4...
Page 56: ...56 HC1000 001_v03 Zelmer Zelmer RU...
Page 57: ...57 HC1000 001_v03 8 100 240 50 60...
Page 58: ...58 HC1000 001_v03 30 A II ZELMER 1275 2008...
Page 60: ...60 HC1000 001_v03 12 10 Ni MH 12 2 3 1 2 3 10 10 B...
Page 61: ...61 HC1000 001_v03 50 1 2 3 10 10 50 C...
Page 62: ...62 HC1000 001_v03 1 2 3 I 1 1 2 D E...
Page 63: ...63 HC1000 001_v03 3 1 2 3 I F...
Page 64: ...64 HC1000 001_v03 1 2 1 2 1 2 3 4 G H...
Page 65: ...65 HC1000 001_v03 1 2 3 1 2 4 5 6 I...
Page 66: ...66 HC1000 001_v03 Zelmer Zelmer BG...
Page 67: ...67 HC1000 001_v03 8 100 240 V 50 60 Hz...
Page 68: ...68 HC1000 001_v03 RCD 30 mA II ZELMER 1275 2008...
Page 70: ...70 HC1000 001_v03 12 10 Ni MH 12 2 3 1 2 3 10 10 B...
Page 71: ...71 HC1000 001_v03 50 1 2 3 10 10 50 C...
Page 72: ...72 HC1000 001_v03 1 2 3 I 1 1 2 D E...
Page 73: ...73 HC1000 001_v03 3 1 2 3 I F...
Page 74: ...74 HC1000 001_v03 1 2 1 2 1 2 G H...
Page 75: ...75 HC1000 001_v03 3 4 click 1 2 3 1 2 4 5 6 PE I...
Page 76: ...76 HC1000 001_v03 Zelmer Zelmer UA...
Page 77: ...77 HC1000 001_v03 8 100 240 V 50 60 Hz...
Page 78: ...78 HC1000 001_v03 RCD 30 mA II ZELMER WE 1275 2008 LVD 2006 95 EC EMC 2004 108 EC...
Page 80: ...80 HC1000 001_v03 Ni MH 12 1 2 3 10 10 50 B...
Page 81: ...81 HC1000 001_v03 1 2 3 10 10 50 1 2 3 C D...
Page 82: ...82 HC1000 001_v03 1 1 2 3 E...
Page 83: ...83 HC1000 001_v03 1 2 3 F...
Page 84: ...84 HC1000 001_v03 1 2 1 2 1 2 3 4 G H...
Page 85: ...85 HC1000 001_v03 1 2 3 1 2 4 5 6 PE I...