background image

38

CM4822-001_v02

FAILURES HANDLING

This chapter will instruct you some errors that may encounter 

and the solutions.

Problem

Cause

Solutions

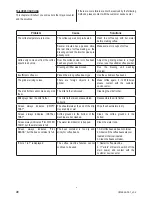
The coffee temperature is too low.

The coffee cup was not pre­heated.

Wash  the  coffee  cup  with  hot  water 

before making coffee.

Several  minutes  have  passed  since 

the last time of coffee making, so the 

brewing unit and the internal pipes are 

already cold.

Make some more cups of coffee.

Coffee only comes out from the coffee 

spout drop by drop.

Over fine coffee powder or coffee bean 

has been ground too fine.

Adjust  the  grinding  wheel  to  a  rough 

state or use the suitable coffee powder.

Brewing unit filter was blocked.

Run  the  brewing  unit  washing 

program.

Insufficient coffee oil.

Picked the wrong coffee bean type.

Use the suitable coffee beans.

The grinder arising noises.

There  are  foreign  objects  in  the 

grinder.

Make  coffee  again,  if  it  still  failures, 

please  contact  with  the  customer 

sevice center.

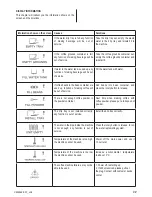
The milk frother cannot make any milk 

foam.

The milk frother is blocked.

Cleaning the milk frother.

Milk sprays from the milk frother.

The milk frother was not assembled

correctly.

Reassemble the milk frother.

Screen  always  indicates  „EMPTY 

TRAY”.

The sheetmetals at the end of the drip 

tray are dirty or wet.

Wipe the sheetmetals to dry.

Screen  always  indicates  „INSTALL 

TRAY”.

Coffee  grounds  in  the  bottom  of  the 

machine are not cleaned.

Clean  the  coffee  grounds  in  the 

bottom.

Screen always indicates “FILL WATER 

TANK”, but the water tank is full.

The water tank inductor is trapped.

Clean the water tank.

Screen  always  indicates  “FILL 

BEANS”, but the bean container is full.

The  bean  container  is  too  oily  and 

sticky for coffee beans.

1. Stir coffee beans in bean container.

2. Observe if the coffee beans are over

roasted or charcoal roasted.

3. Clean the beans container.

“Errors 1 to 7” is displayed.

The  coffee  machine  failures,  cannot 

continue to be used.

1. Restart coffee machine.

2. If “errors” still exists, switch off the 

main  power,  and  contact  with  the 

customer sevice center.

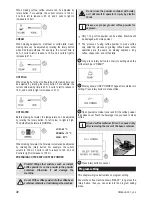
If there are some failures cannot be resolved by the following 

methods, please contact with the customer sevice center.

Summary of Contents for cm4822

Page 1: ...erwisowego Jeżeli przewód zasilający nieodłą czalny ulegnie uszkodzeniu to powi nien on być wymieniony u wytwórcy lub u pracownika zakładu serwisowego albo przez wykwalifikowaną osobę w celu uniknięcia zagrożenia Napraw urządzenia może dokonywać jedynie przeszkolony personel Nie prawidłowo wykonana naprawa może spowodować poważne zagrożenia dla użytkownika W razie wystąpienia usterek zwróć się do ...

Page 2: ...ód zasilający chwytaj za samą wtyczkę Zawsze wyłączaj urządzenie i wyciągaj wtyczkę z gniazdka kiedy urządzenie nie będzie używane przez dłuższy czas oraz przed czyszczeniem Nie używaj ekspresu z przedłużaczem chyba że przedłu żacz został sprawdzony przez wykwalifikowanego tech nika lub pracownika serwisu Urządzenie zawsze podłączaj do gniazdka sieci elektrycz nej jedynie prądu przemiennego wyposa...

Page 3: ...cji wysokości głowicy 4 Pojemnik na fusy 12 Wejście wężyka do mleka 5 Taca ociekowa 13 Spieniacz do mleka 6 Kratka tacy ociekowej 14 Wylot gorącej wody 7 Pokrywa pojemnika na kawę mieloną 15 Wylot gorącego i spienionego mleka 8 Regulator młynka 16 Przewód zasilający 17 Płyta do podgrzewania filiżanek Budowa ekspresu 1 4 5 6 2 7 12 13 14 15 16 11 8 9 10 3 17 ...

Page 4: ...offee 3 Przycisk dotykowy gorąca woda hot water 4 Przycisk włącz wyłącz 5 Ekran wyświetlacza 6 Przycisk dotykowy kawa cappuccino cappuccino 7 Przycisk dotykowy kawa latte coffee latte 8 Przycisk dotykowy gorące mleko spienione mleko milk cream 9 Przycisk czyszczenia automatycznego 10 Pokrętło sterowania 1 6 5 10 7 8 9 2 3 4 ...

Page 5: ...o jego uruchomieniu w przeciwnym wypadku młynek może ulec uszkodzeniu Dopasuj stopień mielenia do rodzaju ziaren Jeżeli ziarna mają ciemny kolor zaleca się ustawienie regulatora młynka na pozycję Grubo mielona Jeżeli ziarna mają jasny kolor zaleca się ustawienie regulatora młynka na pozycję Drobno mielona Podczas przygotowania wybranego napoju jeżeli z wylotu kawy kawa wydobywa się bardzo powoli l...

Page 6: ...twardości wodny nie są elementem wyposażenia ekspresu należy je nabyć w specjalistycznych sklepach 2 Zanurz odpowiednią część paska testowego w wodzie na 2 sekundy 3 Wyjmij pasek testowy usuń nadmiar wody i obserwuj kolor Następnie ustaw liczbę oznaczającą dany stopień twardości wody według wzornika kolorów paska testowego Informacje na temat ustawień twardości wody podano w punkcie Regu lacja ust...

Page 7: ...panelu sterowania Aby poprowadzić Cię przez kolejne etapy przygotowania kawy za pomocą przycisków panelu sterowania weźmiemy za przykład program espresso Zalecana pojemność espresso to 30 50 ml Z uwagi na małą pojemność espresso zalecamy podgrzać filiżankę przed rozpoczęciem przygotowania napoju 1 Naciśnij przycisk espresso 2 Młynek zacznie mielić ziarna W tym czasie możesz wybrać moc kawy obracaj...

Page 8: ...szenie do 21 s GORĄCA WODA Podczas przygotowywania gorącej wody za pomocą pokrę tła sterowania można ustawić jej temperaturę Ustawieniem fabrycznym jest temperatura normalna NORMAL Niska LOW ok 65 C Normalna NORMAL ok 75 C Wysoka HIGH ok 85 C Podczas przygotowywania gorącej wody jej ilość można ustawić przekręcając pokrętło sterowania Na przy kład obecne ustawienie to 150 ml przekręcenie pokrętła ...

Page 9: ...onego mleka USTAWIENIA I ZAKRES PARAMETRÓW NAPOJÓW Parametry takie jak Moc i objętość espresso Moc i objętość long coffee Moc i objętość kawy w cappuccino oraz czas przygoto wania pianki z mleka Moc i objętość kawy w caffe latte oraz czas przygotowa nia mleka i pianki Temperatura i objętość gorącej wody Czas przygotowania gorącego mleka Czas przygotowania spienionego mleka mogą być ustawione dla n...

Page 10: ...ba przygotowań porcji gorącej wody 5 Liczba przygotowanych cappuccino 6 Liczba przygotowanych caffe latte 7 Liczba przygotowanych napojów z kawy mielonej 8 Liczba przygotowanych porcji gorącego mleka 9 Liczba przygotowanych porcji spienionego mleka 10 Liczba operacji płukania 11 Liczba operacji płukania jednostki zaparzającej 12 Liczba operacji odkamieniania 13 Liczba operacji instalacji i wymiany...

Page 11: ...o czyszczenia aby rozpocząć 6 Na wyświetlaczu pojawi się komunikat przedstawiony na ilustracji poniżej Naciśnij przycisk automatycznego czysz czenia aby rozpocząć czyszczenie jednostki zaparzającej 7 Trwa czyszczenie jednostki zaparzającej 8 Po zakończeniu czyszczenia urządzenie powróci do trybu READY GOTOWY Po zakończeniu programu czyszczenia opróżnij tackę ocie kową CZYSZCZENIE MODUŁU MLECZNEGO ...

Page 12: ...y roztwór wlej do zbiornika na wodę Proces odkamieniania trwa ok 30 minut Nie przerywaj procesu w trakcie odkamienia nia Przerwanie tego procesu może uszkodzić urządzenie Po pewnym czasie użytkowania kiedy konieczne będzie usunięcie osadów z kamienia na ekranie wyświetlacza pojawi się komunikat NEEDS DESCALE KONIECZNE ODKAMIENIANIE oraz PRESS RINSE NACIŚNIJ PŁU KANIE Naciśnij przycisk czyszczenia ...

Page 13: ...yszczenia opróżnij tackę ociekową CZYSZCZENIE POJEMNIKA NA FUSY I TACY OCIEKOWEJ Nie używaj rozpuszczalników żrących środ ków czyszczących ani alkoholu do czyszczenia pojemnika na fusy i tacy ociekowej Pojemnika na fusy oraz tacy ociekowej nie należy myć w zmywarce Nie używaj metalowych przedmiotów do usuwa nia zabrudzeń lub resztek kawy może to dopro wadzić do uszkodzenia pojemnika na fusy i tacy...

Page 14: ...iekową i pojemnik na fusy opłucz oba pojemniki pod bieżącą wodą Przetrzyj 2 metalowe styki znajdujące się na końcu tacy i dopiero wtedy włóż ją ponownie do ekspresu CZYSZCZENIE ZBIORNIKA WODY Przy każdej wymianie wody w zbiorniku zalecamy jego przepłukanie pod bieżącą wodą Przy regularnym czyszczeniu zbiornika wody raz w miesiącu zalecamy używanie wilgotnej szmatki i łagodnego środka czyszczącego ...

Page 15: ...e spadła na podłogę W przypadku uszkodzenia pokrywy pojemnika skontaktuj się z serwisem DEMONTAŻ I CZYSZCZENIE SPIENIACZA DO MLEKA Aby przygotowanie spienionego mleka było pra widłowe czyść spieniacz do mleka codziennie 1 Delikatnie wyjmij spieniacz z ekspresu 2 Ostrożnie zdemontuj wszystkie części spieniacza 3 Umyj części pod bieżącą wodą 4 Zmontuj wszystkie części i włóż spieniacz do ekspresu IN...

Page 16: ...ją się resztki kawy mielonej Do usu nięcia resztek kawy możesz użyć szczoteczki Używaj suchej i miękkiej szmatki do wycie rania panelu dotykowego urządzenia Panel dotykowy wykonany jest ze szkła nie uderzaj w niego jego pęknięcie grozi porażeniem prą dem elektrycznym Używaj suchej i miękkiej szmatki do wycierania powierzchni urządzenia Nigdy nie używaj twar dych lub ostrych przedmiotów do usuwania...

Page 17: ...ablokowany spieniacz do mleka Oczyść spieniacz do mleka Mleko pryska ze spieniacza Zespół spieniacza jest niewłaściwie złożony Złóż poprawnie zespół spieniacza Pomimo opróżnienia tacy ociekowej ekran wyświetlacza pokazuje komu nikat EMPTY TRAY OPRÓŻNIJ TACĘ Metalowe elementy na końcu tacy ociekowej są zabrudzone lub mokre Wytrzyj do sucha metalowe elementy Ekran wyświetlacza ciągle pokazuje komuni...

Page 18: ...pojemnik na kawę ziarnistą jest pusty wszel kie funkcje przygotowania napojów są automatycznie wyłączone Wsyp ziarna do pojemnika i naciśnij pokrętło główne aby uruchomić urządzenie UZUPEŁNIJ KAWĘ MIELONĄ Nie ma kawy w pojemniku na kawę mieloną Następnym razem przed przygotowaniem napoju z kawy mielonej wsyp do pojemnika całą łyżkę kawy WŁÓŻ TACĘ Taca ociekowa nie została właściwie włożona wszel k...

Page 19: ...nia urządze nia Po usunięciu całej wody z urządzenia wytrzyj urządzenie do sucha zarówno zewnątrz jak i wewnątrz Po zakończeniu programu całkowite usuwanie wody urządzenie kiedy zostanie ponownie uruchomione patrz Pierwsze uruchomienie powróci do stanu jak przed pierwszym uży ciem Podczas całkowitego usuwania wody z wylotu kawy wydostanie się para wodna pod ciśnie niem Bądź ostrożny gdyż istnieje ...

Page 20: ...nia gdyż znajdujące się w urządzeniu nie bezpieczne składniki mogą być zagrożeniem dla środowiska Nie wyrzucaj urządzenia wraz z odpadami komunalnymi Producent nie odpowiada za ewentualne szkody spowodowane zastosowaniem urządzenia niezgodnym z jego przeznaczeniem lub niewłaściwą jego obsługą Producent zastrzega sobie prawo modyfikacji wyrobu w każdej chwili bez wcześniejszego powiada miania w cel...

Page 21: ...oid a hazard The appliance may only be repaired by qualified service personnel Improper repairs can cause serious hazard to the user In case of defects please contact an authorised service centre Do not attempt to lubricate your appliance No additional maintenance work is required in addition to regular cleaning Do not dismantle the appliance or attempt to open the housing Always make sure that th...

Page 22: ...ang over edge of table or shelf nor touch hot surfaces Do not clean the coffee machine or accessories in a dish washer Only coffee beans can be introduced into the coffee bean container Placing other food products liquids or objects in the container may cause danger and damage the appliance Ground coffee can only be introduced into the ground coffee container Using other food products liquids or o...

Page 23: ...ontainer 2 Water tank lid 10 Coffee spout 3 Water tank 11 Handle 4 Coffee grounds container 12 Milk pipe 5 Drip tray 13 Milk frother 6 Drip tray grid 14 Hot water spout 7 Powder container cover 15 Milk and cream spout 8 Grinding wheel 16 Power cord 17 Cup heating plate Features and components ...

Page 24: ...01_v02 Control Panel 1 Espresso icon 2 Long coffee icon 3 Hot water icon 4 Power switch 5 Screen 6 Cappuccino icon 7 Coffee Latte icon 8 Hot milk cream icon 9 Cleaning button 10 Rotary button 1 6 5 10 7 8 9 2 3 4 ...

Page 25: ...EL Please adjust the grinding wheel when the grinder is running or the grinder will be damaged Please adjust the fineness of coffee bean powder according to the coffee beans If your coffee beans are in dark color it is recommended to set to the rough mode If your coffee beans are in light color it is recommended to set to the fine mode During making coffee if the coffee outflows very slowly or com...

Page 26: ...t strips are not included with the coffee machine you need to purchase them in a specialty store 2 Dip the test strip in water for 2 seconds 3 Remove the test strip shake off excess water and watch the colour soft hard very hard 0 25 50 120 250 425 Water hardness contrast card 2 sec 15 sec Then set the number representing the water hardness according to colour scale See Adjust water hardness for i...

Page 27: ...tion 2 The grinder will begin to grind At this time you can adjust the amount of coffee beans by rotating the rotary button Default amount of coffee beans for espresso Coffee beans in the container can get stuck Use a spoon included to gently stir the beans Be careful not to damage the grinder with the spoon 3 During making coffee you can adjust the volume of coffee by rotating the rotary button D...

Page 28: ...RING COFFEE WITH COFFEE POWDER Prohibit filling other mixtures such as instant coffee powder or cocoa powder in the powder container Otherwise it will damage the machine Do not fill the coffee powder into the coffee bean container otherwise it will damage the machine Do not rinse the powder container with water or it will result in operator s injury by electric shock Please use proper ground coffe...

Page 29: ...efault setting of the machine is normal mode After entering the program setting please turn the rotary button to ECO SETTING option then press the rotary button setting is finished AUTOMATIC SWITCH OFF The machine s default switch off time is 30 minutes which means the machine will automatically switch off after the last use on 30 minutes The setting range of automatic switch off is from 15 minute...

Page 30: ...otate the rotary to choose the language and press the rotary button setting is completed EXIT After entering the program setting please turn the rotary button to the EXIT option Then press the rotary button After completing setting the machine will return to READY Cleaning and maintenance Paying attention to daily maintenance of coffee machine not only ensure the taste of each cup of coffee but al...

Page 31: ...x container and insert to the hole of the drip tray grid according to the display Press rinse button to rinse milk unit 4 Milk unit is cleaning After cleaning finished the machine enters into READY status Please empty the drip tray after the cleaning program is completed DESCALING THE COFFEE MACHINE The daily usage will cause calcareous deposited in coffee machine The depositing rate varies with t...

Page 32: ...tton to start the descaling program it will take 25 minutes PREPARE TO DESCALE THE APPLIANCE 1 Take a bag of decalcifier and sufficiently dissolves it in clean water then put this mixed liquid to the water tank and reinstall the water tank to coffee machine 2 After adding decalcifier press cleaning button to start descaling and cleaning 3 Put a container of which the capacity is more than 1L under...

Page 33: ...make coffee Please empty the drip tray after the cleaning program is completed CLEANING COFFEE GROUNDS CONTAINER AND DRIP TRAY Do not use chemical solvents and erosive cleaner or alcohol to clean the coffee grounds container and drip tray The drip tray and coffee grounds container cannot be cleaned in dishwasher Do not use metal objects to clean dirt or coffee precipitate to avoid scraping the dri...

Page 34: ...nd never let it fall down If the water tank damaged please contact with customer sevice center CLEANING BEAN CONTAINER Please do not use water to wash the beans container it would cause the grinder damaged Please use a dry rag or a paper towel to clean the residuary grease in the bean container Because the bean container cover is made from food grade and environmental materials it might be friable...

Page 35: ...plug Never immerse the coffee machine in water There will be a risk of electric shock Regularly check the coffee machine whether there is excessive coffee powder precipitate inside the machine You can use a brush to remove the coffee precipitate Use a dry and soft rag to wipe the touch panel of the machine As the touch panel is made of glass please do not hit it to avoid the risk of electric shock...

Page 36: ...cannot make any milk foam The milk frother is blocked Cleaning the milk frother Milk sprays from the milk frother The milk frother was not assembled correctly Reassemble the milk frother Screen always indicates EMPTY TRAY The sheetmetals at the end of the drip tray are dirty or wet Wipe the sheetmetals to dry Screen always indicates INSTALL TRAY Coffee grounds in the bottom of the machine are not ...

Page 37: ...n to release There is not enough coffee powder in the powder container Next time when making coffee with coffee powder please put a full spoon of powder The drip tray is not installed correctly any function is out of service Install the drip tray correctly The water in the pipe inside the machine is not enough any function is out of service Press the rotary button to release to run the water reple...

Page 38: ...y program was executed the system will rerun to the program of first time use when the coffee machine is used again While emptying the waterway there will be a high temperature steam sprays from coffee spout Please pay special attention to avoid being scalded 1 The machine is on the status of READY 2 Take out the water tank and the machine indicates FILL WATER TANK 3 Long pressing the cleaning but...

Page 39: ... to particular disposal centre because of the dangerous elements of this appliance which can be hazardous for natural environment Do not dispose the appliance with the municipal waste Manufacturer does not accept any liability for any damages resulting from unintended use or improper handling Manufacturer reserves his rights to modify the product any time in order to adjust it to law regulations n...

Page 40: ...CM4822 001_v02 Notes ...
Reviews: