8
As the flange focal distance varies from camera type to camera type, it is necessary
to adjust the CP.2 lens to the camera used when changing the mount or camera
model (=shimming). In order to perform this adjustment, Carl Zeiss provides shims in
different thicknesses that are color coded.
When the mount has been unscrewed, these shims can be placed in a groove in the
lens barrel. Any possible combination of shims can be used to achieve the required
thickness and therefore the required flange focal distance. The lens already contains
shims when delivered.
ȴ Carl Zeiss recommends that the camera is set to the usual standard settings
(cf. works settings). You can obtain further details from the instruction manual
of the camera you use.
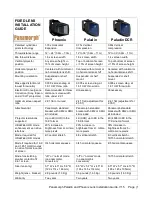
Procedure
In the following chapter we explain how to adjust your Compact Prime CP.2 to a
DSLR camera.
1. Fasten the Carl Zeiss test chart on a wall at the appropriate test distance
(see tables on page 12 – 16; the test distance is depending on the focal length)
and ensure that the illumination is bright and uniform.
2. Mount the camera and lens on a tripod and level the camera, making sure that
the centre of the image is aligned with the centre of the Siemens star.
D | Adjusting the lens
to your camera