background image

Cancer Institute


Microscopy Core Facility 


V1.0 

If you do not desire to collect a Z-stack ignore sections j) to o) 
 
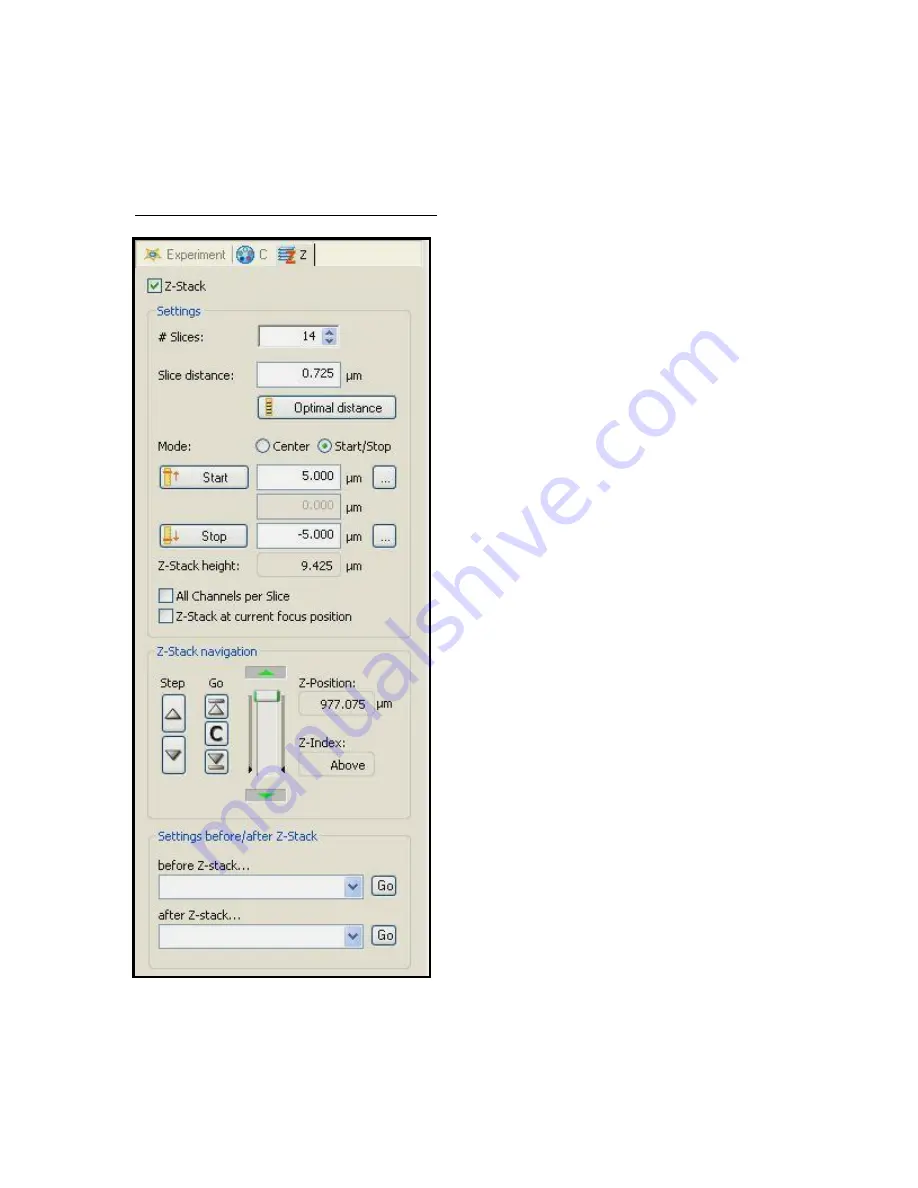
j) Open the Z tab – Fig 9 
 
Fig 9 – Multidimensional Acquisition Z tab 
 

k)  

if  you  desire  a  collection  of  images 
through the Z axis click on Z button at 
top  of  tab  –  as  shown  fig  10.  Select 
Start/Stop mode as shown. 

 
l)  

Using  ocular  viewer  focus  (slide 
viewing  slider  in)  to  the  top  of  your 
sample and click on start button – the 
computer now marks where imaging 
will begin 

 
m)  

Focus to beneath sample and click on 
stop 

 
n)


Select a slice distance so that z slices 
are  at  desired  distance  from  each 
other. 

 
o)


Return  Viewing  slider  to  the  original 
position (pulled out) 

 
p)


Click on Start – located at bottom of 
screen near left side. 


q)


Once the series of images (or image) 
is  collected  it  is  prudent  to  save 
immediately.  Saving  as  a  .zvi  file  is 
recommended as ALL data about how 
it was collected by the microscope is 
saved.  These  files  are  larger  but  you 
can return to the file and process to a 
much greater proportion to other file 
formats. It is possible once you have 
finished  creating  desired  images  to 
export as a smaller file type of choice. 


Summary of Contents for Axio Imager A1

Page 1: ...sic coverage of use of the Zeiss Axio Imager M1 for multi channelled fluorescent acquisition For more complex usages please contact Fig 1 Front View of Microscope Ocular Viewer Main Stage Mercury Lamp...

Page 2: ...mp control and Microscope power boxes located proximally to main microscope stage Turn on Microscope switch located behind 1st focusing wheel b Turn on computer and Activate AxioVision Program Fig 2 S...

Page 3: ...ieved by pressing stage dropping button and adding a tear sized drop on top of slide so cover slips are necessary and returning stage by pressing stage returning button Make sure at this point to pres...

Page 4: ...u only desire a single multichannel image you can leave out to portions about Z stack Remember to not select a Z stack section f Fig 4 Axiovision Tool Bar a Select Workarea tool bar if workarea is not...

Page 5: ...hannels that will be examined by microscope if chosen For example in the Experiment box shown in Fig 6 the name shown is dapi gfp rhod phase This file will make the microscope acquire images through a...

Page 6: ...1 is intended for phase contrast using an x10 objective which is not currently installed i It is now possible to select the optimal settings for each channel by clicking on each channel separately an...

Page 7: ...begin m Focus to beneath sample and click on stop n Select a slice distance so that z slices are at desired distance from each other o Return Viewing slider to the original position pulled out p Click...

Page 8: ...sample in every channel desired Fig 10 In this format the data is still raw and is best saved to be processed separately afterwards Fig 10 Z stack Window a You can turn each channel collected on and o...

Page 9: ...ocessing option The function of deconvolution is to clean up images to remove positional and chromatic aberrations There are a choice of 3 algorithms which each function in their own way Simply click...

Page 10: ...b select initial and final frame of view desired and enter into parameters section of workarea StartPos and EndPos Fig 12 c Select dimension of view default of ZY d Click Start to create new image Fig...

Page 11: ...ures is not automatically chosen to be the right magnification When you choose to annotate with a scale bar a scaling tab needs to be opened This allows you to set the scale of the image b Select scal...

Page 12: ...age and selecting properties It is in this window that the Attributes tab can be selected where properties of annotations can be changed This is particularly useful when annotation colour is not contr...

Reviews: