


Page 6
|
HDbridge 2500/2600-DT Configuration Guide
www.zeevee.com
HDbridge 2500/2600-DT Configuration Guide
|
Page 7
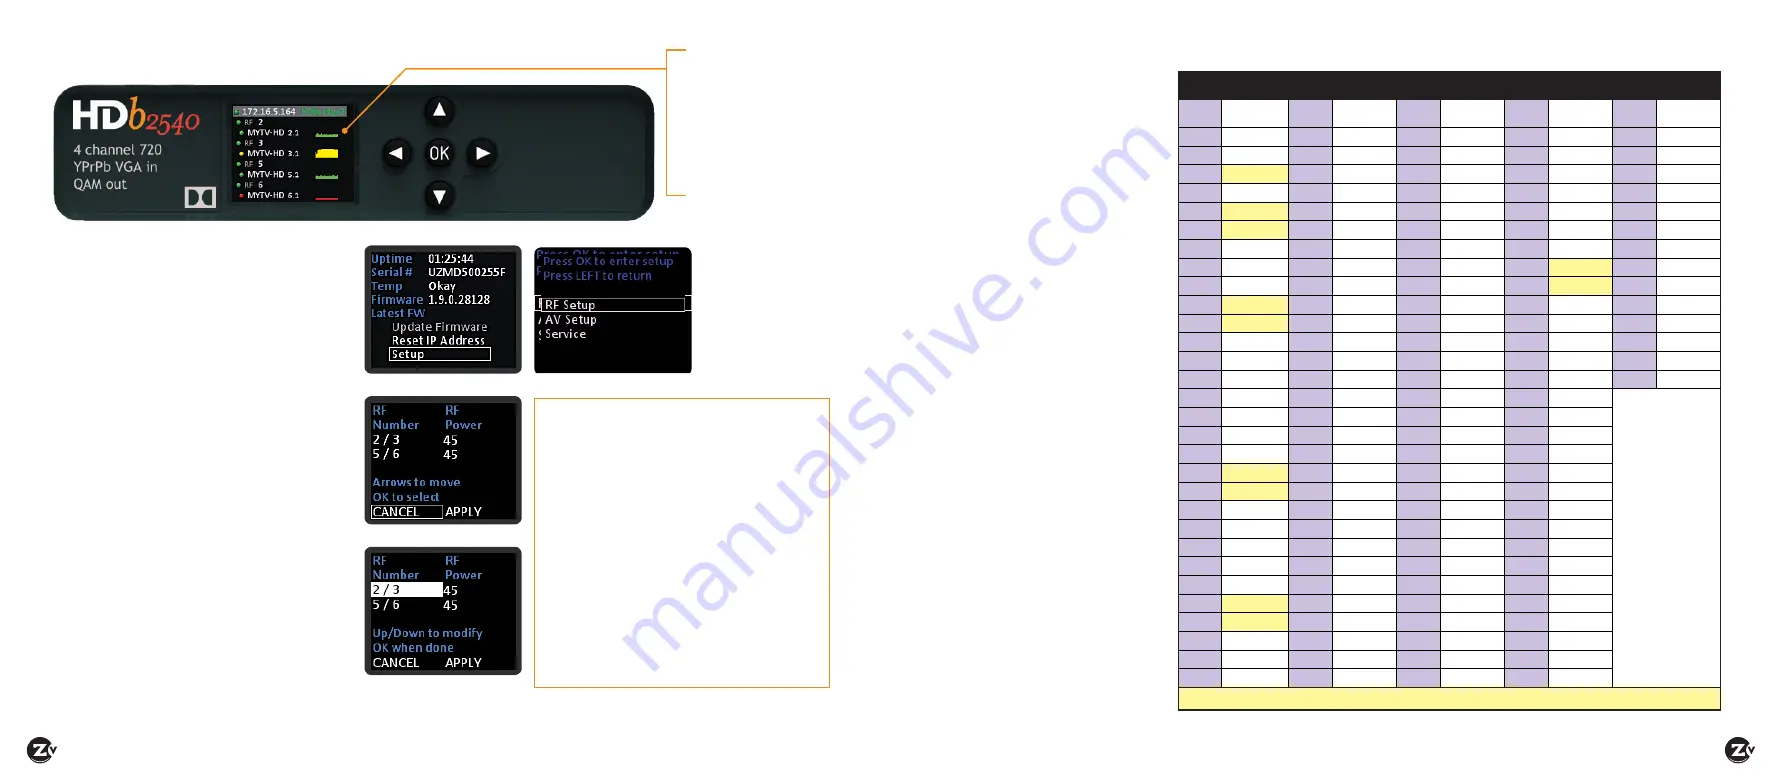
Front Panel Configuration
SETUP SCREEN
CONFIGURATION SCREEN
ACTIVE CONFIGURATION SCREEN
Cable TV Channels vs RF Frequency (MHz) Map
RF
Ch.
Band
(MHz)
RF
Ch.
Band
(MHz)
RF
Ch.
Band
(MHz)
RF
Ch.
Band
(MHz)
RF
Ch.
Band
(MHz)
2
54-60
27
240-246
57
420-426
87
600-606
122
780-786
3
60-66
28
246-252
58
426-432
88
606-612
123
786-792
4
66-72
29
252-258
59
432-438
89
612-618
124
792-798
5
76-82
30
258-264
60
438-444
90
618-624
125
798-804
6
82-88
31
264-270
61
444-450
91
624-630
126
804-810
95
90-96
32
270-276
62
450-456
92
630-636
127
810-816
96
96-102
33
276-282
63
456-462
93
636-642
128
816-822
97
102-108
34
282-288
64
462-468
94
642-648
129
822-828
98
108-114
35
288-294
65
468-474
100
648-654
130
828-834
99
114-120
36
294-300
66
474-480
101
654-660
131
834-840
14
120-126
37
300-306
67
480-486
102
660-666
132
840-846
15
126-132
38
306-312
68
486-492
103
666-672
133
846-852
16
132-138
39
312-318
69
492-498
104
672-678
134
852-858
17
138-144
40
318-324
70
498-504
105
678-684
135
858-864
18
144-150
41
324-330
71
504-510
106
684-690
HRC Frequencies =
Standard
Frequencies
minus 1.25 MHz
Except for:
Channel 5,
Video = 78.0 MHz
Channel 6,
Video = 84.0 MHz
IRC Frequencies =
Same as Standard
Frequencies
Except for:
Channel 5, Video =
79.25 MHz
Channel 6, Video =
85.25 MHz
19
150-156
42
330-336
72
510-516
107
690-696
20
156-162
43
336-342
73
516-522
108
696-702
21
162-168
44
342-348
74
522-528
109
702-708
22
168-174
45
348-354
75
528-534
110
708-714
7
174-180
46
354-360
76
534-540
111
714-720
8
180-186
47
360-366
77
540-546
112
720-726
9
186-192
48
366-372
78
546-552
113
726-732
10
192-198
49
372-378
79
552-558
114
732-738
11
198-204
50
378-384
80
558-564
115
738-744
12
204-210
51
384-390
81
564-570
116
744-750
13
210-216
52
390-396
82
570-576
117
750-756
23
216-222
53
396-402
83
576-582
118
756-762
24
222-228
54
402-408
84
582-588
119
762-768
25
228-234
55
408-414
85
588-594
120
768-774
26
234-240
56
414-420
86
594-600
121
774-780
The highlighted areas in the frequency map show the RF numbers that can be paired together but are not numerically sequential.
Map for configuring RF
numbers and virtual
channels
The Cable TV Channels vs RF
Frequency (MHz) Map shows how
the RF channels are paired and
matched with RF frequency.
You will need to refer to this map
when configuring RF numbers and
virtual channels.
IMPORTANT NOTES
•
RF numbers are applied
in pairs based on the
frequency map. For
instance, if you enter
RF # “2,” then RF #“3”
automatically populates.
• RF numbers “4” and
“5” cannot be paired
together because of a
gap in the frequencies
(MHz).
• The RF numbers are
not always paired in
numerical sequence (as
with RF # 6, which pairs
with 95, and RF # 99
which pairs with 14 and
so on).
• ZV channels can be
set directly adjacent to
any other well-formed
channel and will not
cause interference.
No channel spacing is
required.
Shows audio/video being
encoded
Green — Both audio and
video are detected
Yellow — Video, but no
audio detected
Red — No video detected
You can set the RF broadcast channels using the
front panel controls. In many cases, your ZeeVee
modulator will require only these configurations.
Setting the RF broadcast channels
or power
1.
Unlock the panel by pressing/holding together
the left and right arrow buttons (
) until
“Setup” lights up.
2.
Press “OK” to enter the Configuration screen.
3.
Press “OK” to select “RF Setup”.
4.
Use the arrow buttons (
) to go to
each item you want to configure (such as RF
Number or RF Power), then press “OK” to edit
the highlighted field. Use the up and down
(
) arrow buttons to scroll through the
options for that field.
5.
Once you’ve made changes, press “OK” to
accept. You can then select the next item for
configuration.
6.
When finished making changes, use the
arrow buttons to scroll down and select
“Apply,” then click “OK” to save your changes.
Note: The front panel locks automatically after
a few seconds. To make more changes, press/
hold the left and right arrow buttons again to
unlock front panel capabilities.
To update firmware:
• If unit is connected to the internet and can
communicate with our servers, select Update
Firmware from the Setup screen and press “OK”.
To reset IP address:
• When using DCHP, select Reset IP Address to
force a release/renew of your IP address, and
press “OK”.
To restore factory defaults or
revert firmware:
1.
Power down the unit.
2.
Hold the left and right arrows down and
reapply power. You will be prompted with
options: PRESS
• UP to reset config
• DOWN to revert FW
• OK to boot normally
RF SETUP


