background image


  2D Image On-Counter Scanner 

10 

U

SER

M

ANUAL


USB Virtual COM Installation 

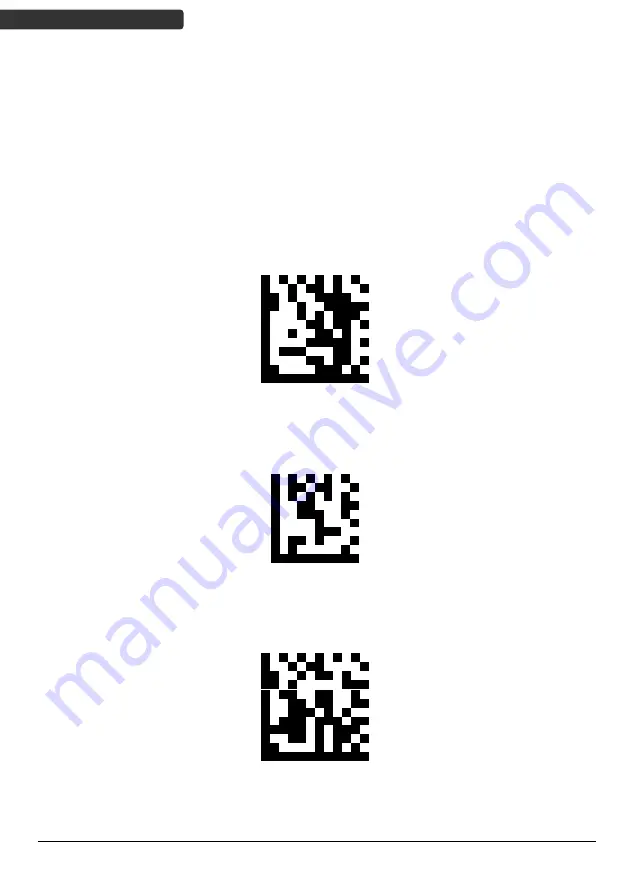
If you use virtual COM port emulation, follow the steps below to start using the scanner. 

1.


Execute the driver (VCOM-Driver-Installation.exe). 

2.


Connect the scanner USB cable to the host computer. 

3.


Set the interface to USB Virtual COM Port. 


Set 


Enable USB virtual COM 


End 


Summary of Contents for Z-8082 Lite

Page 1: ...2D Image On Counter Scanner ...

Page 2: ......

Page 3: ...ner i USER S MANUAL This User s Manual is intended for 2D Image On Counter Scanner Z 8082 Lite Revision History Changes to the original manual are listed below Version Date Description of Version 1 0 0 2019 1 2 Initial Release ...

Page 4: ...formation only and is subject to change without notice All trademarks mentioned herein registered or otherwise are the properties of their various respective owners Copyright 2018 All rights reserved Guidance for Printing This manual is in A5 size Please double check your printer setting before printing it out Adjustments Do not attempt any adjustments or alteration of this product Do not remove t...

Page 5: ... Beeper Indication 4 LED Indication 4 Installation 5 Scan Test 7 Setting Up the Scanner 8 Programming the Scanner 8 Standby Mode of Scanner 9 USB Virtual COM Installation 10 Dimensions 12 Scan Angle 12 Mounting Screw Holes 13 Interface Cable Pin Out 14 Specification 15 Cleaning the Scan Window 16 Trouble Shooting 16 ...

Page 6: ......

Page 7: ... scan zone The instant decoding performance provides efficiency for your 1D and 2D consumer applications Z 8082 Lite is designed to address today s business needs allowing users to capture data accurately and effectively with minimum complexity High speed and reliable performance on all common 1D and 2D codes Offer convenience by its full directional motion tolerance function and wide scan zone VE...

Page 8: ...nds on customer selection or 5V Power Adapter Only for RS 232 cable as optional accessory Plug type depends on electrical requirements of your geographic location Screw Pack Quick Guide 1 Please leave this user s manual within easy access for persons using the scanner 2 If any contents are damaged or missing please contact your dealer immediately ...

Page 9: ... 2 LED Indicator Reading status indication 3 Tone Button Push to switch beep tone 4 Scan Window Read barcodes 5 Speaker Exit For beep tone indication 6 Table Mount For securing the scanner on the table 7 Host Port Plug the interface cable into this port Do not let the scan LED light face directly to human eyes 1 3 4 5 2 6 7 ...

Page 10: ... has been successfully decoded 2 short beeps The scanner has entered program mode 1 long beep A setting has been programmed 3 beeps in a series from low to high pitch The scanner has exited program mode 3 short beeps Error setting the scanner LED Indication LED Indication 1 red flash A barcode has been successfully decoded Steady blue Scanner in work mode ...

Page 11: ... MANUAL Installation 1 Separate Table Mount from the scanner 2 Attach the Interface Cable by inserting it through the hole on table mount as illustrated 3 Secure the table mount to counter by using three M3 self tapping screws and washers ...

Page 12: ...er and table mount with two M3 mechine screws 6 Connect the cable to the terminal s communication port Plug the power supply into the power jack on the interface cable if host can not provide sufficient power Use only an AC DC power adapter approved for the scanner Use of other power supplies may cause damage to the scanner and void the factory warranty ...

Page 13: ... necessary 3 If the POS screen does not show the expected scans please refer to the Programming Guide 1 If the scanner is connected to a USB for this test it should read one barcode beep and then remain a red LED indicating light This is normal when the USB is not connected to a live host terminal 2 If the scanner does not produce any beeps or produces the wrong beeps or the LED does not light up ...

Page 14: ...eters may be set at any time without affecting the other parameters Programming the Scanner 1 When the scanner is powered on blue LED lights find the Set barcode in the Quick Start Guide or Programming Guide and present this barcode to the scanner When the scanner gives two beeps it means the scanner is in programming mode 2 Decide which parameters are required and find their barcodes in the Quick...

Page 15: ...inue scan mode is programmable To wake up the scanner present an object close to the scan window Standby Time Programming Parameters Set Off Default 5 Seconds 10 Seconds 20 Seconds 30 Seconds 60 Seconds End The scanner includes a sensor that detects activity in front of the scan window The detecting distance is about 5 cm 1 9 inch from the scan window while in condition with effectiveness of envir...

Page 16: ...ation If you use virtual COM port emulation follow the steps below to start using the scanner 1 Execute the driver VCOM Driver Installation exe 2 Connect the scanner USB cable to the host computer 3 Set the interface to USB Virtual COM Port Set Enable USB virtual COM End ...

Page 17: ...anner 11 USER S MANUAL On the computer check Device Manager to see if the computer successfully detects the scanner as Barcode Scanner USB COM device The COM port number would vary depending on different hardware environment ...

Page 18: ...2D Image On Counter Scanner 12 2 USER S MANUAL Dimensions Unit mm Scan Angle ...

Page 19: ...e On Counter Scanner 13 USER S MANUAL Mounting Screw Holes The device is reserved with several mounting holes for permanent fixture if required Please refer to the figure below for detailed information Unit mm ...

Page 20: ...NUAL Interface Cable Pin Out RS 232C Cable DTE pin out Power adapter required if host can not provide sufficient power PIN OUT CONFIGURATION DB 9 F FUNCTION 2 TX 3 RX 5 GND 7 CTS 8 RTS USB Cable USB Type A Connector Function 1 VCC 2 D 3 D 4 VSS ...

Page 21: ...Contrast UPC EAN 100 30 UPC EAN 100 Indicators Blue Power Red Good Read Physical Dimensions 151 8 H x 152 2 W x 85 D mm Weight 470 g Cable 2 0 Meters Communication Interface USB HID USB VCOM RS 232 Power Input Voltage 5VDC 10 Power Consumption Operating 200 mA Average Standby Mode 150 mA Average Regulatory ESD Contact 8 kV Air 15 kV EMC CE FCC DOC Compliant VCCI BSMI LED Safety IEC62471 Environmen...

Page 22: ...e Shooting This section contains information about how to solve problems that you may encounter when operating the scanner However before referring to the tips make sure that the scanner is installed as instructed in this manual and that all cables are properly connected If the problem remains please contact your dealer Problem Diagnostic Tips The scanner is on but cannot read barcodes The scanner...

Reviews: