background image

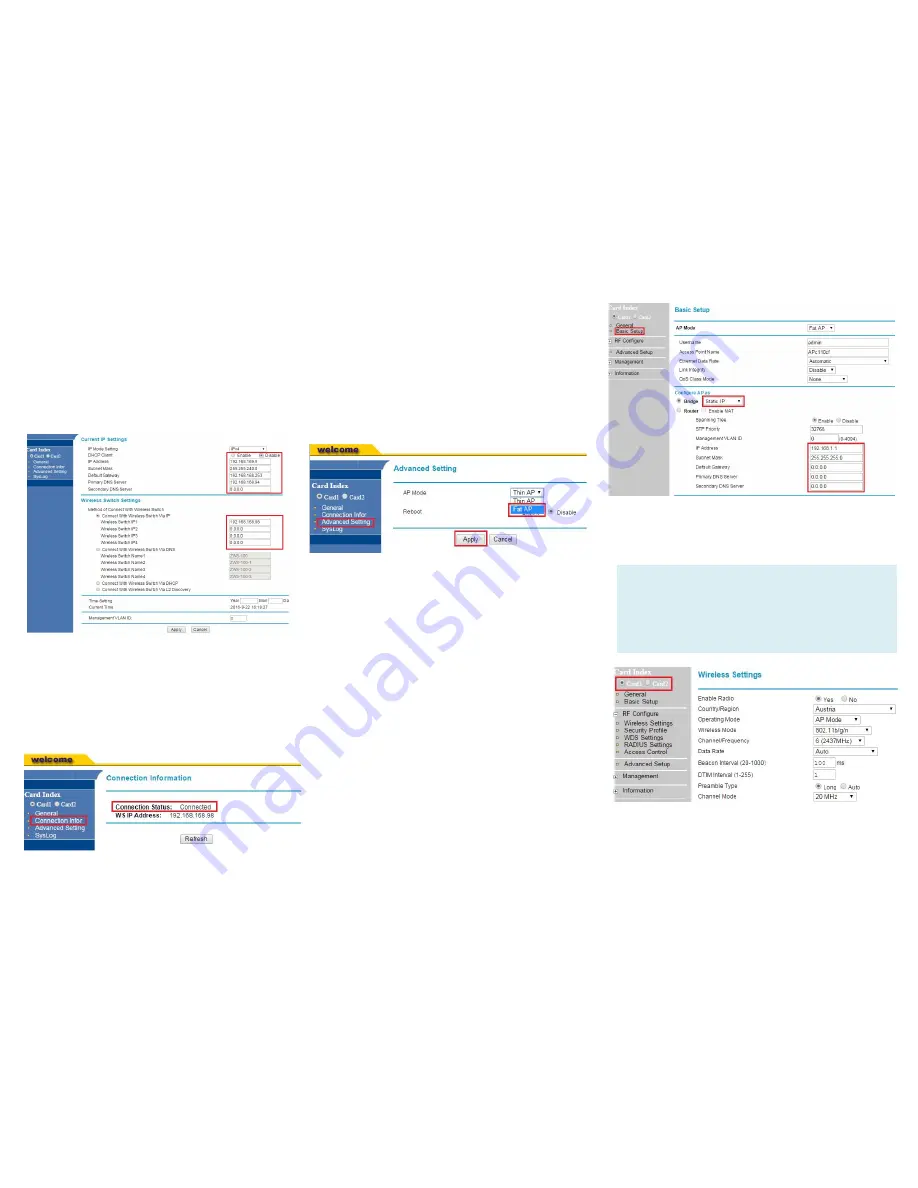
1. Once login, first assign a fixed IP address 

or a DHCP IP to the AP under 

Current IP 

Setting

.  Under 

Wireless Switch Setting

select Connect With 

Wireless Switch Via 

IP 

and input the IP address of the AP 

access controller.  Click Apply to take 
effect.

2. On the main menu on the left, go to 

Connection Info 

to check the 

connection status with the AP controller.  
If the tunnel has been made successfully, 
the connection status will show: 
Connected.

Configuring for Standalone Operation

Before configuring fat AP Basic settings, make 
sure that AP mode is set to 

Fat AP. 

1. If currently in Thin AP Mode: On the main 

menu on the left, click 

Advanced Setting

Select 

Fat AP 

from the drop-down list.  Click 

Apply to take effect.

2. On the main menu on the left, click 

Basic 

Setup

. In the 

Basic Setup 

page, go to the 

section Configure AP as.  If you want to 
assign a fixed IP address, select 

Static IP

Enter the parameters in the following fields: 
IP Address, Subnet Mask, Default Gateway, 
Primary DNS Server, and Secondary DNS 
Server. If you want the wireless AP to obtain 
the address from the DHCP Server 
automatically, select 

DHCP Client

.  Click 

Apply.

3. Go to 

RF Configure 

> Wireless Settings.  (For 

dual band 5G setting, select Card 2 first then 
go to 

RF Configure 

Wireless Settings

.)

Note:

For dual band APs, the two radios (2.4GHz and 
5GHz) need to be configured separately on the 
Web interface.  The rest of the configuration 
procedures are the same as for 2.4G and 5G radio.

These are the essential wireless settings that will 
enable wireless devices on the network to 
associate with the Access Point.

Summary of Contents for ZN-7100-DE500-G V2

Page 1: ...ERVIEW Front View No LED State Description 1 PWR Off No power to AP Green On AP power on device ready 2 WLAN Off 2 4G radio disabled Blinking Green 2 4G radio enabled or data being forwarded 3 LAN Off Ethernet port not connected Green On Ethernet port connected Blinking Green Ethernet link activity LED Indicators on the Device ZN 7100 DE500 G V2 Wireless Access Point 1 Mounting screws and bracket ...

Page 2: ...hen click Properties 6 Select Use the following IP address option if it is not already selected and then make the following entries IP address Any address in the 192 168 1 x network Subnet mask 255 255 255 0 7 Click OK to save your changes and exit the dialog box STEP 3 LOG INTO THE AP 1 On your PC open a Web browser window 2 In the browser type https 192 168 1 1 and press Enter to connect to the ...

Page 3: ... Click Apply to take effect 2 On the main menu on the left click Basic Setup In the Basic Setup page go to the section Configure AP as If you want to assign a fixed IP address select Static IP Enter the parameters in the following fields IP Address Subnet Mask Default Gateway Primary DNS Server and Secondary DNS Server If you want the wireless AP to obtain the address from the DHCP Server automati...

Page 4: ...d 2 If you can connect open a browser and link to any public website STEP 5 INSTALL THE AP 1 Disconnect the AP s power adapter from the power outlet or disconnect the PoE cable 2 Move the AP to its permanent location accessible to both power source and network connections Note Make sure that sufficient survey has been made to determine the best placement for maximum range coverage and network perf...

Page 5: ...jector to an AC power source 3 Perform a spot check to verify if the PWR and LAN LED are lit to make sure the AP is operating normally STEP 8 VERIFY THE CONNECTION 1 Use any wireless enabled computer or mobile device to search for and select the wireless network you ve previously configured 2 If you can connect open a browser and link to any public Web site If you are using AP Controller to manage...

Reviews: