background image


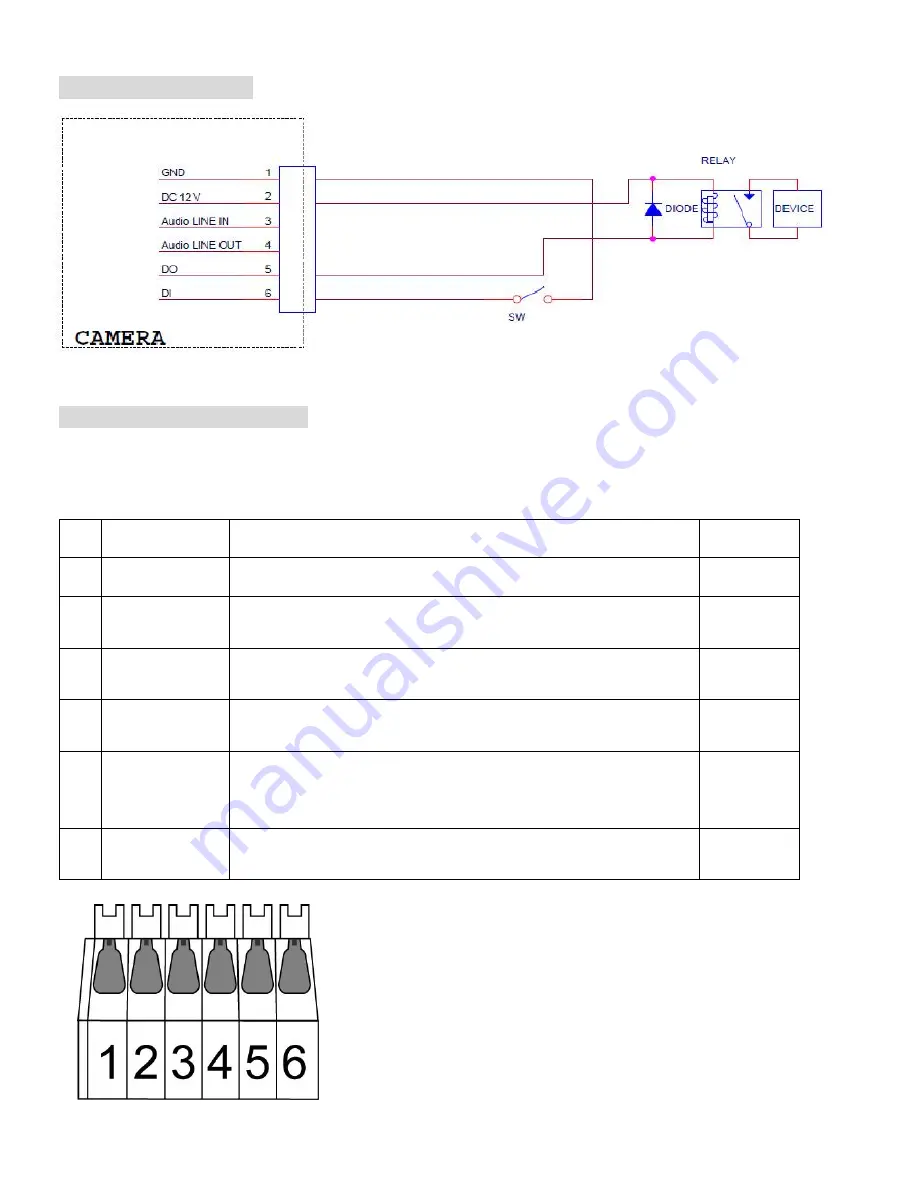
I/O Terminal Block Circuit 


I/O Terminal Block Pin Definition 

This Camera provides an external I/O terminal block which is used to connect input/ output devices. 

The pin definitions are described below. 

PIN 

Definition 

Description 

Max. V/A 

Ground 


+ 12V DC 


12V DC 

1.2W 

Audio Input 

Connect  the  wires  of  the  audio  input  device  to 

GND 

(Pin  1)  and 

AUDIO.IN 

(Pin 3). 

Audio Output 

Connect the wires of the audio output device to 

GND 

(Pin 1) and 

AUDIO.OUT 

(Pin 4).   

Digital Output 1 

Uses an NPN transistor with the emitter connected to the GND 

pin. If used with an external relay, a diode must be connected in 

parallel with the load for protection against voltage transients. 

100 mA 

24V 

Digital Input 1 

Connected to GND to activate, or leave floating (or unconnected) 
to deactivate. 

30V DC 


Summary of Contents for P6210

Page 1: ...1 86085A1000000 P6210 PN 86085A1000010...

Page 2: ......

Page 3: ...g See P 10 Change the Web Interface into your preferred language See P 10 Application of IP Camera See P 11 For more information please check the User Manual available in the Software CD or you can do...

Page 4: ...to plug in cables through the side of top cover and through a hole on the ceiling or wall Routing hole Lens MicroSD SDHC Reset Power LED Indicator Network LED Indicator External I O connector DC 12V...

Page 5: ...ct the wires of the audio input device to GND Pin 1 and AUDIO IN Pin 3 4 Audio Output Connect the wires of the audio output device to GND Pin 1 and AUDIO OUT Pin 4 5 Digital Output 1 Uses an NPN trans...

Page 6: ...wer Mode PoE Mode Power Requirement PoE IEEE802 3af with Class 3 Power Consumption 5 38W Adaptor Mode Power Requirement 12V 1A Adaptor Power Consumption 5 43W Install the hardware and connect all cabl...

Page 7: ...1 Connect the power adaptor to the IP Camera 2 Connect the IP Camera to a normal Hub Switch Router c2 Power over Ethernet PoE 1 Connect the IP Camera to a PoE enabled Hub Switch Router Note If using a...

Page 8: ...your desired pan position 2 Turn the lens module up and down to your desire tile position e Completion 1 Clean the dome bubble to remove the dust and finger print 2 Fix the tamper proof screws using s...

Page 9: ...two settings before using Intelligent IP Installer 2 Select Intelligent IP Installer and follow the installation process to complete the installation a Browser s Internet Properties Security Default L...

Page 10: ...he IP Camera for the first time a yellow information bar appears below the address bar This website wants to install the following add on AxvideoView cab from Zavio Inc 5 Click the information bar and...

Page 11: ...rowser 1 Select Safari icon 2 Click Bonjour function and select the camera you wish to access 3 Enter name and password to login to the IP camera Default is admin admin 4 The monitor image will be dis...

Page 12: ...g Image Setting select the environment setting you wish Change the Web Interface into your preferred language Use the settings screen to set the language of the Web Interface Go to System Maintenance...

Page 13: ...11 Application of IP Camera...

Page 14: ...12 Memo...

Page 15: ...13 Memo...

Page 16: ...14...

Reviews: