background image


Change the Web Interface into your preferred language 

Use the settings screen to set the language of the Web Interface. 

Go to “Setting > System > Maintenance ”. 

1. Insert Software CD into your CD-ROM. 

2. Browse and select the preferred language from language pack in the Software CD and then click OK. 

3. The web interface will change into your preferred language. 
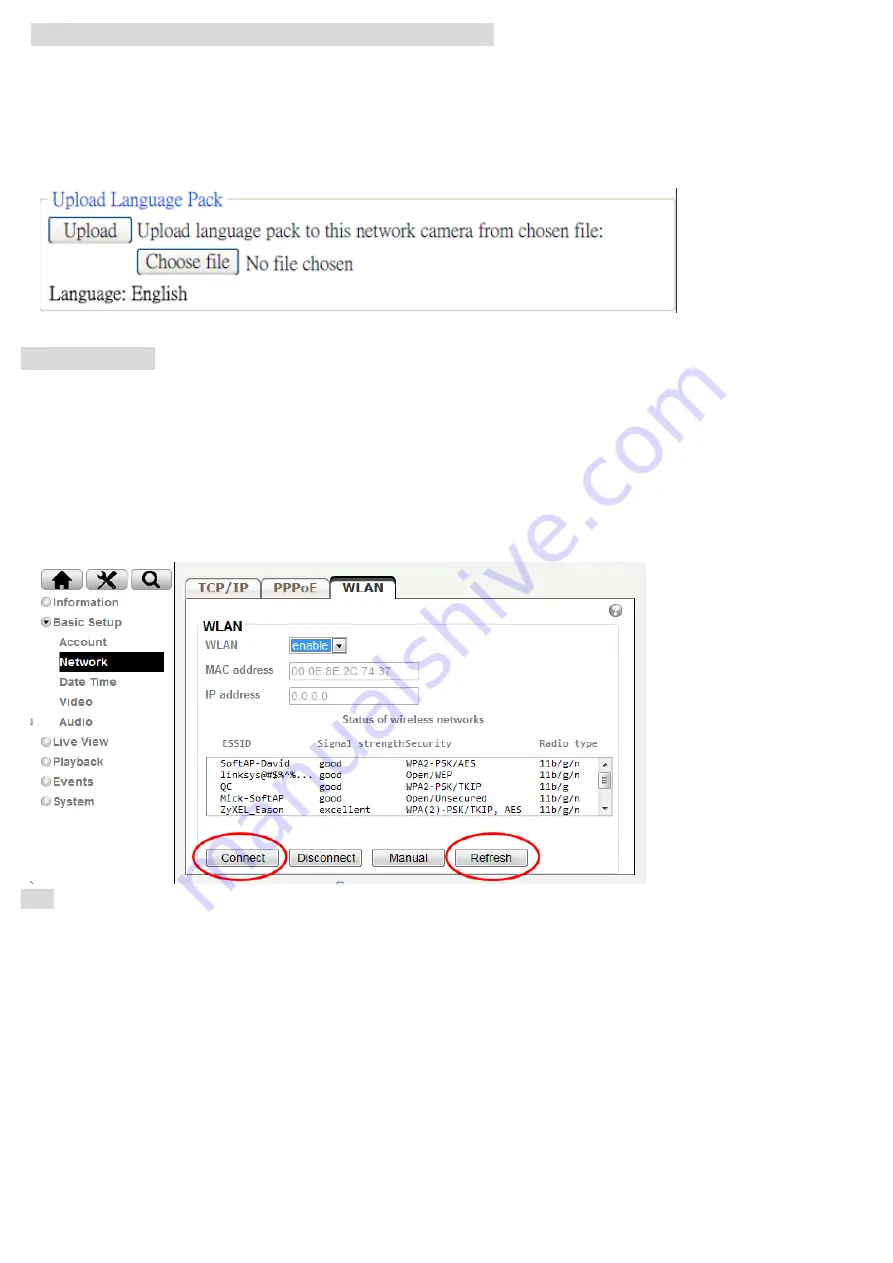


Wireless Setting


Power the IP Camera and connect an Ethernet network cable to the IP Camera’s LAN port, then insert the USB 

Wi-Fi dongle at the rear. Using Intelligent IP Installer and entering the camera’s setting page.   

Please go to “Setting > Basic Setup > Network > WLAN”, set the wireless option to “Enable” 

1. Click Refresh and choose the AP you wish to connect and click Connect. 

2. Enter the password within the 

Active transmit key

 field if required. 

3. Choose the option of Obtain an IP address automatically (DHCP) and Obtain DNS server address automatically. 

4. Click “Save” to apply settings. The 

Wireless IP address

 appears in the 

IP address

 field. 


Note: The wireless private IP address can be found in Intelligent IP Installer 


Summary of Contents for D5113

Page 1: ...0 D5113 86085F6000010 ...

Page 2: ...P 6 Mac OS using Safari Browser P 8 Change light environment setting P 8 Change the Web Interface into your preferred language P 9 Wireless Setting P 9 Application of IP Camera P 10 For more information please check the User Manual available in the Software CD or you can download the latest software from http www zavio com Package Contents Camera D5113 IP Camera Quick Installation Guide Brief prod...

Page 3: ...2 LED Indicator Definition DI DO Diagram ...

Page 4: ...ction 1 Connect the power adaptor to the IP Camera 2 Using a standard RJ 45 network cable connect the IP Camera to a normal Hub Switch Router c2 Power over Ethernet PoE 1 Using a standard RJ 45 network cable connect the IP Camera to a PoE enabled Hub Switch Router ...

Page 5: ...4 ...

Page 6: ...5 ...

Page 7: ...k two settings before using Intelligent IP Installer Select Intelligent IP Installer and follow the installation process to complete the installation b Browser s Internet Properties Privacy Uncheck Pop up Blocker a Browser s Internet Properties Security Default Level 2 Click the Intelligent IP Installer Icon on your desktop The main page will show up listing all active camera and video server devi...

Page 8: ...the IP Camera for the first time a yellow information bar appears below the address bar This website wants to install the following add on AxvideoView cab from Zavio Inc 5 Click the information bar and select Install ActiveX control 6 Click Install 7 Live video displays in the centre of your web browser ...

Page 9: ...pon the lighting environment of your country Go to Setting Live View Camera Setting Image Setting select the environment setting you wish 1 Select Safari icon 2 Click Bonjour function and select the camera you wish to access 3 Enter name and password to login to the IP camera Default is admin admin 4 The monitor image will be displayed in your browser ...

Page 10: ...he IP Camera s LAN port then insert the USB Wi Fi dongle at the rear Using Intelligent IP Installer and entering the camera s setting page Please go to Setting Basic Setup Network WLAN set the wireless option to Enable 1 Click Refresh and choose the AP you wish to connect and click Connect 2 Enter the password within the Active transmit key field if required 3 Choose the option of Obtain an IP add...

Page 11: ...10 Application of IP Camera ...

Page 12: ...11 Memo ...

Page 13: ...12 Memo ...

Reviews: