background image


25 

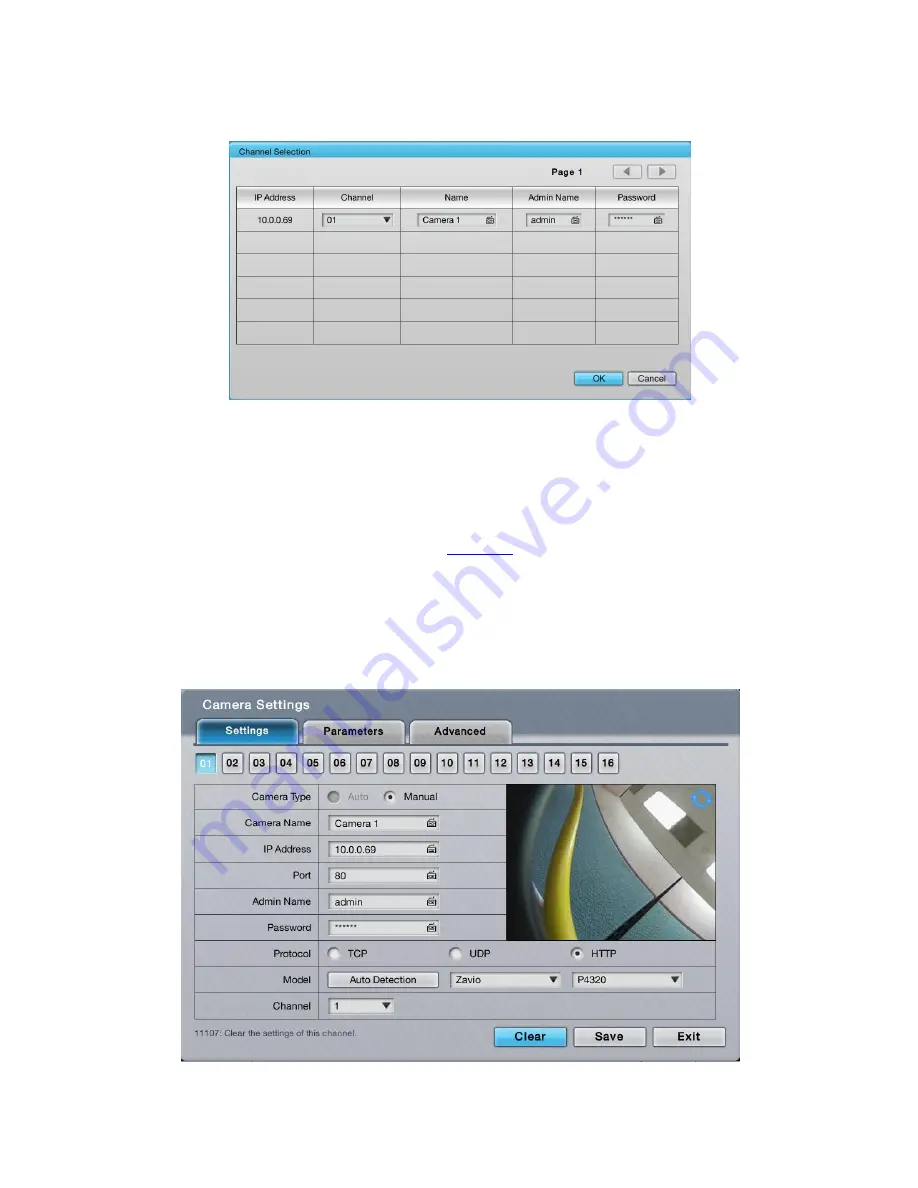
A window will pop up to fill in the camera’s information.   


6.1.1.2


Delete Camera 


To delete an existing camera, follow the below steps: 
Access

 Camera 

menu as described in 

Camera

.   

Open 

Camera Settings 

submenu. 

Select 

Settings 

icon on the upper left corner of the 

Camera list

.   

Choose the camera channel you wish to delete and click 

Clear

Remember to click 

Save

 to apply the change. 


Summary of Contents for 8HDD Series

Page 1: ...ZAVIO Network Video Recorder User Manual Local 8HDD Series...

Page 2: ...14 5 1 2 Status Bar 16 5 2 Playback 18 5 2 1 Video Area 18 5 2 2 Status Bar 20 6 Settings 22 6 1 Camera 23 6 1 1 Camera Settings 23 6 1 2 Batch Maintenance 30 6 1 3 Camera Status 32 6 2 Recording Eve...

Page 3: ...t 67 6 6 2 License Management 71 6 6 3 Log System 75 6 6 4 Save Load Configuration 78 6 7 System 82 6 7 1 Information 83 6 7 2 System Settings 83 6 7 3 System Upgrade 89 6 7 4 Install Wizard 90 6 8 Di...

Page 4: ...ns one click setup and mobile APP One click setup reduces the time of camera configuration by searching and automatically adding cameras in the local network Mobile app facilitates the process of esta...

Page 5: ...c to default admin account Press for 14sec to default system 3 Power LED Status Orange On Unlit Off 4 Ethernet LED Status Blue Connected Unlit Disconnected 5 USB 2 0 6 USB 2 0 Rear View No Description...

Page 6: ...erminal Block 3 81mm 2 Mouse 1 Red SATA cable 8 Rack mount kit 2 Disk screws 32 Rack mount screws 6 Power cord 1 Quick start guide 1 3 2 Install 3 5 HDD Unscrew the housing on the back side Pull the c...

Page 7: ...racket to the cabinet Note The connectors should face the main board Screw the HDD bracket to the cabinet Connect the other red SATA cable terminal and the power cable to each connector Plug Red SATA...

Page 8: ...resolutions are 1920x1080 1280x1024 1280x720 and 1024x768 Please confirm that one of the resolutions is supported by your monitor 3 5 Power on Connect the power cord directly to the back of the unit...

Page 9: ...time the user must select a language The system will restart again to apply the selected language Language can be changed later in Main Menu System System Settings General After restarting the system...

Page 10: ...nal DHCP server settings network settings and RAID level settings All settings featured by Install Wizard are accessible on system s Main Menu 1 Setup administrator password To keep default password c...

Page 11: ...9 3 If you select Smart enable please set at least one LAN as a static IP 4 Define the IP range for built in DHCP server The system will assign IP addresses to the devices based on the range defined...

Page 12: ...icense you may activate them now or click Next to proceed You may activate license later on the License Management menu 6 Click Setup to search and automatically add the cameras within the same subnet...

Page 13: ...function is enabled the time change will activate automatically every year based on the recurrence set 8 Select the RAID type If a volume has been created the information will be shown on the table as...

Page 14: ...are correct click the Finish button to exit the settings procedure and activate the system Once the preliminary setup is through the system automatically restart requiring user to log in again The def...

Page 15: ...deos 5 1 Live View After users log in the Live View window will show on screen Live View is the screen where live videos are displayed Most of the Live View screen is occupied by a video area with a S...

Page 16: ...the Live View screen to override current decoding streaming Two way audio can be enabled on the Live View screen If a camera is not configured correctly the Video Area of the Live View will show a bla...

Page 17: ...eams However you can only receive sounds from camera through the 1st stream Disconnection Disconnected camera Connecting Connecting camera No MxPEG MxPEG codec is only supported on remote browser appl...

Page 18: ...rch page to search for recorded videos by date time Menu List Opens a mini toolbar that covers the following buttons Button Description Opens the Main Menu of the operating system Opens the I O Panel...

Page 19: ...mergency Record Enables Always record Always record means continuous recording See also Mode tab for details about the recording modes See also Camera Status for details about the recording status Aud...

Page 20: ...pied by a video area with a Status Bar spreading along the bottom of the screen 5 2 1 Video Area The screenshot below shows the Playback s Video Area when recorded videos are being played Video Area o...

Page 21: ...ers 2M The actual performance depends on the type of cameras MPEG4 Up to 2M 1920x1080 per channel MJPEG Up to 4M 2560x1600 per channel but with limited fps support Before firmware version 1 2 H 264 Up...

Page 22: ...it this key once to bring the playback to the previous frame Step Forward Hit this key once to jump the playback to the next frame Previous Interval Hit this key once to bring the playback to the prev...

Page 23: ...ideos for Playback Backup To retrieve videos for playback or backup click on the icon to open a time table Select the start time and click on the icon to show videos available in the following 48 hour...

Page 24: ...le and sets the events See Recording Event for the settings Device Manages camera input output See Device for the settings Storage Manages the system s storage and data backup See Storage for the sett...

Page 25: ...res the submenus Camera Settings Batch Maintenance and Camera Status 6 1 1 Camera Settings Camera Settings enables user to manually add and delete cameras in the same subnet and change its settings To...

Page 26: ...anually add cameras follow the below steps Access Camera menu as described in Camera Click Camera Settings button Select Search icon on the upper left corner of the Camera list Choose the cameras you...

Page 27: ...lete an existing camera follow the below steps Access Camera menu as described in Camera Open Camera Settings submenu Select Settings icon on the upper left corner of the Camera list Choose the camera...

Page 28: ...Address Insert camera s IP address Port Insert port number 80 Administrator Insert camera s username and password Password Protocol Set the protocol for the camera This setting is only available after...

Page 29: ...ormats that the camera supports Options available areH 264 MPEG4 MJPEG and MxPEG However option availability depends on camera s brand and model Currently MxPEG decoding isn t supported on local displ...

Page 30: ...motion detection please access it directly via camera s application or webpage Set up motion detection area Select channel to apply motion detection then use left click of the mouse to drag and select...

Page 31: ...f motion is detected Event triggered will show on screen Click Save to apply the new settings then click Simulation to test the function 6 1 1 4 IPC Motion The IPC Motion allows user to set up motion...

Page 32: ...hat the alarm will only be triggered when the movement exceeds certain reaction 6 1 2 Batch Maintenance Batch Maintenance enables several functions that include Naming Camera firmware upgrade Language...

Page 33: ...t by using the virtual keyboard In Maintenance tab system enables user to upgrade camera firmware upload language pack and reboot and reset camera to default setting To enable the maintenance features...

Page 34: ...status It also allows users to have an overview of the camera status and total bit rate To access the Camera Status submenu Open Camera menu as described in Camera Click Camera Status button The Camer...

Page 35: ...ng recording Always recording stopped Always recording 2nd stream Always recording 1st stream Always recording Dual record Schedule recording recording Schedule recoding stopped Emergency recording re...

Page 36: ...ps users configure video recording and events to alarm To access the Recording Event menu Open the Main Menu as described in Settings Click Recording Event button Recording Event features Recording Se...

Page 37: ...rding mode To access the Mode tab Access Recording Event menu Open Recording Settings and select Mode tab On the Mode tab the featured settings are Group Box Setting Description Default Recording Mode...

Page 38: ...p Video Keep video days Set how long to keep recorded videos Max 365 days Deselected The actual days of video kept depends on the available disk space 6 2 1 2 Schedule tab The Schedule tab sets the sc...

Page 39: ...sable a time slot from recording In week mode apply the schedule of the selected week day to another day or channel In day mode apply the current day schedule to other channel s 6 2 1 3 Motion tab Mot...

Page 40: ...ecord Set the time to start recording before the digital input is triggered 15 sec Post Record Sets the time to keep recording after the digital input stops 15 sec Input Defines which camera to associ...

Page 41: ...bed in Settings Click Recording Event Select Event Action Event Action features Camera Camera I O and System 6 2 2 1 Camera Camera enables settings for event action from the camera To access the Camer...

Page 42: ...l dialog opens for user selection Disabled CMS When triggered system will send out a signal to CMS You may choose whether sending with snapshot or not Disabled E map popup remote When triggered the sy...

Page 43: ...t When an event occurs the system will send an output signal to other connected devices Once selected a Detail dialog opens for users to set which output pin to send the output signal through Disabled...

Page 44: ...through the I O box To access the I O Box tab Access Recording Event menu Open Event Action and select I O Box tab On the I O Box tab the featured settings are Setting Description Default Selects the...

Page 45: ...tor to show users the location of the scene clearly Disabled On screen display When an event occurs the system will show an alert message on selected camera s of screen Disabled Details button Output...

Page 46: ...output pin to send the output signal through Disabled Email When an event occurs the system will send Email notifications To set up the Email s to receive notifications see Email Once selected its De...

Page 47: ...ll receive push notifications The user can view click View to watch the recording videos If user password is changed please sign in with new password to start service again Users can turn off push not...

Page 48: ...nfigured events It also manages the SMTP server for outgoing Emails To access the Email submenu Open Recording Event Click Email Email setting features Contact and SMTP 6 2 3 1 Contact The Contact tab...

Page 49: ...l from the contact list 6 2 3 2 SMTP SMTP sets up the Simple Mail Transfer Protocol for system to send out Emails To access the SMTP tab Open the Main Menu as described in Settings Open Recording Even...

Page 50: ...e an Email is sent Disabled Username Sets up the username for SMTP authentication Password Sets up the password for SMTP authentication Test button System will send a test Email to sender to make sure...

Page 51: ...r name should be the format of FolderName FolderName SubFolderName and so on Test Runs a test on the configuration by making the system create a folder onto the configured FTP server 6 3Device Device...

Page 52: ...abled Name Enters a name or info about the I O pin Type Sets I O type for the I O pin N O means normally open N C means normally close N O normally open Duration Defines the time to keep an output act...

Page 53: ...Default Selects the on box I O or an I O box to configure I O Pin Enables disables an I O pin Enabled Name Enters a name or info about the I O pin Type Sets I O type for the I O pin N O means normally...

Page 54: ...es multiple disk drives into a logical unit To access the RAID Management submenu Open Storage menu as described in Storage Click RAID Management RAID Management features Status Create Modify Delete a...

Page 55: ...atus tab the featured settings are Setting Description Default List Delivers the present RAID volume s in the system Status Switches the status info between the present RAID volume s and disk s If no...

Page 56: ...Used Capacity Delivers the used space on the RAID volume Usage Delivers the percentage of the RAID volume s usage Update Time Delivers the time when the RAID volume was created or last updated Number...

Page 57: ...le to work normally Warning The disk is damaged Recommend to change the disk Abnormal The disk is damaged seriously and it may cause the system errors Strongly recommend you to stop recording and chan...

Page 58: ...rom the external disk DAS You cannot create a single volume with both embedded and external disks inside Top HDD tray 1 2 3 4 and bottom tray 5 6 7 8 cannot be created as 1 volume 6 4 1 3 Modify Modif...

Page 59: ...Description Details button Details of the RAID volume s disk including disk identity model number and total capacity Delete button Deletes the selected RAID volume Delete a RAID volume 1 Select a RAID...

Page 60: ...l number and total capacity Format button Formats the selected RAID volume Format a RAID volume 1 Select a RAID volume 2 Click Format button 6 4 2 Auto Backup Auto Backup enables users to back up reco...

Page 61: ...to back up of the videos recorded on the previous day Disabled Daily Backup Time Sets the daily time for the system to do the auto backup 00 00 Video Start Time Sets the start time of recorded video o...

Page 62: ...d P2P settings 6 5 1 Network Settings Network Settings sets the system s networking including IP address subnet mask default gateway and primary secondary DNS To access the Network Settings Open Netwo...

Page 63: ...P Address Delivers the IP address assigned to this LAN port Subnet Mask Delivers the subnet mask assigned to the IP address used on the LAN port Default Gateway Delivers the IP address assigned to the...

Page 64: ...General tab configures server name and selects LAN to connect to the Internet To access the General tab Open Network menu as described in Network Click Network Settings and select General tab The feat...

Page 65: ...the LAN port This setting is only available when Type is set to Static 192 168 1 1 Primary DNS Assigns the IP address for the primary DNS This setting is only available when Type is set to Static 192...

Page 66: ...ions available are DynDns and DtDNS DynDns Username Set the username to login to the DDNS service Password Set the password to login to the DDNS service Host Name Enter the sub domain name Update Cycl...

Page 67: ...the following settings Item Description Default Management Port Sets the transmission port for remote settings 80 Live Stream Port Sets the transmission port for liveview streaming 5150 Liveview Max...

Page 68: ...5 3 P2P Setting P2P Setting allows users to add the unit to ZAVIOR Mobile APP without the need for setting up port forwarding and configuring firewall security To enable the P2P Setting Open Network m...

Page 69: ...g System and Save Load Configuration 6 6 1 User Management User Management manages user accounts and access privilege to the system To access the User Management submenu Open the Main Menu as describe...

Page 70: ...he password for the user account Group Assign a user group for the user accounts Options available are power user user and guest user Group Description power user A power user is allowed to access all...

Page 71: ...Access tab Click the edit button to edit a user s access to a channel 6 6 1 3 Local Privilege Local Privilege tab shows the list of user s that are allowed to locally access system services To access...

Page 72: ...lege shows users authorized to remotely access system services To access the Remote Privilege tab Open Management Click User Management and select Remote Privilege tab 6 6 1 5 Advanced Advanced tab sh...

Page 73: ...tab Open Management Click User Management and select Advanced tab 6 6 2 License Management Access License Management to activate the POS license To access the License Management submenu Open Managemen...

Page 74: ...tab Open Management Click License Management The Online Activation tab will open Upgrade the system with the available license key 1 Open the Online Activation tab as described above 2 Enter the seri...

Page 75: ...ive 4 Copy the exported file offline reg to a PC with Internet connection 5 Run OfflineTool exe which is included in NVR toolkit 6 Select Input SN file and enter the license key Click Activate button...

Page 76: ...cessfully Transfer the activated license key offline 1 Plug an USB flash drive into the unit s USB port 2 Select the license from the License List and click the Export button A dialog will pop on scre...

Page 77: ...nish the transfer process 6 6 3 Log System The Log System submenu allows users to view system events To access the Log System submenu Open Management menu as described in Management Click Log System b...

Page 78: ...Setting Description Default Switches the history to a specific range of time To switch 1 Click the down arrow of the date box and select a specific period of time 2 Click the down arrow of the type b...

Page 79: ...ic period of time 2 Click the down arrow of the type box and select a type of log 3 Click the Query button The current date Click the right arrow button to view more logs Click the link button to view...

Page 80: ...e 2 Click the down arrow of the type box and select a type of log 3 Click the Query button The current date Click the right arrow button to view more logs 6 6 4 Save Load Configuration With Save Load...

Page 81: ...nd Reset 6 6 4 1 Save Config The Save Config tab saves the system settings to a configuration file To access the Save Config tab Open Management menu as described in Management Click Save Load Configu...

Page 82: ...nfig tab as described above 3 Enter a name for the configuration file 4 Click the Save button The system will prompt configuration file is saved to the USB flash drive User accounts won t be saved to...

Page 83: ...se and select the configuration file to load 4 Click the Load button The system will prompt the configuration file is loaded 6 6 4 3 Reset Use the Reset tab to restore all system settings to factory d...

Page 84: ...t 1 User accounts and privileges will be saved even after default settings are loaded 2 RAID information will be saved even after default settings or configurations are loaded 6 7 System Use the Syste...

Page 85: ...ion Model Delivers the system s model name Version Delivers the system version CPU Delivers the CPU model number MAC Address I Delivers the system s MAC address MAC Address II Delivers the system s MA...

Page 86: ...6 7 2 1 General General configures general system settings such as Main Menu timeout operating system s language security access and buzzer control To access the General tab Open System menu as descri...

Page 87: ...uzzer The unit is built in with a buzzer which sounds whenever the unit finishes starting or when a problem is detected Enabled Language Sets the language used on the operating system The system will...

Page 88: ...Daylight Saving Time dialog will opens to provide the advanced settings for daylight saving time including the following Setting Description Default Adjust clock Defines how much forward backward shou...

Page 89: ...PS UPS configures how the system reacts to power failure by defining the timing for auto shutdown This tab also delivers the info about the UPS module used To access the UPS tab Open System menu as de...

Page 90: ...een the unit and the UPS to check the status of UPS 6 7 2 5 Shutdown Use the Shutdown tab to safely turn off the unit or restart the operating system To access the Shutdown tab Open System menu as des...

Page 91: ...he System Upgrade Open System menu as described in System Click System Upgrade button 6 7 3 1 System Upgrade System Upgrade tab enables system upgrade To access the System Upgrade tab Open System menu...

Page 92: ...B flash drive 2 Plug the USB flash drive to the system 3 Open the System Upgrade tab on the system as described above 4 Click the Browse button and select the firmware Click OK button 5 Click the Upgr...

Page 93: ...ll Wizard See Install Wizard for the follow ups 6 8 Display Use the Display menu to configure the system s display parameters including display layout monitor resolution and other onscreen elements To...

Page 94: ...the system s display parameters 6 8 2 Display Settings Display Settings configures the system s display monitor the presentation of the onscreen Video Area Status Bar To access the Display Settings su...

Page 95: ...l time setting becomes available Define the dwell time for each group of video to show on screen Disabled Fix Aspect Ratio Enables fixing the ratio of video source instead of fitting it on every grid...

Page 96: ...ow key to advance or withdraw the channel s order among the available video channels 6 8 2 3 Status Bar Use the Status Bar to control the presentation of the Status Bar and the information delivered b...

Page 97: ...isplay Click Display Settings Select OSD tab The featured settings are Setting Description Default Camera Name Enables showing the camera name in the upper left corner of the Video Area Click the Edit...

Page 98: ...ing Description Default Snapshot In addition to the 1x1 snapshot it features another snapshot of the full display layout including the status bar Unchecked Event Pop up When event is triggered motion...

Page 99: ...Address 2F No 24 2 Gongye E 4th Rd East Dist Hsinchu City 300 Taiwan TEL 886 3 579 0275 http www zavio com...

Reviews: