P
r o f e s s io n a l
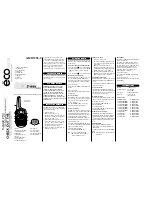
FM
H a n d h e ld T r a n s c e i v e r
PRECAUTIO NS
S
a f e t y
Please observe the following precautions to prevent the trans
ceiver damaged:
a
This device em its Radio Frequency (RF) energy. Caution
should be observed when operating this device.
A
Do not m odify this transceiver unless instructed by this
manual.
A
Never hold the antenna of the transceiver while transm it
ting.
A
Never operate the transceiver with an earphone at high
volum e level, hearing experts advise against continuous
high volum e operation.
A
Never operate the transceiver while driving a vehicle, safe
driving requires your full attention.
A
Turn off your transceiver while taking on fuel, or while park
in gasoline service station.
A
Never expose the transceiver to rain, w et areas, or any
liquids, the transceiver may be damaged.
A
Do not operate the transceiver near unshielded electrical
blasting caps or in an explosive atm osphere.
A
Be careful when operating the transceiver for a continu
ously periods of tim e the body will becom e hot.
A
Avoid the use of chem ical agents when cleaning, as they
can dam age the surface of the transceiver.
o