


If you deactivate the acoustic signals,
they continue operate when the
appliance has a malfunction.
BEFORE FIRST USE
1. Put a small quantity of detergent in the
compartment for washing phase.
2. Set and start a programme for cotton at the
highest temperature without laundry.
This removes all possible dirt from the drum and the
tub.
DAILY USE
WARNING! Refer to Safety chapters.
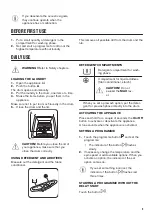
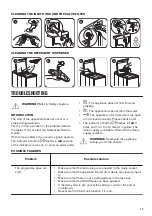
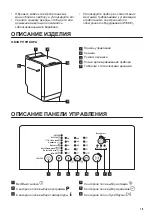
LOADING THE LAUNDRY
1. Open the appliance lid.
2. Push the button A.
The drum opens automatically.
3. Put the laundry in the drum, one item at a time.
4. Shake the items before you put them in the
appliance.
Make sure not to put too much laundry in the drum.
5. Close the drum and the lid.
A
CAUTION! Before you close the lid of
your appliance, make sure that you
close the drum correctly.
USING DETERGENT AND ADDITIVES
Measure out the detergent and the fabric
conditioner.
DETERGENT COMPARTMENTS
Detergent compartment for wash-
ing phase.
Compartment for liquid additives
(fabric conditioner, starch).
CAUTION! Do not
exceed the MAX lev-
el.
When you set a prewash option, put the deter-
gent for prewash phase directly into the drum.
ACTIVATING THE APPLIANCE
Press and hold for a couple of seconds the On/Off
button to activate or deactivate the appliance.
A tune sounds when the appliance is activated.
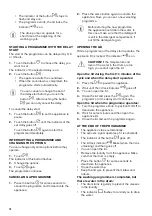
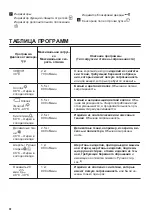
SETTING A PROGRAMME
1. Touch the programme button and set the
programme:
• The indicator of the button
flashes
slowly.
2. If necessary, change the temperature and the
spin speed or add available options. When you
activate an option, the indicator of the set
option comes on.
If you set something incorrect, the
indicator of the button
flashes red
three times.
STARTING A PROGRAMME WITHOUT THE
DELAY START
Touch the button
.
9
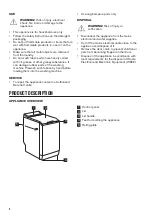
Summary of Contents for ZWY 50924WI
Page 1: ...GETTING STARTED EASY User Manual ZWY 50924WI EN User Manual 2 Washing Machine RU 16...
Page 16: ...8 3 16...
Page 17: ...5 5 0 5 0 05 8 0 8 17...
Page 18: ...0 C E E C 18...
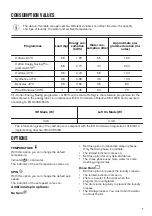
Page 21: ...20 C 20 C 2 5 900 3 1 60 C 5 5 EEC 92 75 2 3 1 30 30 1 2 75 1 5 21...
Page 23: ...9 6 3 1 1 23...
Page 24: ...4 1 2 1 2 A 3 4 5 A 24...
Page 25: ...MAX 1 2 9 6 3 1 2 1 2 1 2 3 1 2 25...
Page 26: ...10 1 2 3 4 1 2 3 1 2 3 18 5 26...
Page 27: ...40 C 60 C 27...
Page 28: ...0 C 1 2 3 4 5 6 7 0 C 28...
Page 29: ...1 2 3 1 2 3 90 4 1 2 1 2 3 4 11 1 2 3 29...
Page 30: ...30...
Page 31: ...PNC Mod Prod No Ser No 400 890 600 600 31...
Page 32: ...230 2200 10 50 IPX4 0 5 0 05 8 0 8 1 5 5 A 900 1 3 4 32...
Page 33: ...33...
Page 34: ...34...
Page 35: ...35...