background image

Installation

Unpacking

Positioning

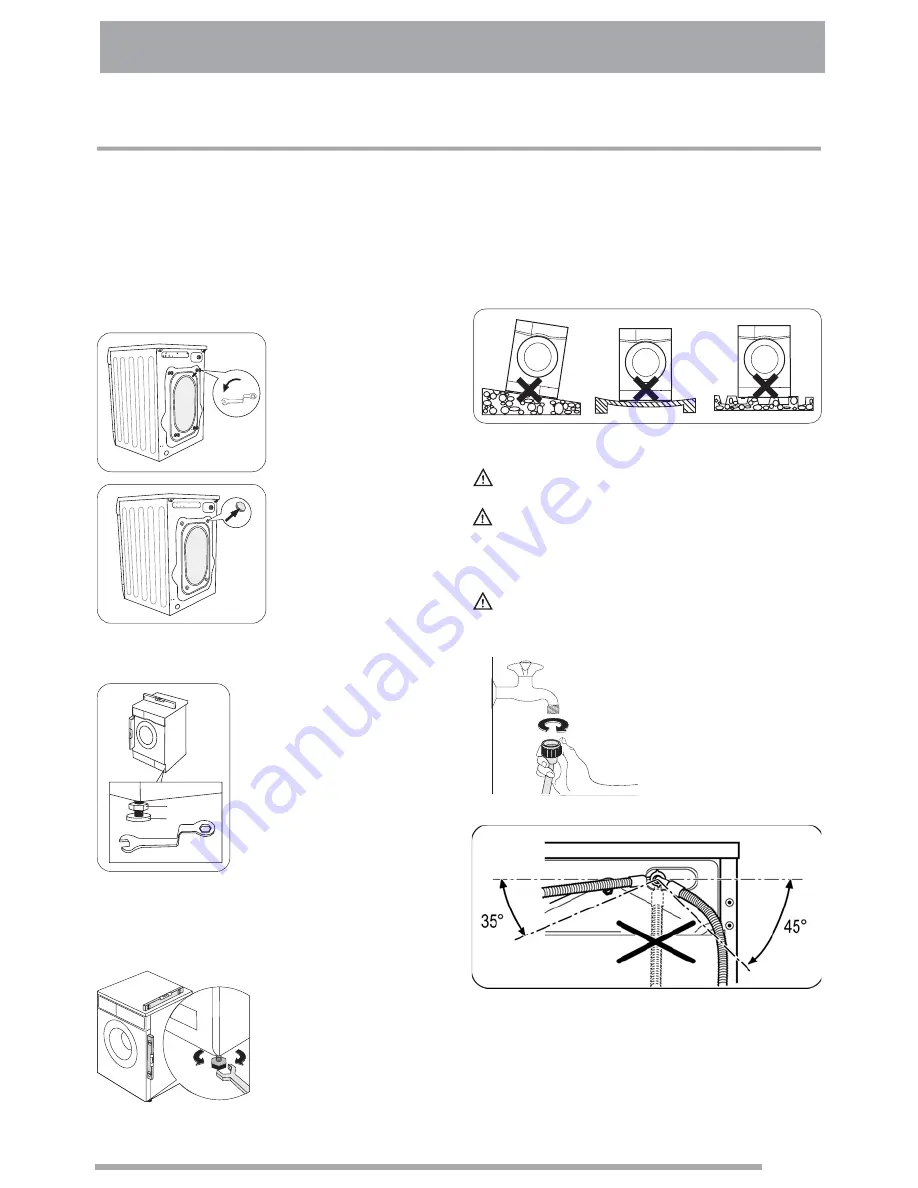
All transit bolts and packing must be removed before
using the appliance.
You are advised to keep all transit devices so that
they can be refitted if the machine ever has to be
transported again.

Unscrew the four bolts

using a spanner.
Slide out the relevant
plastic spacers.

Fill the holes with the
corresponding plastic
plug caps supplied in the
bag containing the
instruction booklet.

Install the machine on a flat

hard floor. Make sure that air
circulation around the machine
is not impeded by carpets, rugs
etc. Check that the machine
does not touch the wall or other
kitchen units. Level the
washing machine by raising or
lowering the feet. The feet may
be tight to adjust as they

incorporate a self locking nut,

but the machine MUST be level and stable.
Any necessary adjustment can be made with a
spanner.

If necessary, check the

setting with a spirit level.

Accurate levelling prevents vibration, noise and

displacement of the machine during operation. Never
place cardboard, wood or similar materials under the
machine to compensate for any unevenness in the
floor.

This appliance must be connected to a

cold water supply.

Before connecting up the appliance to

new pipework or to pipework that has not been

used for some time, run off a reasonable amount of
water to flush out any debris that may have collected

Do not use the hose from your previous

appliance to connect to water supply.

Connect the hose to a tap
with a 3/4” thread.

Always use the hose

supplied with the
appliance.

The other end of the inlet hose which connects to the
appliance can be turned as showed in the picture. Do
not place the inlet hose downwards. Angle the hose to
the left or right depending on the position of your
water tap. Set the hose correctly by loosening the ring
nut. After positioning the inlet hose, be sure to tighten
the ring nut again to prevent leaks.

Water inlet

Caution!

Caution!

Caution!

1

2

19

Summary of Contents for ZWF1000M

Page 1: ...ZANUSSI Manual User Machine Washing ZWF180M ZWF1000M ...

Page 2: ...ng the appliance Before first starting up check the appliance for any damage incurred during transport Never connect up a damaged appliance If parts are damaged contact your supplier If the appliance is delivered in the winter months when there are minus temperatures store it at room temperature for 24 hours before using for the first time It is dangerous to alter the specifications or attempt to ...

Page 3: ...l pockets are empty and buttons and zips are fastened Avoid washing frayed or torn articles and treat stains such as paint ink rust and grass before washing Underwired bras must NOT be machine washed Garments which have been in contact with volatile petroleum products should not be machine washed Use If volatile cleaning fluids are used care should be taken to ensure that the fluid is removed from...

Page 4: ...urn on the water tap 7 Plug the power supply 8 Select the desired programme 9 Press the start pause button Quick Guide Accessories Inlet hose Drain hose support Transport hole plugs Detergent dispenser drawer Back cabinet 1 2 3 4 6 7 8 5 Dispenser detergent drawer Control panel Drain hose Door Plinth Filter cover Adjustable feet Main plug 1 2 3 4 5 6 7 8 ...

Page 5: ...nser drawer Any fabric softener or starching additives must be poured into the compartment before starting the wash programme Control panel Programme selector dial Turn the selector dial to select the required washing programme OPTIONS button In order to get better care of your clothes you can select the Select the economy for cottons and synthetic items lightly or normally soiled The washing temp...

Page 6: ...er drain nor spin after the final rinse Less Iron function can be used in all procedures except single wash rinse drain and spin To select drain spin and or any other washing programmes firstturn the selector dial in position Oandthenselecttherequiredprogramme Only for cottons and synthetic items lightly or normally soiled at a temperature of 40 C or higher The washing time will be prolonged and t...

Page 7: ...hing time will be prolonged Available for cotton programmes Washing phases The washing phase running is indicated by the corresponding blinking led Start Pause button has the start and pause function When this button is pressed continuously this machine is switched between start and pause 4 5 6 7 ...

Page 8: ...8 Energy test program Cotton 60 intensive Standard Wool program 40 Compulsory Optional The parameter in this table are only for user s reference Washing Programmes 180M 1000M ...

Page 9: ... any residual marks with bleach soak in water and detergent rinse and treat with acetic or citric acid then rinse Treat any residual marks with bleach Ink Tar stains Detergents and additives Quantity of detergent to be used depending on the type of ink moisten the fabric first with acetone then with acetic acid treat any residual marks on white fabrics with bleach and then rinse thoroughly first t...

Page 10: ...eep and any operation on the control panel becomes silent To restore the buzzer press the Prewash button for three seconds again Turning the machine off and then on again will not change the buzzer state This device permits you to leave the appliance unattended so you do not need to worry that children might be injured by or cause damage to the button Run a cotton cycle at the highest temperature ...

Page 11: ...eatedly to change the spin speed if you want your laundry to be spun at a different speed The relevant pilot light illuminates O O Daily Use Select the available options by pressing button 2 for the model ZWF180M and buttons 3 for model the ZWF1000M Select the Prewash option by pressing button 3 for the model ZWF180M and button 4 for the model ZWF1000M Start the programme by pressing button 5 for ...

Page 12: ... By The machine stops automatically At the end of the programme the door is released after few minutes and can be opened Turn the programme selector dial to to switch the machine off Remove the laundry from the drum and carefully check that the drum is empty If you do not intend to carry out another wash close the water tap Leave the door open to prevent the formation of mildew and unpleasant smel...

Page 13: ...Important Warning According to the soil level within the cycles and the frequency of the cycles you have to inspect and clean the filter regularly The pump should be inspected if the machine does not empty and or spin the machine makes an unusual noise during draining due to objects such as safety pins coins etc blocking the pump Proceed as follows 1 disconnect the appliance 2 if necessary wait un...

Page 14: ...rby because some water may flow Clean the filter in the valve with a stiff brush or with the piece of cloth Screw the hose back to the machine and make sure the connection is tight Turn on the water tap Frost precaution or emergency emptied out If the machine is exposed to temperatures below 0 C or if the water is not discharged proceed as follows 1 Pull out the plug from the power socket 2 Turn o...

Page 15: ... The washing machine does not fill Turn on the water tap Check the selection of the procedure Reconnect the water inlet pipe Check if the water pressure is sufficient Check if the inlet water pipe is bent or blocked Close the washing machine s door The washing machine fills and drains at the same time Make sure the end of the drainage pipe is higher than the water level inside the machine Please d...

Page 16: ...normal situation The machine stops for some time during the wash procedure The washing machine adds water automatically There is too much foam the in drain tube the foam is being drained Foam spills from the detergent drawer Check if the amount of detergent is excessive if it is the specialized detergent for the drum washing machine Reduce the amount of detergent used next time Dip one scoop of th...

Page 17: ...s not opened or water flows too slowly Inlet valve filter is blocked Inlet pipe is twisted If water is not supplied Open the tap or wait till the water supply becomes normal Check inlet valve filter Straighten the water pipe Check the other taps in the room Outlet hose is blocked or twisted Drain pump is blocked Wash and straighten outlet hose Wash drain pump filter Please call up the service line...

Page 18: ...em contact our service centre Before telephoning make a note of the product number model serial number and purchase date of your machine The Service Centre will require this information Technical data 60kg 2 00W 1 2 00W 1 60kg 520 520 5 7 10 ZWF180M ZWF1000M ...

Page 19: ...eck the setting with a spirit level Accurate levelling prevents vibration noise and displacement of the machine during operation Never place cardboard wood or similar materials under the machine to compensate for any unevenness in the floor This appliance must be connected to a cold water supply Before connecting up the appliance to new pipework or to pipework that has not been used for some time ...

Page 20: ...eck that your domestic electrical installation can take the maximum load required also taking into account any other appliances in use Connect the machine to an earthed socket The manufacturer does not accept any responsibility for damage or injury through failure to comply with the above safety precaution Caution Caution The symbol on the product or on its packaging indicates that this product ma...

Page 21: ......

Page 22: ...ZANUSSI ...

Page 23: ......

Page 24: ...ZANUSSI www zanussi co uk www zanussi be Subject to change without notice ...

Reviews: