background image

33

When discharging into a standpipe ensure that
the top of the standpipe is no more than 90 cm
(35.4'') and no less than 60 cm (23.6'') above
floor level.

The drain hose may be extended to a
maximum of 4 metres. An additional drain hose
and joining piece is available from your local
Service Force Centre. The joining piece must
have an internal diameter of 18mm.

If your drain hose
looks like this (see
below) you do not
require the «U» piece.
Just push the hose
firmly into the
standpipe.

2. Onto a sink outlet spigot.

If the outlet spigot has not been used before,
remove any blanking plug that may be in place.

Push the drain hose onto the spigot and secure
with a clip, ensure a loop is formed in the drain
hose (see diagram) to prevent waste from the
sink entering the washer-dryer.

Loop

      1000


6kg

40°

30°

Rinse

Delicates

ZWF10070W

Off

Special

95°

Sport 40°

60° Eco

Sport Shoes 40°

60°

40° Eco

Silk

40°

50°

40°

Mini 30'

Hand
Wash

Cold

30°

Drain

Spin

Wool

Cottons

Synthetics

Easy Iron 40°

Start/Pause

Wash

Door

End

Extra Rinse

Options

Spin

1000

900

700

Prewash

Intensive

Super
Quick

3h

6h

9h

Min.

 60 cm (23.6”)

Max.

 90 cm (35.4”)

Important!

Before connecting the machine to new
pipework or to pipework that has not been
used for some time, run off a reasonable
amount of water to flush out any debris that
may have collected in the pipes.

In the interest of the environment

Washer-dryers should be connected to the
FOUL drainage system, the water will then be
taken to a sewage works for treatment before
being discharged safely into a river. It is
essential that these appliances are not
connected to the surface water drainage
system as this water is discharged directly into
a river or stream and may cause pollution.
If you require any further advice please contact
your local water authority.

SHOWER

BATH

SINK

TOILET

BIDET

WASHING
MACHINE

DISHWASHER

RAINWATER

'RUN-OFF'

SURFACE WATER

DRAINS & SEWERS

UNTREATED

DISCHARGE

RIVER

FOUL DRAIN

FOUL SEWERS

SEWAGE

TREATMENT

WORKS

RIVER

TREATED

DISCHARGE

Summary of Contents for ZWD 12270 G1

Page 1: ...User manual Washer dryer ZWD 12270 W1 ZWD 12270 S1 ZWD 12270 G1 ZWD 14270 W1 ZWD 16270 W1 ...

Page 2: ...ction 31 Environmental concerns 35 Thank you for selecting our appliance We wish you lots of enjoyment with your new appliance and we hope that you will consider our brand again when purchasing household appliances Please read this user manual carefully and keep it throughout the product life cycle as a reference document The user manual should be passed on to any future owner of the appliance The...

Page 3: ...and the inner drum Do not use your washer dryer to wash articles with whalebones material without hems or torn material Always unplug the appliance and turn off the water supply after use cleaning and maintenance Under no circumstances should you attempt to repair the machine yourself Repairs carried out by inexperienced persons may cause injury or serious malfunctioning Contact your local Service...

Page 4: ...ic detergent dispensers should not remain in the drum during the drying cycle as the plastic used is not designed to withstand the heat If you wish to wash through to dry you should use the conventional detergent dispenser drawer Never pull the power supply cable to remove the plug from the socket always take hold of the plug itself Never use the washer dryer if the power supply cable the control ...

Page 5: ...5 Description of the appliance Detergent dispenser drawer Control panel Door opening handle Drain pump Adjustable feet 5 4 3 2 1 1 2 3 4 5 Detergent dispenser drawer Prewash Wash Fabric Softener ...

Page 6: ... one proposed by the washer dryer or to select the No spin or the Rinse Hold option The relevant light will light up Options button By pressing this button you can select only one of the following options Prewash Intensive Super Quick see the relevant chapter Functions The relevant light will light up 1 2 3 Information The control panel is illustrated above It shows the programme selector dial as ...

Page 7: ...o flash Drying Time button By pressing this button you can select a timed programme for cotton or synthetics the relevant phase light illuminates Programme progress display The different pilot lights illuminate during the different phases washing Wash drying Dry and at the end of the cycle End 8 3 8 2 8 1 Display The display shows the following information duration of the selected programme select...

Page 8: ... minute Incorrect option selection The incorrect option selection is indicated by the message Err displayed for a few seconds and by flashing of the red light button 6 8 1 6 5 1 5 Alarm codes In the event of operating problems some alarm codes can be displayed see paragraph What to do if End of programme The End of programme is indicated by three flashing zeros 0 00 The light illumina tes After a ...

Page 9: ...utton A very short cycle for slightly soiled items that have been used or worn for a short time The washing time will be reduced according to the type of fabric and the selected temperature We recommend that you reduce the load size 3 3 3 8 3 2 2 Extra Rinse option button This option is recommended for people who are allergic to detergents and in areas where the water is very soft The machine perf...

Page 10: ...ong spin at max speed Max Load 6 Kg Synthetics 50 40 Synthetic or mixed fabrics Spin red Prewash Intensive Super Quick Extra rinse Main wash rinses Short spin at 900 rpm Max Load 3 Kg Reduced Load 1 5 Kg Synthetics Easy iron 40 Synthetic or mixed fabrics to be gently washed and spun Spin red Prewash Extra rinse Main wash rinses Short spin at 900 rpm Max Load 1 5 Kg Delicates 40 30 Delicate fabrics...

Page 11: ... Hold option Draining of water Spin Separate spin for cottons Spin red Drain and long spin Wool 40 Programme for wool Pure new wool non shrink machine washable label Spin red Main wash rinses Short spin at 900 rpm Max Load 2 Kg Handwash 30 Cold Special programme for hand washing fabrics Spin red Main wash rinses Short spin at 900 rpm Max Load 2 Kg Silk 30 Silk items to be gently washed and spun Ma...

Page 12: ...e programme for the data entered in the Energy Label must be tested dividing the maximum washing load by two equal parts and drying with TIMED DRYING each of them NOTE The different type of cottons towelling sheets shirts and so on or eventual laundry rolling up during spinning phase may cause a not uniform dryness So in the exceptional case that at the end of the cycle the laundry remains slightl...

Page 13: ... Off You can choose the speed by means of the relevant button to adapt it to the fabrics to be spun Off Cancelling Switching off of the appliance To reset a programme and to switch off the machine turn the selector dial to Off A new programme can now be selected Wool and Handwash Washing programme for machine washable wool as well as for hand washable woollens and delicate fabrics with the hand wa...

Page 14: ...for tumble dryers Particularly delicate items such as synthetic curtains woollen and silk garments with metal inserts nylon stockings bulky garments such as anoraks bedcovers quilts sleeping bags and duvets must not be machine dried Garments padded with foam rubber or materi als similar to foam rubber must not be machine dried they represent a fire hazard Also fabrics containing residues of settin...

Page 15: ...tain with the fingertips and a cotton cloth Rust oxalic acid dissolved in hot water or a rust removing product used cold Be careful with rust stains which are not recent since the cellulose structure will have already been damaged and the fabric tends to hole Mould stains treat with bleach rinse well whites and fast coloureds only Grass soap lightly and treat with bleach whites and fast coloureds ...

Page 16: ... compartment marked just before starting the programme Any fabric softener or starching additives must be poured into the compartment marked before starting the wash programme Follow the product manufacturer s recommendations on quantities to use and do not exceed the MAX mark in the detergent dispenser drawer Quantity of detergent to be used The type and quantity of detergent will depend on the t...

Page 17: ... might be injured by or cause damage to the appliance This function remains enabled also when the washer dryer is not working There are two different ways to set this option before pressing the it will be impossible to start the machine after pressing the button it will be impossible to change any other programme or option To enable disable this option press simultaneously for about 6 seconds butt...

Page 18: ...o switch the machine off IMPORTANT If you turn the programme selector dial to another programme when the machine is working the red light of button will flash 3 times and the message Err is displayed to indicate a wrong selection The machine will not perform the new selected programme Select the spin speed or No Spin or Rinse Hold option by pressing button When selecting a programme the light corr...

Page 19: ...el a programme which is running You can now select a new programme 6 6 6 6 6 6 Opening the door after the programme has started First set the machine to pause by pressing the button The door can be opened immediately or after a few minutes depending on the model In any case do not try to open the door if it is locked If the door remains locked this means that the machine is already heating or that...

Page 20: ...e by pressing repeatedly button until the time you want appears on the display see the drying programmes For Cottons you can select a drying time from 10 minutes to 250 minutes 4 10 For Synthetics you can select a drying time from 10 minutes to 130 minutes 2 10 Every time you press the button the time increases by 5 mins 7 Note The drying time will automatically increase by up to 2 minutes This is...

Page 21: ...nd 2 kg for synthetics Note It is possible also to wash and dry up to 4 kg of cotton items see the drying times table Do not use a dosing device ball when carrying out a washing drying programme 1 Load the laundry 2 Add detergent and fabric softener 3 Switch the machine on by turning the selector dial to the selected wash pro gramme fabric 4 Select the drying time by pressing button see the drying...

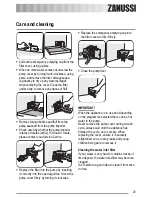
Page 22: ...er drawer should be cleaned regularly To aid cleaning the top part of the additive compartment should be removed Remove the drawer by pressing the catch downwards and by pulling it out Flush it out under a tap to remove any traces of accumulated powder Cleaning the drawer recess Having removed the drawer use a small brush to clean the recess ensuring that all washing powder residue is removed from...

Page 23: ...ter into the pump by inserting it correctly into the special guides Screw the pump cover firmly by turning it clockwise 1 2 1 2 Replace the emergency emptying cap into the filter cover and fix it firmly Close the pump door IMPORTANT When the appliance is in use and depending on the programme selected there can be hot water in the pump Never remove the pump cover during a wash cycle always wait unt...

Page 24: ...ust pour 2 litres of water into the main wash compartment of the detergent drawer and then run the drain programme This will activate the ECO VALVE device avoiding that part of the detergent remains unused at next washing 24 Emergency emptying out If the water is not discharged proceed as follows to empty out the machine pull out the plug from the power socket close the water tap if necessary wait...

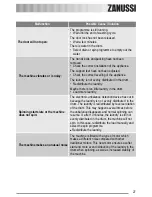
Page 25: ...se is squashed or kinked E10 Check the inlet hose connection The filter in the inlet hose is blocked E10 Clean the water inlet hose filter The door is not properly closed E40 Close the door firmly What to do if IMPORTANT Certain problems are due to lack of simple maintenance or oversights which can be solved easily without calling out an engineer Before contacting your local Service Centre please ...

Page 26: ... Reduce the detergent quantity or use another one Check whether there are any leaks from one of the inlet hose fittings It is not always easy to see this as the water runs down the hose check to see if it is damp Check the water inlet hose connection The inlet hose is damaged Replace it with a new one The emergency emptying cap has not been replaced on the filter after cleaning Refit the emergency...

Page 27: ...ater Spinning starts late or the machine does not spin The electronic unbalance detection device has cut in because the laundry is not evenly distributed in the drum The laundry is redistributed by reverse rotation of the drum This may happen several times before the unbalance disappears and normal spinning can resume If after 10 minutes the laundry is still not evenly distributed in the drum the ...

Page 28: ...serial number and purchase date of your machine the Service Centre will require this information Mod Prod No Ser No Mod Prod No Ser No The machine does not dry or does not dry properly The drying time has not been selected Select the drying time The water tap is not turned on E10 Open the water tap The drain filter is clogged E20 Clean the drain filter The machine is overloaded Reduce the laundry ...

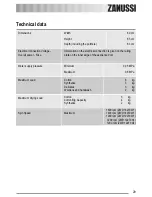
Page 29: ...mum Load 6 0 kg 3 0 kg 3 0 kg 2 0 kg Maximum Spin Speed 1600 rpm ZWD 16270 W1 1400 rpm ZWD 14270 W1 1200 rpm ZWD 12270 W1 1200 rpm ZWD 12270 S1 1200 rpm ZWD 12270 G1 Electrical connection Voltage Overall power Fuse Information on the electrical connection is given on the rating plate on the inner edge of the appliance door Cotton Cotton Big Capacity Synthetics Maximum Drying Load 3 0 kg 4 kg 2 kg ...

Page 30: ... 8 51 Information The consumption data shown on this chart is to be considered purely indicative as it may vary depending on the quantity and type of laundry on the inlet water temperature and on the ambient temperature It refers to the highest temperature for each wash programme The Cottons 60 Eco is the reference programme with a load of 6 kg for the data entered in the energy label in complianc...

Page 31: ...smaller upper hole and the two large ones with the corresponding plastic plug caps supplied in the bag containing the instruction booklet Positioning Install the machine on a flat hard floor Make sure that air circulation around the machine is not impeded by carpets rugs etc Check that the machine does not touch the wall or other kitchen units Level the washer dryer by raising or lowering the feet...

Page 32: ...is type of use NOTE Installation should comply with local water authority and building regulations requirements A minimum water pressure of 0 05 MPa 0 5 bar is required for safe operation of the appliance If you cannot make the cold water connection direct from the rising mains you may be able to operate the appliance from your cold water storage system There should be a minimum vertical distance ...

Page 33: ...0 50 40 Mini 30 Hand Wash Cold 30 Drain Spin Wool Cottons Synthetics Easy Iron 40 Start Pause Wash Door End Extra Rinse Options Spin 1000 900 700 Prewash Intensive Super Quick 3h 6h 9h Min 60 cm 23 6 Max 90 cm 35 4 Important Before connecting the machine to new pipework or to pipework that has not been used for some time run off a reasonable amount of water to flush out any debris that may have co...

Page 34: ...e terminal marked L or coloured red GREEN YELLOW BROWN CORD CLAMP BLUE 13 A E N L Upon completion there must be no cut or stray strands of wire present and the cord clamp must be secure over the outer sheath WARNING A cut off plug inserted into a 13 amp socket is a serious safety shock hazard Ensure that the cut off plug is disposed of safely Should the appliance power supply cable need to be repl...

Page 35: ...priate waste handling of this product For more detailed information about recycling of this product please contact your local council your household waste disposal service or the shop where you purchased the product Ecological hints To save water energy and to help protect the environment we recommend that you follow these tips Normally soiled laundry may be washed without prewashing in order to s...

Page 36: ...www electrolux com www zanussi electrolux co uk Subject to change without notice 132963663 00 122010 ...

Reviews: