background image

34

INSTALLATION

If this appliance – equipped with magnetic door 
seals – replaces an older appliance featuring a 
spring lock (mechanical latch) on the door or lid, 
please ensure that this lock is made completely 
unusable before «throwing out» the old appliance. 
This will prevent it from becoming a death-trap for 
a child.

Location

Place the appliance as far away as possible from 
sources of heat, e.g. radiators, heaters, direct 
sunlight, etc. The best results are achieved with a 
room temperature of b10

°

C and +32

°

C.

Make sure that there is nothing hindering air 
circulation at the back, bottom or top of the 
appliance.

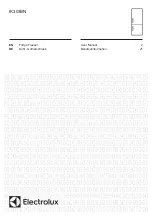
For safety reasons, minimum ventilation must be as 
shown in Fig. 1:

Appliance positioned under overhanging kitchen 
wall units (see Fig. 1-A).

Appliance positioned without overhanging kitchen 
units (see Fig. 1-B).

Attention: keep ventilation openings clear of obstruction.

One or more adjustable feet mounted on the base of 
the appliance make it possible to set it perfectly 
level.

Fig. 1

Rear spacers

In the bag with the documentation, there are two spacers 
which must be fitted as shown in the figure.

Slacken the screws and insert the spacer under the 
screw head, then re-tighten the screws.

D524

A

B

min.
50 cm

2

min.
50 cm

2

min.
50 cm

2

Fig. 1a

Power connection

Before plugging in, ensure that the voltage and 
frequency shown on the serial number plate 
correspond to your domestic power supply.
Voltage can vary by 

±

6% of the rated voltage.

For operation with different voltages, a suitably 
sized auto-transformer must be used.

The appliance must be earthed.

The power supply cable plug is provided with a 
contact for this purpose.
If the domestic power supply socket is not earthed, 
connect the appliance to a separate earth in 
compliance with current regulations, consulting a 
specialist technician.

The Manufacturer declines all responsibility if the above 
safety precautions are not observed.

This appliance complies with EEC directive number 87/
308 of 2/6/87 relative to radio interference suppression.

This appliance complies with the following 
E.E.C. Directives:

-

73/23 EEC

 of 19.2.73 (Low Voltage Directive) and 

subsequent modifications;

-

89/336 EEC

 of 3.5.89 (Electromagnetic 

Compatibility Directive) and subsequent 
modifications.

Cleaning the appliance’s interior

Before using the appliance for the first time, wash 
all internal parts with lukewarm water and neutral 
soap so as to remove the typical «new» smell and 
then dry thoroughly. Do not use detergents or 
abrasive powders as these will damage the finish.

PR153

Summary of Contents for ZVC 2000 S

Page 1: ...GEFRIERSCHRANK CONGELATEUR DIEPVRIEZER FREEZER ZVC 2000 S BEDIENUNGSANLEITUNG MODE D EMPLOI GEBRUIKSAANWIJZING INSTRUCTION BOOKLET 2222 128 07 ...

Page 2: ...g page 36 Quick freezing page 36 The temperature alarm light page 36 Internal thermometer page 36 Freezing food page 37 Rules to observe when freezing foods page 37 Frozen food storage page 38 Helpful hints page 38 Cold accumulator page 38 Thawing out frozen foods page 38 Ice cube production page 38 Defrosting page 38 Maintenance page 39 Periodical cleaning page 39 Idle periods page 39 Something n...

Page 3: ...d be punctured this would damage the appliance beyond repair and cause food loss DO NOT USE SHARP INSTRUMENTS to scrape off frost or ice Frost may be removed by using the scraper provided Under no circumstances should solid ice be forced off the liner Solid ice should be allowed to thaw when defrosting the appliance See defrost instructions Do not use a mechanical device or any artificial means to...

Page 4: ... screw head then re tighten the screws D524 A B min 50 cm 2 min 50 cm 2 min 50 cm 2 Fig 1a Power connection Before plugging in ensure that the voltage and frequency shown on the serial number plate correspond to your domestic power supply Voltage can vary by 6 of the rated voltage For operation with different voltages a suitably sized auto transformer must be used The appliance must be earthed The...

Page 5: ...D427 Remove the handle and refit it on the opposite side Fig 4 Fig 4 The holes that are not used are to be masked with the plastic plugs removed If after having reversed the door it is not in line with the unit the top hinge can be adjusted To do this use a 10 mm spanner as shown in Figure 3 slacken the nut align the door by pushing it to the left or right then re tighten the nut Attention After h...

Page 6: ...mostat settings may be modified according to the surrounding room temperature the location of the freezer and the frequency of door openings etc To turn off the freezer turn the thermostat knob to the O position Quick freezing For quick freezing turn the N S knob D to the S symbol The quick freezing indicator light B will then light up The temperature alarm light C The temperature alarm light turn...

Page 7: ...o not forget that once frozen foods have thawed out they spoil rapidly Low fat content foods are better conserved in the freezer than those with higher fat content Salt whenever present reduces the duration of satisfactory conservation Foods to be frozen must be enclosed in air tight sacks or containers especially indicated for this purpose Close these sacks or containers tightly to eliminate all ...

Page 8: ...the length of time for which food will keep in the event of a power failure or breakdown It must be placed in the top drawer Fig 7 Thawing out frozen foods Frozen foods must be allowed to thaw out before use either in the refrigerator meat poultry fish etc or at room temperature all other foods according to the available time Frozen products which come in small sized or separate packages may be co...

Page 9: ...socket remove all food from the appliance defrost and clean the interior and all accessories leave the door slightly open thus letting air circulate and preventing the formation of mould and unpleasant smells SOMETHING NOT WORKING If the appliance is not functioning properly check that the plug is firmly in the wall socket and the mains power switch is on there is no power failure the control knob...

Reviews: