background image

Using the grill
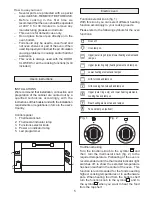
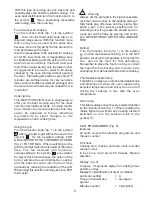
Turn the function knob (fig. 1) to the symbol
      when you wish to grill without fan and to the
symbol      for fan assisted grilling. FOR
GRILLING TURN THE THERMOSTAT KNOB
(fig. 2) TO THE MAX. When switching on the
grill the turnspit motor will also start at the same
time. The fan assisted grill functions,
corresponding to the symbol        are suitable
for wet or thick food because the action of the
hot air will provide even distribution cooking,
and the heat will enter into the food more
gradually by reducing the radiation of the grill.
When using this function turn they knob on 200°
thermostat.

Defrost
Turn the function knob (fig. 1) to the symbol
     and the thermostat knob (fig. 2) to the OFF
position. Air at room temperature is forced by the
fan  around the food for fast defrosting.
Remember to place the food on a tray, to collect
the liquid from defrosting and to remove the
packaging from defrosted foods before cooking.

Thermostat indicator lamp
This light is on when you turn the thermostat knob
and switches off when the oven reaches the
selected temperature and will cycle on and off
during the cooking in line with the oven
temperature.

Oven lamp
This light is always on with every selected function
by the function knob (fig. 1). When needing the
inside lighted up without any heating element
switched on turn the selector knob to the
symbol      .

           Warning
Always set the grill grid in the highest possible
rack (but not too close to the heating element:
fatty foods give off smoke and may start a fire)
place a pan in the lowest possible rack for
collecting juice. If a grease fire should occur in
a pan put out the flame by placing a lid on the
pan: NEVER THROW WATER ON A GREASE
FIRE.

Forced convection baking
Turn the function knob (fig. 1) to the symbol
       , then turn the thermostat knob (fig. 2) to
required temperature. With this function more
than on tray may be used at the same time
because hot air is forced by the fan around the
food and between the trays .
Also the temperature to be selected for cooking
is 10-15% lower than the corresponding value
for traditional baking and the action of the hot
air will do more uniformly  dried and crust your
food. When using one tray only the lower runner
is suggested to be used in order to be easily
checked by the oven window without opening
the door.  Preheating time will be very short (15
minutes are sufficient also for very sensitive
items such as soufflés or whisked sponges) and
the more common foods may be cooked from a
“cold start”.

Cooking time
This MULTIFUNCTION oven is engineered to
offer you the best cooking way for the most
common international foods.  Cooking results
are a matter of personal preference and may
easily be adjusted to follow individual
requirements by slight changes to the
temperature or/and  cooking time.

With this type of cooking use one tray only and
centrally place the shelf for optimal cooking.  For
even heat distribution turn the function knob  to
the symbol        this is particularly favourable
when using more than one tray.

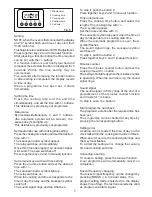
“LED” PROGRAMMER (Fig. 5)
Features
24 hours clock with automatic programme and
minutes counter.

Functions
Cooking time, cooking end time, clock, minutes
counter, times
to be set up to 23 hours 59 minutes. Manual
selection.

Display  (fig. 5)
4-figures, 7-segments diplay for cooking times
and time of day.
Display for identification of timer conditions:
Automatic setting

=

A

Time and manual use

=

saucepan

symbol
Minutes counter

=

bell symbol

   6

Summary of Contents for ZOB 9900 X

Page 1: ...Model ZOB 9900 X GB INSTALLATION AND OPERATING INSTRUCTIONS ...

Page 2: ...ce and safety requirements Howewer safety is also YOUR responsability through proper use and care With this in mind it is important that you read this booklet Acquaint yourself with the features and follow the use and care suggestion carefully for complete satisfaction Be sure you know the correct model and serial number of your oven The data plate is inside the oven door RECORD HERE FOR EASY REFE...

Page 3: ...ce barefoot Do not pull the feeding cable in order to detach the plug from socket Do not leave the apparatus exposed to atmospheric agents rain sun and so on Do not allow the appliance to be used by children Don t let children sit down or play with the oven door Do not use the drop down door as a stool to reach above cabinets Care should be taken to avoid touching heating elements inside the oven ...

Page 4: ... 25 Total absorbed power W 2900 Voltage 50 Hz single phase V 230 Section cable alimentation mm2 3x1 5 This product meets the requirements of E E C rules 2006 95 E E C regarding Low Tension 89 336 E E C regarding electromagnetic disturbances 89 109 E E C regarding materials in contact with food INDEX TECHNICAL FEATURES page 4 User s instructions page 5 Controls panel and functions page 5 Traditiona...

Page 5: ...the air circulation causing problems in cooking and or harmful accidents This oven is always used with the DOOR CLOSED for all the cooking functions Grill included Electric oven Oven off Oven lamp on Upper outer ring only and lower heating elements and lamp on Upper outer ring only heating element and lamp on Lower heating element and lamp on Grill turnspit and lamp on Grill cooking fan turnspit a...

Page 6: ... the flame by placing a lid on the pan NEVER THROW WATER ON A GREASE FIRE Forced convection baking Turn the function knob fig 1 to the symbol then turn the thermostat knob fig 2 to required temperature With this function more than on tray may be used at the same time because hot air is forced by the fan around the food and between the trays Also the temperature to be selected for cooking is 10 15 ...

Page 7: ...f a programme or of the minutes counter function and it lasts for 7 minutes To stop it push the button 1 Semi automatic use with cooking time setting Press the cooking time button and set the desired time with The saucepan and A symbol appear The relay switches on immediately Once this time has elapsed an acoustic signal will sound The oven switches off Press together keys 2 and 3 manual function ...

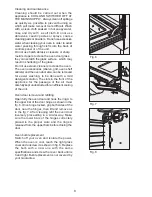
Page 8: ...e oven door also can be removed for easier washing to be done with a mild detergent solution The slots in the front of the appliance for the passage of the air must carefully kept unobstructed for an efficient cooling of the unit Oven door removal and refitting Open fully the oven door and hook the ring A to the upper bar of the door hinge as shown in the fig 6 Once hinge locked grip both sides of...

Page 9: ...le to maximum power of the oven See data plate on the appliance WARNING THIS APPLIANCE MUST BE EARTHED The appliance s electrical safety can only be guaranteed when it has been correctly connected to a properly earthed power supply as laid down in the regulations for electrical safety Important the manufacturer cannot be held responsible for any damage to persons or objects due to the lack of an e...

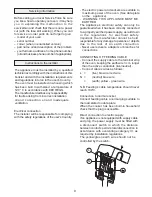
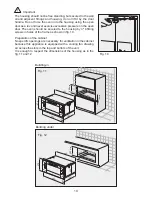
Page 10: ...housing by nº 4 fitting screws in holes of the frame as shown in fig 10 Preparation of the cabinet No specific openings are necessary for ventilation in the cabinet because this appliance is equipped with a cooling fan drawing air across the slots in the top and bottom of the unit It is enough to respect the dimensions of the housing as in the fig 11 and 12 Fig 11 460 min 550 min 860 min 855 455 8...

Page 11: ...n the product or on the documents accompanying the product indicates that this appliance may not be treated as household waste Instead it shall be handed over to the applicable collection point for the recycling of electrical and electronic equipment Disposal must be carried out in accordance with local environmental regulations for waste disposal For more detailed information about treatment reco...

Page 12: ...Tip Montagnani MO cod 537738 0208 ...

Reviews: