13
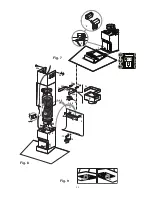
Wall unit mounting - Fig. 7-8-9
Disconnect the hood during electrical connection,
by turning the home mains switch off.
Remove the grease filter.
•
Rest the motor unit on a flat surface and thread
the lower part of the hood onto it
(1)
.
•
Make all the electrical connections between the
two parts
(2)
.
•
Secure the two parts using 12 screws
(3)
.
•
Mark the wall with a centre line, this will aid the
fixing procedure
(4)
, position the template so
that the mid line printed on the template
matches with the centre line previously marked,
the lower side of the template corresponds to
the lower side of the hood once installed
(5)
.
•
Drill two holes Ø 8mm and fix the support
bracket with two wall plugs and screws
(6)
.
•
Hang the hood
(7)
adjust its position
(8-9)
and
from the inside of the hood mark one point for
final fixing
(10)
, remove the hood
(11)
and drill
an hole Ø 8mm
(12)
, fit a wall plugs
(13)
.
•
Drill two holes Ø 8mm on the upper side close
to the ceilling
(14)
, fit two wall plugs and fix the
chimney support with two screws
(15)
.
•
Hang the hood again
(16)
.
•
Fix it securely with a screw
(17)
. To simplify
the installation operation remove the charcoal
filter frame.
•
If the hood is used in the
recirculation
function
, fix the deflector
F
on the chimney
support
G
with four screws and fit an extraction
pipe
(18
- not supplied
)
to connect deflector to
the outlet hole
B
of the hood.
In case the hood is to be used in exhausting
version, then the deflector must not be mounted
and fit an extraction pipe
(18)
to connect outlet
hole
B
of the hood to the outside.
•
Make the electrical connection
(19)
, but leave
the hood disconnected from the household
mains supply.
•
Fix the chimney
(20a)
to the chimney support
(20b)
slide downwards
(21)
and , from the
inside the of the hood
(22)
.
Slide down the lower section on the proper housing
on top of the hood. Refit the grease filter.
Connect the hood to the household mains supply
and check that the hood works correctly.


