background image

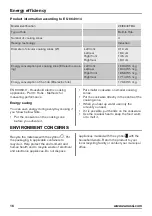
Energy efficiency

Product information according to EU 66/2014

Model identification


ZEI6640FBA

Type of hob


Built-In Hob

Number of cooking zones


4

Heating technology


Induction

Diameter of circular cooking zones (Ø)

Left front

Left rear

Right front

Right rear

21.0 cm

18.0 cm

14.5 cm

18.0 cm

Energy consumption per cooking zone (ECelectric cook-

ing)

Left front

Left rear

Right front

Right rear

169.3 Wh / kg

180.0 Wh / kg

185.8 Wh / kg

171.4 Wh / kg

Energy consumption of the hob (ECelectric hob)


176.6 Wh / kg

EN 60350-2 - Household electric cooking

appliances - Part 2: Hobs - Methods for

measuring performance

Energy saving

You can save energy during everyday cooking if

you follow bellow hints.
• Put the cookware on the cooking zone

before you activate it.

• Put smaller cookware on smaller cooking

zones.

• Put the cookware directly in the centre of the

cooking zone.

• When you heat up water use only the

amount you need.

• If it is possible, put the lids on the cookware.

• Use the residual heat to keep the food warm

or to melt it.

ENVIRONMENT CONCERNS

Recycle the materials with the symbol  . Put

the packaging in applicable containers to

recycle it. Help protect the environment and

human health and to recycle waste of electrical

and electronic appliances. Do not dispose

appliances marked with the symbol   with the

household waste. Return the product to your

local recycling facility or contact your municipal

office.

16

www.zanussi.com

Summary of Contents for ZEI6640FBA

Page 1: ...User Manual 2 Manual de instruções 17 EN PT ZEI6640FBA Hob Placa ...

Page 2: ...sical sensory or mental capabilities or lack of experience and knowledge if they have been given supervision or instruction concerning use of the appliance in a safe way and understand the hazards involved Do not let children play with the appliance Keep all packaging away from children Keep children and pets away from the appliance when it operates or when it cools down Accessible parts are hot I...

Page 3: ...t the bottom of the appliance from steam and moisture Do not install the appliance adjacent to a door or under a window This prevents hot cookware to fall from the appliance when the door or the window is opened If the appliance is installed above drawers make sure that the space between the bottom of the appliance and the upper drawer is sufficient for air circulation The bottom of the appliance ...

Page 4: ...erate the appliance with wet hands or when it has contact with water Do not use the appliance as a work surface or as a storage surface If the surface of the appliance is cracked disconnect immediately the appliance from the power supply This to prevent an electrical shock Users with a pacemaker must keep a distance of minimum 30 cm from the induction cooking zones when the appliance is in operati...

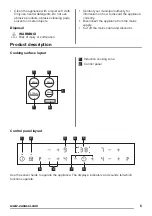
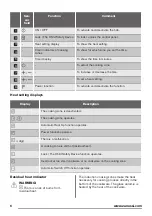
Page 5: ...for information on how to discard the appliance correctly Disconnect the appliance from the mains supply Cut off the mains cable and discard it Product description Cooking surface layout 145 mm 180 mm 210 mm 180 mm 1 1 1 1 2 1 Induction cooking zone 2 Control panel Control panel layout 1 2 4 5 3 6 7 8 9 Use the sensor fields to operate the appliance The displays indicators and sounds tell which fu...

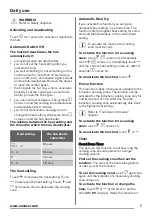
Page 6: ...tion Heat setting displays Display Description The cooking zone is deactivated The cooking zone operates Automatic Heat Up function operates Power function operates digit There is a malfunction A cooking zone is still hot residual heat Lock The Child Safety Device function operates Incorrect or too small cookware or no cookware on the cooking zone Automatic Switch Off function operates Residual he...

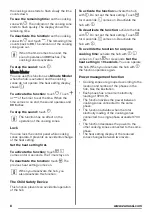
Page 7: ...Heat Up If you activate this function you can get a necessary heat setting in a shorter time The function sets the highest heat setting for some time and then decreases to the correct heat setting To activate the function the cooking zone must be cold To activate the function for a cooking zone touch comes on Immediately touch comes on Immediately touch until the correct heat setting comes on Afte...

Page 8: ...o deactivate the function touch The previous heat setting comes on When you deactivate the hob you also deactivate this function The Child Safety Device This function prevents an accidental operation of the hob To activate the function activate the hob with Do not set the heat setting Touch for 4 seconds comes on Deactivate the hob with To deactivate the function activate the hob with Do not set t...

Page 9: ...apt to the dimension of the bottom of the cookware automatically to some limit The cooking zone efficiency is related to the diameter of the cookware The cookware with a smaller diameter than the minimum receives only a part of the power generated by the cooking zone Refer to Technical information chapter The noises during operation If you can hear crack noise cookware is made of different materia...

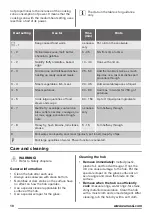
Page 10: ...don bleu cutlets rissoles sausages liv er roux eggs pancakes dough nuts as neces sary Turn halfway through 7 8 Heavy fry hash browns loin steaks steaks 5 15 Turn halfway through 9 Boil water cook pasta sear meat goulash pot roast deep fry chips Boil large quantities of water Power function is activated Care and cleaning WARNING Refer to Safety chapters General information Clean the hob after each ...

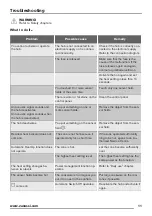
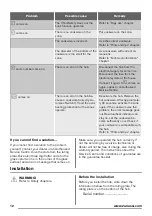
Page 11: ... sounds when the hob is deactivated You put something on one or more sensor fields Remove the object from the sen sor fields The hob deactivates You put something on the sensor field Remove the object from the sen sor field Residual heat indicator does not come on The zone is not hot because it operated only for a short time If the zone operated sufficiently long to be hot speak to an Au thorised ...

Page 12: ...proximate ly 30 seconds activate the zone again If the cookware was the problem the error message goes out Residual heat indicator can stay on Let the cookware be come sufficiently cool Check if your cookware is compatible with the hob Refer to Hints and tips chapter If you cannot find a solution If you cannot find a solution to the problem yourself contact your dealer or an Authorised Service Cen...

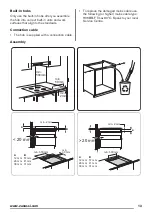
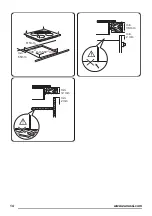
Page 13: ... supplied with a connection cable To replace the damaged mains cable use the following or higher mains cable type H05BB F Tmax 90 C Speak to your local Service Centre Assembly min 50mm min 500mm min 2mm min 2 mm A B A 12 mm 28 mm 38 mm B 57 mm 41 mm 31 mm min 30 mm min 500 mm 20 mm 20 mm min 2 mm A B A 12 mm 28 mm 38 mm B 57 mm 41 mm 31 mm min 500 mm www zanussi com 13 ...

Page 14: ...R 5mm min 55mm 560 1mm 490 1 mm min 38 mm min 2 mm min 12 mm min 2 mm 14 www zanussi com ...

Page 15: ... Typ 58 GAD D5 AU 220 240 V 50 60 Hz Induction 7 4 kW Made in Germany Ser Nr 7 4 kW ZANUSSI Cooking zones specification Cooking zone Nominal power maximum heat setting W Power function W Power function maximum dura tion min Cookware di ameter mm Left front 2300 3700 10 180 210 Left rear 1800 145 180 Right front 1400 2500 4 125 145 Right rear 1800 145 180 The power of the cooking zones can be diffe...

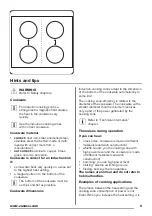
Page 16: ...ing You can save energy during everyday cooking if you follow bellow hints Put the cookware on the cooking zone before you activate it Put smaller cookware on smaller cooking zones Put the cookware directly in the centre of the cooking zone When you heat up water use only the amount you need If it is possible put the lids on the cookware Use the residual heat to keep the food warm or to melt it EN...

Page 17: ...des físicas sensoriais ou mentais reduzidas ou com pouca experiência e conhecimento se tiverem recebido supervisão ou instruções relativas à utilização do aparelho de forma segura e compreenderem os perigos envolvidos Não permita que as crianças brinquem com o aparelho Mantenha todos os materiais de embalagem fora do alcance das crianças Mantenha as crianças e os animais domésticos afastados do ap...

Page 18: ...TÊNCIA A instalação deste aparelho tem de ser efectuada por uma pessoa qualificada Remova toda a embalagem Não instale nem utilize o aparelho se ele estiver danificado Cumpra as instruções de instalação fornecidas com o aparelho Respeite as distâncias mínimas relativamente a outros aparelhos e unidades Tenha sempre cuidado quando deslocar o aparelho porque o aparelho é pesado Use sempre luvas de p...

Page 19: ...a instalação Certifique se de que a ficha fica acessível após a instalação Se a tomada eléctrica estiver solta não ligue a ficha Não puxe o cabo de alimentação para desligar o aparelho Puxe sempre a ficha de alimentação Utilize apenas dispositivos de isolamento correctos disjuntores de protecção fusíveis os fusíveis de rosca devem ser retirados do suporte diferenciais e contactores A instalação el...

Page 20: ...o Os tachos de ferro fundido ou alumínio ou que tenham a base danificada podem riscar o vidro ou a vitrocerâmica Levante sempre estes objectos quando precisar de os deslocar sobre a placa Este aparelho serve apenas para cozinhar Não pode ser usado para outras funções como por exemplo aquecimento de divisões Manutenção e limpeza Limpe o aparelho com regularidade para evitar que o material da superf...

Page 21: ...s campos do sensor para controlar o aparelho Os visores indicadores e sons indicam as funções que estão em funcionamento Cam po do sen sor Função Comentário 1 ON OFF Para activar e desactivar a placa 2 Bloqueio de Funções Disposi tivo de Segurança para Crian ças Para bloquear desbloquear o painel de comandos 3 Indicador do grau de cozedura Para indicar o grau de cozedura www zanussi com 21 ...

Page 22: ... A zona de cozedura está activada A função Aquecimento Automático está a funcionar Função Power activo dígito Existe uma anomalia Uma zona de cozedura ainda está quente calor residual A função Bloqueio de Funções Dispositivo de Segurança para Crianças está a funcionar O tacho não é adequado é demasiado pequeno ou não há tacho na zona de cozedura A função Desactivação Automática está a funcionar In...

Page 23: ...ctiva se após 1 2 6 horas 3 4 5 horas 5 4 horas 6 9 1 5 horas Grau de cozedura Toque em para aumentar o grau de cozedura Toque em para diminuir o grau de cozedura Toque em e simultaneamente para desactivar a zona de cozedura Aquecimento Automático Se activar esta função pode obter um grau de cozedura necessário em menos tempo A função activa o maior grau de cozedura durante algum tempo e depois di...

Page 24: ...l de comandos com zonas de cozedura a funcionar Isto impede uma alteração acidental do grau de cozedura Comece por definir o grau de cozedura Para activar a função toque em acende durante 4 segundos O temporizador permanece activo Para desactivar a função toque em O visor apresenta o grau de cozedura anterior Quando desactivar a placa também desactivará esta função Dispositivo de Segurança para Cr...

Page 25: ...chos As zonas de cozedura de indução adaptam se automaticamente à dimensão da base dos tachos até um determinado limite A eficiência da zona de cozedura está relacionada com o diâmetro do tacho Um tacho que tenha diâmetro inferior ao mínimo indicado recebe apenas uma parte da potência gerada pela zona de cozedura Consulte o capítulo Informação técnica Ruídos durante o funcionamento Se ouvir estali...

Page 26: ...r 20 45 Adicione algumas colheres de so pa de líquido 4 5 Cozer batatas a vapor 20 60 Utilize no máximo l de água pa ra 750 g de batatas 4 5 Cozer grandes quantidades de ali mentos guisados e sopas 60 150 Até 3 l de líquido mais os ingre dientes 6 7 Fritura ligeira escalopes cordon bleu de vitela costeletas rissóis salsichas fígado roux ovos pan quecas sonhos conforme necessá rio Vire a meio do te...

Page 27: ...mente à corrente eléctri ca Consulte o diagrama de liga ções O disjuntor está desligado Certifique se de que o disjuntor é a causa da anomalia Se o dis juntor disparar diversas vezes contacte um electricista qualifica do Active novamente a placa e defi na o grau de cozedura em menos de 10 segundos Tocou em 2 ou mais campos do sensor em simultâneo Toque em apenas um campo do sensor Manchas de gordu...

Page 28: ...na O tacho não é adequado Utilize um tacho adequado Consulte o capítulo Sugestões e dicas O diâmetro da base do tacho é demasiado pequeno para a zona Utilize um tacho com as dimen sões correctas Consulte o capítulo Informação técnica Aparece e um número A placa apresenta um erro Desligue a placa da alimentação eléctrica durante algum tempo Desligue o disjuntor do quadro eléctrico da sua casa Volte...

Page 29: ...cnica e as condições da garantia encontram se no folheto da garantia Instalação ADVERTÊNCIA Consulte os capítulos relativos à segurança Antes da instalação Antes de instalar a placa anote aqui as seguintes informações que pode consultar na placa de características A placa de características encontra se na parte de baixo da placa Número de série Placas encastradas Utilize as placas de encastrar ape...

Page 30: ...A B A 12 mm 28 mm 38 mm B 57 mm 41 mm 31 mm min 30 mm min 500 mm 20 mm 20 mm min 2 mm A B A 12 mm 28 mm 38 mm B 57 mm 41 mm 31 mm min 500 mm R 5mm min 55mm 560 1mm 490 1 mm min 38 mm min 2 mm 30 www zanussi com ...

Page 31: ...essários A caixa de protecção acessória pode não estar disponível em alguns países Contacte o seu fornecedor local Não pode utilizar a caixa de protecção se instalar a placa por cima de um forno Informação técnica Placa de características Modelo ZEI6640FBA PNC 949 595 531 01 Tipo 58 GAD D5 AU 220 240 V 50 60 Hz Indução 7 4 kW Fabricado na Alemanha N º de série 7 4 kW ZANUSSI www zanussi com 31 ...

Page 32: ...etro das zonas de cozedura circulares Ø Dianteira esquerda Traseira esquerda Dianteira direita Traseira direita 21 0 cm 18 0 cm 14 5 cm 18 0 cm Consumo de energia por zona de cozedura cozedura ECelectric Dianteira esquerda Traseira esquerda Dianteira direita Traseira direita 169 3 Wh kg 180 0 Wh kg 185 8 Wh kg 171 4 Wh kg Consumo de energia da placa placa ECelectric 176 6 Wh kg EN 60350 2 Aparelho...

Page 33: ...eciclagem Ajude a proteger o ambiente e a saúde pública através da reciclagem dos aparelhos eléctricos e electrónicos Não elimine os aparelhos que tenham o símbolo juntamente com os resíduos domésticos Coloque o produto num ponto de recolha para reciclagem local ou contacte as suas autoridades municipais www zanussi com 33 ...

Page 34: ...34 www zanussi com ...

Page 35: ...www zanussi com 35 ...

Page 36: ...www zanussi com shop 867327041 A 342015 ...

Reviews: