background image

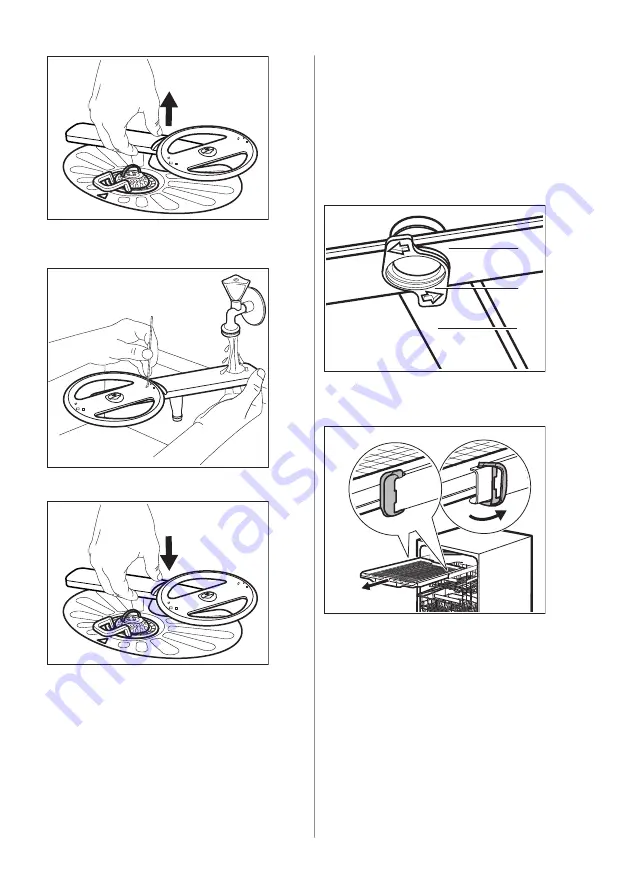
2. Wash the spray arm under running water.

Use a thin pointed tool, e.g. a toothpick,

to remove particles of soil from the holes.

3. To install the spray arm back, press it

downwards.

11.6 Cleaning the upper spray arm

Do not remove the upper spray arm. If the

openings in the spray arm are clogged,

remove the remaining particles of soil with a

thin pointed object, e.g. a toothpick.

11.7 Cleaning the ceiling spray arm

We recommend to clean the ceiling spray

arm regularly to prevent soil from clogging the

holes. Clogged holes can cause

unsatisfactory washing results.
The ceiling spray arm is placed on the ceiling

of the appliance. The spray arm (C) is

installed in the delivery tube (A) with the

mounting element (B).

C

B

A

1. Release the stoppers on the sides of the

sliding rails of the cutlery drawer and pull

the drawer out.

1

2

2. Move the upper basket to the lowest level

to reach the spray arm more easily.

3. To detach the spray arm (C) from the

delivery tube (A), turn the mounting

element (B) counterclockwise and pull the

spray arm downwards.

4. Wash the spray arm under running water.

Use a thin pointed tool, e.g. a toothpick,

to remove particles of soil from the holes.

Run the water through the holes to wash

soil particles away from the inside.

20 ENGLISH

Summary of Contents for ZDFN662W1

Page 1: ...zanussi com register ZDFN662W1 EN User Manual Dishwasher zanussi com register...

Page 2: ...efully read the supplied instructions The manufacturer is not responsible for any injuries or damage that are the result of incorrect installation or usage Always keep the instructions in a safe and a...

Page 3: ...t houses and other similar accommodation where such use does not exceed average domestic usage levels Do not change the specification of this appliance The operating water pressure minimum and maximum...

Page 4: ...ion cables Make sure not to cause damage to the mains plug and to the mains cable Should the mains cable need to be replaced this must be carried out by our Authorised Service Centre Connect the mains...

Page 5: ...parts related to door assemblies printed circuit boards electronic displays pressure switches thermostats and sensors software and firmware including reset software The following spare parts are avai...

Page 6: ...arm 4 Lower spray arm 5 Filters 6 Rating plate 7 Salt container 8 Air vent 9 Rinse aid dispenser 10 Detergent dispenser 11 Lower basket 12 Upper basket 13 Cutlery drawer The graphic is a general overv...

Page 7: ...mme operates Rinse aid indicator It is on when the rinse aid dispenser needs refilling It is always off while the programme operates Washing phase indicator It is on when the washing phase operates Ri...

Page 8: ...60 C Drying AirDry 2 ExtraPower GlassCare Crockery cut lery pots pans Normal lightly dried on Dishwashing 60 C Intermediate rinse Final rinse 55 C Drying AirDry 2 ExtraPower GlassCare Crockery cutler...

Page 9: ...rogramme should be run at least once every 2 months with a descaler or a cleaning product designed for dishwashers and without any load 5 With this programme you can quickly rinse off food remains fro...

Page 10: ...programme and reduces it to 45 C How to activate GlassCare Press until the indicator is on The display shows the updated programme duration 6 2 ExtraPower This option improves the dishwashing results...

Page 11: ...mg l ppm Clarke de grees Water softener level 47 50 84 90 8 4 9 0 835 904 58 63 10 43 46 76 83 7 6 8 3 755 834 53 57 9 37 42 65 75 6 5 7 5 645 754 46 52 8 29 36 51 64 5 1 6 4 505 644 36 45 7 23 28 40...

Page 12: ...2022 UK Ecodesign 2021 745 The pressure and the temperature of water as well as the variations of the mains supply can change the values How to set the water softener level Make sure the appliance is...

Page 13: ...ndicators are off The display shows the current setting AirDry is deactivated AirDry is activated 2 Press to change the setting 3 Press the on off button to confirm the setting 8 BEFORE FIRST USE 1 Ma...

Page 14: ...rinse aid only Do not fill it with detergent CAUTION Only use rinse aid designed specifically for dishwashers 1 Press the release button D to open the lid C 2 Fill the dispenser A until the rinse aid...

Page 15: ...if a programme was not started Starting a programme 1 Press the on off button to activate the appliance Make sure that the appliance is in programme selection mode 2 Close the appliance door 3 Press...

Page 16: ...nstructed in the user manual usually consumes less water and energy than washing dishes by hand Load the dishwasher to its full capacity to save water and energy For best cleaning results arrange item...

Page 17: ...t the shortest programme with a rinsing phase Do not add detergent and do put dishes in the baskets 4 When the programme is complete adjust the water softener according to the water hardness in your a...

Page 18: ...ing programme for optimal cleaning results Using short duration programmes regularly can cause grease and limescale buildup inside the appliance Run long duration programmes at least twice a month to...

Page 19: ...2 guides 7 Reassemble the filters B and C 8 Put back the filter B in the flat filter A Turn it clockwise until it locks CAUTION An incorrect position of the filters can cause bad washing results and d...

Page 20: ...n cause unsatisfactory washing results The ceiling spray arm is placed on the ceiling of the appliance The spray arm C is installed in the delivery tube A with the mounting element B C B A 1 Release t...

Page 21: ...the mains socket Make sure that there is no damaged fuse in the fuse box The programme does not start Make sure that the appliance door is closed Press the start button If the delay start is set canc...

Page 22: ...ts more times during operation It is normal It provides optimal cleaning results and energy savings The programme lasts too long If the delayed start is set cancel the delay setting or wait for the en...

Page 23: ...ts and tips and the basket loading leaf let Use more intensive washing programme Activate the ExtraPower option to improve the washing results of a selected programme Clean spray arm jets and filter R...

Page 24: ...penser from opening Odours inside the appliance Refer to Internal cleaning Start the programme with a descaler or a cleaning product de signed for dishwashers Limescale deposits on the tableware on th...

Page 25: ...database using the link https eprel ec europa eu and the model name and product number that you can find on the rating plate of the appliance Refer to the chapter Product description For more detailed...

Page 26: ......

Page 27: ......

Page 28: ...156815621 A 432023...

Reviews: