background image

2

1

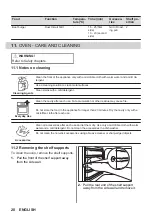
Install the shelf supports in the opposite

sequence.

CAUTION!

Make sure that the longer fixing wire is in

the front. The ends of the two wires must

point to the rear. Incorrect installation can

cause damage to the enamel.

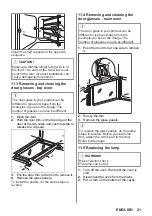
11.3 Removing and cleaning the

door glasses - top oven

The door glass in your product can be

different in type and shape from the

examples you see in the image. The

number of glasses can also be different.

1. Open the door.

2. Hold the door trim on the top edge of the

door at the two sides and push inwards to

release the clip seal.

1

2

1

3. Pull the door trim to the front to remove it.

4. Remove the glass panels.

To install the panels, do the same steps in

reverse.

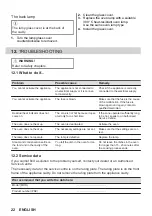
11.4 Removing and cleaning the

door glasses - main oven

The door glass in your product can be

different in type and shape from the

example you see in the image. The

number of glasses can also be different.

1. Push the door trim at one side to remove

it.

1

2

A

2. Pull up the trim.

3. Remove the glass panels.

To replace the glass panels, do the same

steps in reverse. Before you lower the

trim, attach the A trim part to the door.

Refer to the image.

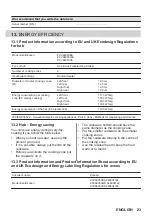
11.5 Replacing the lamp

WARNING!

Risk of electric shock.

The lamp can be hot.

1. Turn off the oven. Wait until the oven is

cold.

2. Disconnect the oven from the mains.

3. Put a cloth on the bottom of the cavity.

ENGLISH 21

Summary of Contents for ZCV66050WA

Page 1: ...zanussi com register ZCV66050BA ZCV66050WA ZCV66050XA EN User Manual Cooker ...

Page 2: ...carefully read the supplied instructions The manufacturer is not responsible for any injuries or damage that are the result of incorrect installation or usage Always keep the instructions in a safe and accessible location for future reference 1 1 Children and vulnerable people safety This appliance can be used by children aged from 8 years and above and persons with reduced physical sensory or men...

Page 3: ...ilar accommodation where such use does not exceed average domestic usage levels Only a qualified person must install this appliance and replace the cable This appliance must be connected to the mains with a H05VV F type cable to withstand the temperature of the rear panel This appliance is intended for use up to an altitude of 2000 m above sea level This appliance is not intended to be used on shi...

Page 4: ...box remove the fuse to disconnect the appliance from power supply In either case contact the Authorised Service Centre WARNING The appliance and its accessible parts become hot during use Care should be taken to avoid touching heating elements Always use oven gloves to remove or insert accessories or ovenware Before maintenance cut the power supply WARNING Ensure that the appliance is switched off...

Page 5: ...s in order to prevent tipping of the appliance Refer to Installation chapter 2 2 Electrical Connection WARNING Risk of fire and electric shock All electrical connections should be made by a qualified electrician The appliance must be earthed Make sure that the parameters on the rating plate are compatible with the electrical ratings of the mains power supply Always use a correctly installed shockp...

Page 6: ... the appliance or directly on the bottom of cavity do not put water directly into the hot appliance do not keep moist dishes and food in the appliance after you finish the cooking be careful when you remove or install the accessories Discoloration of the enamel or stainless steel has no effect on the performance of the appliance Use a deep pan for moist cakes Fruit juices cause stains that can be ...

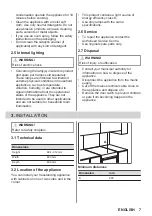
Page 7: ...used in other applications and are not suitable for household room illumination This product contains a light source of energy efficiency class G Use only lamps with the same specifications 2 6 Service To repair the appliance contact the Authorised Service Centre Use original spare parts only 2 7 Disposal WARNING Risk of injury or suffocation Contact your municipal authority for information on how...

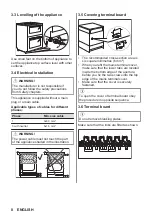
Page 8: ... 5x1 5 mm WARNING The power cable must not touch the part of the appliance shaded in the illustration 3 5 Covering terminal board The recommended cross section area is six square millimetres 6 mm When you refit the mains terminal cover make sure that the lower tabs are located inside the bottom edge of the aperture before you fix the two screws into the top edge of the mains terminal cover Make su...

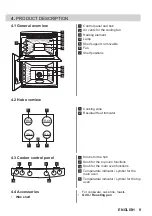
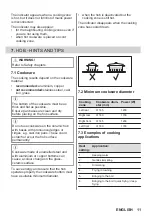
Page 9: ...ns 4 2 Hob overview 145 mm 180 mm 145 mm 180 mm 1 1 1 1 2 1 Cooking zone 2 Residual Heat Indicator 4 3 Cooker control panel 4 5 1 2 3 1 1 Knobs for the hob 2 Knob for the top oven functions 3 Knob for the main oven functions 4 Temperature indicator symbol for the main oven 5 Temperature indicator symbol for the top oven 4 4 Accessories Wire shelf For cookware cake tins roasts Grill Roasting pan EN...

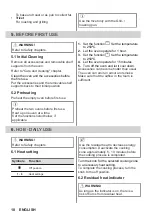
Page 10: ...emperature to 250ºC 2 Let the oven operate for 1 hour 3 Set the function Set the temperature to 250ºC 4 Let the oven operate for 15 minutes 5 Turn off the oven and let it cool down Accessories can become hotter than usual The oven can emit an odour and smoke Make sure that the airflow in the room is sufficient 6 HOB DAILY USE WARNING Refer to Safety chapters 6 1 Heat setting Symbols Function Off p...

Page 11: ... Ensure pan bases are clean and dry before placing on the hob surface Do not use cookware on the ceramic hob with bases with pronounced edges or ridges e g cast iron pans These could scratch or scour the hob surface permanently Cookware made of enamelled steel and with aluminium or copper bottoms can cause a colour change on the glass ceramic surface To save energy and ensure that the hob operates...

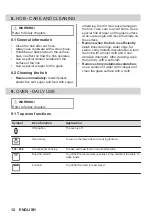
Page 12: ... on the surface Remove when the hob is sufficiently cool limescale rings water rings fat stains shiny metallic discoloration Clean the hob with a moist cloth and a non abrasive detergent After cleaning wipe the hob dry with a soft cloth Remove shiny metallic discoloration use a solution of water with vinegar and clean the glass surface with a cloth 9 OVEN DAILY USE WARNING Refer to Safety chapters...

Page 13: ...mbols indicators or lamps The indicator comes on when the oven heats up The lamp comes on when the oven operates The symbol shows whether the knob controls one of the cooking zones the oven functions or the temperature 1 Turn the knob for the top main oven functions to select an oven function 2 To deactivate the oven turn the knob for the top main oven functions to the off position 9 4 Cooling fan...

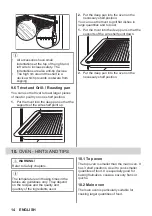
Page 14: ...et to grill flat dishes in large quantities and to toast 1 Put the trivet into the deep pan so that the supports of the wire shelf point down 2 Put the deep pan into the oven on the necessary shelf position 10 OVEN HINTS AND TIPS WARNING Refer to Safety chapters The temperature and baking times in the tables are guidelines only They depend on the recipes and the quality and quantity of the ingredi...

Page 15: ... set a longer baking time and lower oven temperature The cake is too dry The oven temperature is too low Next time set higher oven temperature The baking time is too long Next time set shorter baking time The cake bakes unevenly The oven temperature is too high and the baking time is too short Next time set a longer baking time and lower oven temperature The cake batter is not evenly dis tributed ...

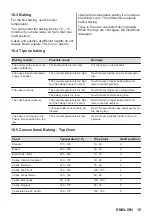
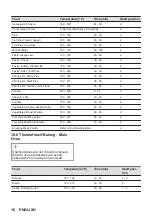
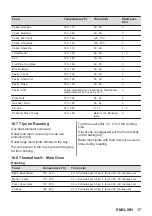
Page 16: ...at Pies 190 210 25 35 2 Shortcrusts Quiche Tarts Flans 180 200 25 50 2 Scones 220 230 8 12 3 Shepard s Pie 190 200 30 40 2 Souffles 170 180 20 30 2 Vegetables Baked Jacket Potatos 180 190 60 90 2 Vegetables Roast Potatos 180 190 60 90 2 Yorkshire Pudding Large 220 210 25 40 2 Yorkshire Pudding Individual 210 220 15 25 2 Roasting Meat Poultry Refer to the Roasting table 2 10 6 Thermaflow Baking Mai...

Page 17: ...oultry 160 180 Refer to the Roasting table 2 10 7 Tips on Roasting Use heat resistant ovenware Roast lean meat covered you can use aluminium foil Roast large meat joints directly in the tray Put some water in the tray to prevent dripping fat from burning Turn the roast after 1 2 2 3 of the cooking time If level one is suggested put the food directly on the baking tray Baste meat joints with their ...

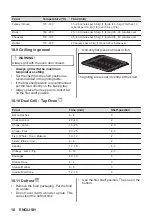
Page 18: ...irst shelf position is recommended put the food directly on the baking tray Always place the deep pan to collect fat on the first shelf position Grill only flat pieces of meat or fish The grilling area is set in centre of the shelf 10 10 Dual Grill Top Oven Food Time min Shelf position Bacon Rashers 5 6 3 Chicken Joints 20 40 2 Chops Lamb 15 25 2 3 Chops Pork 20 25 2 3 Fish Whole Trout Makarel 10 ...

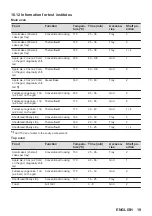
Page 19: ...d Conventional Cooking 200 25 35 Grid 2 Fatless sponge cake 1 tin ø 26 cm on the grid Thermaflow 170 25 35 Grid 2 Fatless sponge cake 1 tin ø 26 cm on the grid Thermaflow 170 30 40 Grid 1 4 Shortbread Pastry strip Conventional Cooking 160 20 30 Tray 3 Shortbread Pastry strip Thermaflow 140 20 30 Tray 3 Shortbread Pastry strip Thermaflow 140 15 25 Tray 1 4 1 Add 150 ml of water to the cavity emboss...

Page 20: ...each use Fat accumulation or other residue may cause fire Do not store the food in the appliance for longer than 20 minutes Dry the cavity only with a microfibre cloth after each use Accessories Clean all accessories after each use and let them dry Use only a microfibre cloth with warm water and a mild detergent Do not clean the accessories in a dishwasher Do not clean the non stick accessories us...

Page 21: ...e door trim to the front to remove it 4 Remove the glass panels To install the panels do the same steps in reverse 11 4 Removing and cleaning the door glasses main oven The door glass in your product can be different in type and shape from the example you see in the image The number of glasses can also be different 1 Push the door trim at one side to remove it 1 2 A 2 Pull up the trim 3 Remove the...

Page 22: ...e zone is not hot because it oper ated only for a short time If the zone operated sufficiently long to be hot speak to an Authorised Service Centre The oven does not heat up The oven is deactivated Activate the oven The oven does not heat up The necessary settings are not set Make sure that the settings are cor rect The lamp does not operate The lamp is defective Replace the lamp Steam and condens...

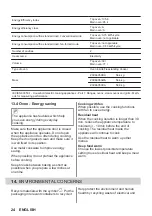
Page 23: ...0350 2 Household electric cooking appliances Part 2 Hobs Methods for measuring performance 13 2 Hob Energy saving You can save energy during everyday cooking if you follow the hints below When you heat up water use only the amount you need If it is possible always put the lids on the cookware Before you activate the cooking zone put the cookware on it The cookware bottom should have the same diame...

Page 24: ...he appliance operates Do not open the appliance door too often during cooking Keep the door gasket clean and make sure it is well fixed in its position Use metal cookware to improve energy saving When possible do not preheat the appliance before cooking Keep breaks between baking as short as possible when you prepare a few dishes at one time Cooking with fan When possible use the cooking functions...

Page 25: ...appliances marked with the symbol with the household waste Return the product to your local recycling facility or contact your municipal office Electrolux Appliances AB Contact Address Al Powstańców Śląskich 26 30 570 Kraków Poland ENGLISH 25 ...

Page 26: ......

Page 27: ......

Page 28: ...867363651 C 082023 ...

Reviews: