background image

12

MAINTENANCE AND CLEANING


The oven should be kept clean at all

times. A build-up of fats or other
foodstuffs could result in a fire,
especially in the grill pan.


Before cleaning, ensure all control

knobs are in the OFF position, and the
appliance has cooled completely

.


Before any maintenance or cleaning can

be carried out, you must DISCONNECT
the cooker from the electricity supply.

Cleaning materials

Before using any cleaning materials on your
oven, check that they are suitable and that their
use is recommended by the manufacturer.

Cleaners that contain bleach should NOT

be used as they may dull the surface
finishes. Harsh abrasives should also be
avoided.

External cleaning

We recommend  for cleaning cleaners type
AXION or CIF that do not scratch the surface;
after that rinse and dry with a soft cloth. Avoid
use of metall objects (knife, edge), steel wool or
nylon pads, abrasive or caustic products, or
diluents.

To prevent damaging or weakening the

door glass panels avoid the use of the
following:
• Household detergent and bleaches
• Impregnated pads unsuitable for non

stick saucepans

• Brillo/Ajax pads or steel wool pads
• Chemical oven pads or aerosols
• Rust removers
• Bath/Sink stain removers

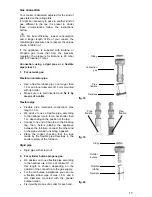
Oven Door

-

  The door can be dismantled for cleaning as

follows:

-


Open the door completely.

-

  Revolve the two locking parts on the hinge

arms completely upwards.

-


Partially close the door, to a 30

o

 angle

-


Lift the door and pull out

The internal oven door glass can be removed for
cleaning. For this purpose remove the 2 fixing
screws. Clean the outer and inner door glass
using warm soapy water.
Always support the door while removing the
glass panel as the door may spring closed due to
its lighter weight.

locking parts

fig. 14

fig. 15

fig. 16

DO NOT clean the oven door while the

glass panels are warm. If this precaution
is not observed the glass panel may
shatter.
If the door glass panel becomes chipped
or has deep scratches, the glass will be
weakened and must be replaced to
prevent the possibility of the panel
shattering.
Contact your local Service Centre who
will be pleased to advise further.

IMPORTANT: 

The inner door glass must be in

place when using the oven.

Summary of Contents for ZCM5150

Page 1: ...INSTRUCTION BOOK ELECTROGAS COOKER 50x50 Model ZCM 5150 ...

Page 2: ...nd clening Something not working Guarantee conditions After Sales Service 2 3 5 6 6 7 9 10 11 12 14 15 15 Safety Installation Gas connection Electrical connection Oven lamp replacement Change of gas 16 16 17 18 19 19 How to read the instruction book The symbols bellow will guide you when reading the instruction book Safety instructions Description of operations step by step Advice and recommendati...

Page 3: ...e oven electric 1700 W electric 1800 W Lamp 15W type E14 Accessories Oven grid Dripping pan Protective screen Dimensions Height Breadth Depth 850 mm 500 mm 536 mm This appliance complies with the following EEC Directives 90 683 73 23 Low Voltage Directive and subsequent modifications 89 336 Electromagnetical Compatibility Directive and subsequent modifications 90 396 Gas Appliance Directive 93 68 ...

Page 4: ...vise when frying in oil or greys chips hot greys ran cause fires easily Unstable or deformed pans should not be placed on the burners in order to avoid accidents caused by upsetting or boiling over Never pule the appliance by the oven handle Beside the accessories in the oven you can use only heat proof pans see instructions of the manufacturers Do not put products for cleaning or inflammable mate...

Page 5: ... our responsibility for possible damages resulting from bad use and non observing of safety rules in force Do observe strictly the cleaning and maintenance instructions Environment protection All materials marked by the symbol are recycling Store them in places especially foreseen for this purpose inform yourself at the services of your area for recovery and recycling In case of functioning anomal...

Page 6: ...ontrol knob Back right burner control knob Front left burner control knob Oven knob KNOB THERMOSTAT Pilot Ignition switch ZANUSSI OVEN TOP GAS GAS MAIN 0 OVEN 0 2 3 4 5 1 6 HOT PLATE ZCM 5150 Hob 2 1 3 4 1500W 2000W 1000W 2600W 1 Front left burner semi rapid 2 Electric plate 3 Back right burner auxiliary 4 Front right burner rapid ...

Page 7: ... be used in traditional cooking or for grilling but not simultaneously Control knob fig 1 It makes possible to choose the most appropriate temperature and to select the elements radiating heat one by one Explanations of symbols 0 Off position Oven light 50 250 Temperature selection Bottom heat Top heat Grill To select the temperature turn the knob clockwise until the pointer indicating the desires...

Page 8: ...ent It is a radiant cooking it is only the top element that is heating This position of the thermostat is recommended for warning up the cooked meals It is not necessary to preheat the oven How to proceed 1 Insert the meal on the 3rd level 2 Turn the thermostat on position For turning off the heating elements Turn the knob clockwise to position off 0 Electric grill When grilling the accessible par...

Page 9: ...at to be roasted Use guide 3 for the thin pieces to be roasted toasts pork bacon sausage small fish Use guide 2 for thick pieces to be roasted beef bacon large fish poultry When the first side is brown turn the meat without pricking it in order that the juices are not lost Roast the second side Salt when ending the cooking Cooking time has to determined by the thickness of the piece to be roasted ...

Page 10: ...it pushed until the gas ignites 1 spark second Release the knob after 10 seconds and watch that the burner has ignited until the safety valve automatically keeps the burner lit Upon ignition adjust the flame as required OR Power Cut Push the corresponding knob in completely and turn it left to the symbol big flame and ignite with a match Release the knob after 10 seconds and watch that the burner ...

Page 11: ...ner ring and the sparklers always clean The following diameters containers can be used rapid burner 2600 W min 165 mm semi rapid burner 2000 W min 140 mm auxiliary burner 1000 W min 100 mm Hot plate What pot to use Always use pots which properly fit to the chosen burner 14 16 cm Choose thick flat bottom pots fig 12 Saucepans for use on solid plates should have several characteristics They should b...

Page 12: ...rmal and is not a fault with the oven To prevent discoloration regularly wipe away condensation and also soilage from surfaces Cookware Use any ovenproof cookware which will withstand temperatures of 2500 C Oven dishes etc should not be placed directly on the oven base Oven Cooking Turn off the oven 5 minutes before the end of cooking time and use residual heat to complete the cooking The thicknes...

Page 13: ...d the use of the following Household detergent and bleaches Impregnated pads unsuitable for non stick saucepans Brillo Ajax pads or steel wool pads Chemical oven pads or aerosols Rust removers Bath Sink stain removers Oven Door The door can be dismantled for cleaning as follows Open the door completely Revolve the two locking parts on the hinge arms completely upwards Partially close the door to a...

Page 14: ... oil on a kitchen towel to avoid rust It is important to note that the plate will smoke a little and produce a slightly unpleasant odour when next used Drying Important After cleaning dry the hotplates thoroughly by switching on to a low medium setting for a few minutes Restoring To maintain the appearance of your sealed hotplates apply a little salt free vegetable oil or restorative agent i e Col...

Page 15: ...unit is connected and the electrical supply is switched on the mains fuse has not blown the correct control knob has been turned The hotplate is not giving satisfactory results Check the hotplate is clean and dry the pan is the correct size for the hotplate the pan has a flat bottom the setting is correct for the type of cooking The oven does not come on Check check if a cooking function temperatu...

Page 16: ...r wrong installation non conforming to the rules imposed by the power water gas distributor if the user modified the material or took off the marking or the serial numbers if the person who made the repairing is not certified by the manufacturer or the dealer if the appliance was used for commercial or industrial purpose or other household purposes than what it was conceived for if the appliance w...

Page 17: ...ld be carried out by a qualified electrician or competent person in accordance with the current regulations This cooker must be earthed This cooker is designed to be connected to a 230V 50Hz AC electrical supply Before switching on make sure the electricity supply voltage is the same as that indicated on the rating plate Before connecting check that The plug used for connection is easily accessibl...

Page 18: ...lexible pipe mechanic connection max length 1 5 m We advice to use a flexible pipe according to the national rule in force not shorter than 1 m depending on the position of the tap Connect one end of the pipe to the blocking tap than before placing the appliance between the furniture connect the other end to the pipe extension inserting a gasket Place the cooker checking that the loop made by the ...

Page 19: ...cated on the rating plate Note In case of a direct connection to the mains you have to interpose an omnipolar switch a minimum opening between contacts of 3 mm The switch should be sited within 2m of the hob and be easily accessible upon completion of the installation The yellow green grounding cable has not to be interrupted by the switch Ensure that the cooker supply cable does not come into con...

Page 20: ...sible from inside For reaching the lamp 1 Unscrew the glass lamp protection fig 22 2 Unscrew the lamp 3 Replace the lamp 4 Remount the lamp protection fig 22 CHANGE OF GAS Your cooker is foreseen to work with natural gas propane or butane It is not foreseen for butane or propane air For changing the gas type it is necessary to replace the nozzles hob adjust the minimum level check the gas connecti...

Page 21: ...he type of gas check that the minimum level is correct The air admission is correct when the flame is about 4 mm in length The top burners do not need adjustment of primary air Check that turning the knob quickly from the maximum position to the minimum one the flame does not go out Flame adjustment To adjust the minimum level Light the burner Turn the knob to the position of the minimum flame Rem...

Reviews: