


3
WARNINGS
It is very important that this instruction book
should be kept safety for future consultation. If it
should be sold or given to another person, please
ensure that the booklet goes together with it, so
that the new owner can know the functions of the
machine and also be aware of the warnings.
This warnings has been given for your and others
safety.
•
Prior to installation, ensure that the local
distribution conditions (nature of gas and
pressure) and the adjustement of the
appliance are compatible.
•
The adjustement conditions for this
appliance are stated on the label.
•
This appliance is not connected to a
combustion products evacuation device. It
shall be installed and connected in
accordance with current installation
regulations. Particular attention shall be
given to the relevant requirements
regarding ventilation.
•
This appliance has been designed for use by
adults. Take care therefore, that children do
not attempt to play with it.
•
When receiving the appliance, unpack it on
the spot. Check the general aspect of the
appliance. In case you have any comments
write them on the delivery note and keep one
copy.
•
Your appliance is intended only for normal
household use. Never use it for other
purposes, as commercial or industrial.
•
It is dangerous to modify, or attempt to
modify, the characteristics of this appliance.
•
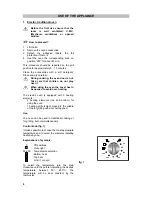
On first use, heat the oven empty in order to
eliminate the unpleasant swells of the thermal
insulation of the oven and residual grease
used in manufacturing.
-
Lift the cover.
-
Remove the accessories in the oven.
-
Remove all type of stickers and plastic
protection.
-
Heat the oven for about 45 min, knob on
position “ 250”. During this operation the
appliance with smoke, air the kitchen for
eliminating the swells and the smoke. The
accessories too, should be washed before
the first use.
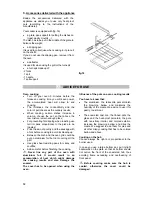
•
The use of a gas cooking appliance
produces, heat and humidity in the room in
which it is installed. Ensure good
ventilation of the room keeping natural
ventilation openings clear or installing a
mechanic ventilating device.
•
An intensive and prolonged use of the
cooker could necessitate a supplementary
airing by opening the window, or a more
effective ventilation by increasing the
mechanical device power, if there is.
•
In case you use electric appliances near the
cooker (for instance an electric mixer) the
cables should not come into touch with the hot
parts of the cooker or fastened by the oven
door of the cooker.
•
Supervise when frying in oil or greys
(chips…), hot greys ran cause fires easily.
•
Unstable or deformed pans should not be
placed on the hotplates and burners in
order to avoid accidents caused by
upsetting or boiling over.
•
Never pule the appliance by the oven handle.
Beside the accessories in the oven you can
use only heat-proof pans (see instructions of
the manufacturers).
•
Do not put products for cleaning or
inflammable material in the drawer (if your
cooker has one) or near the cooker.
•
On the open oven door never put :
-
heavy
things,
-
ensure that children do not climb up or sit on
it.
•
Always use gloves to remove dishes from
oven or when you come close to the hot
elements of the cooker.
•
Do not cover the bottom of the appliance with
aluminium foil, over heating causes damaging
of the enamel.
•
Never use the dripping pan as roasting tray.
•
In order to avoid damage of knobs do not
have opened the oven door when it works or it
is still hot.
•
The flame of the burner has to be smooth.
Avoid draught. If the flame is not regular clean
the burner and if the anomaly persists call
your after sales service.
•
After use of your gas cooker ensure that a the
knobs are on “Off” position.
•
Do not leave anything (cloths, aluminium foil,
etc.) on the hob when using the burners.
•
Always clean the cover before closing.
•
When the oven is in use the cover has to be
opened.
•
Leave the oven and the hob cool before
closing otherwise the cover could deteriorate.
•
Change the gas supply pipe little before its
expire date, mentioned on it.
•
Never use propane bottle (cylinder) in your
kitchen or in a closed room.
•
Do not allow children near the cooker
when it is in use, for avoiding touch of hot
surfaces, overturning of pots.


