background image

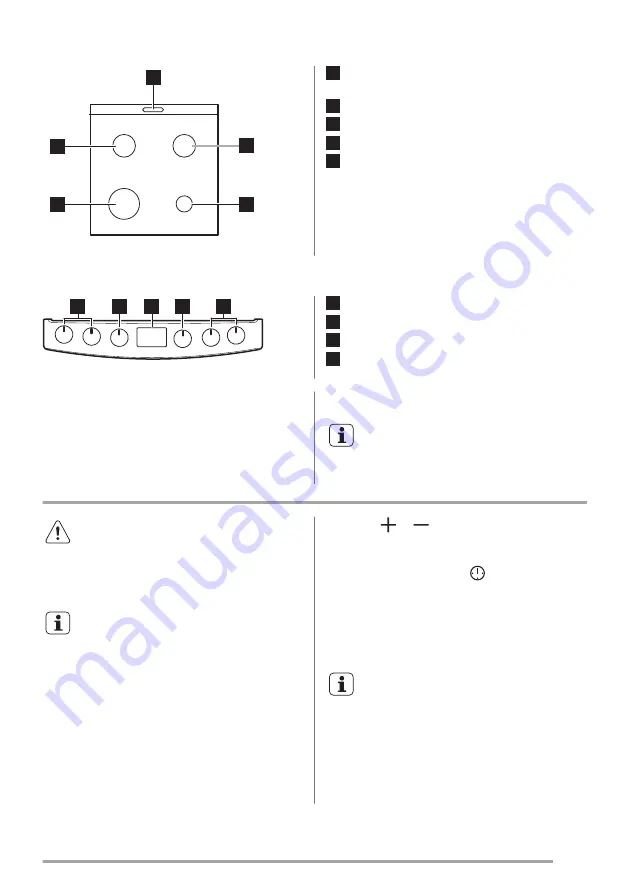
Cooking surface layout

2

5

4

3

1

1

Steam outlet - number and position depend

on the model

2

Semi-rapid burner

3

Auxiliary burner

4

Rapid burner

5

Semi-rapid burner

Cooker control panel

2

3

4

1

1

1

Knobs for the hob

2

Knob for the main oven

3

Electronic programmer

4

Knob for the top oven

Accessories

• Wire shelf

For cookware, cake tins, roasts.

• Grill- / Roasting pan

To bake and roast or as pan to collect fat.

• Trivet

For roasting and grilling.

Use the trivet only with the Grill- /

roasting pan.

Before first use

WARNING!

Refer to Safety chapters.

Initial Cleaning

Remove all accessories from the appliance.

Refer to "Care and cleaning"

chapter.

Clean the appliance before first use.

Put the accessories back to their initial position.

Setting the time

You must set the time before you operate the

oven.
When you connect the appliance to the

electrical supply or after a power cut, the

indicator for the Time of Day function flashes.

Press the   or   to set the correct time.

After approximately five seconds, the flashing

stops and the display shows the time of day.
To change the time, press   again and again

until the indicator for the Time of Day function

flashes.

Preheating

Preheat the empty appliance before first use.

Preheat the two ovens. Heat up one

oven at a time.

1. Set the maximum temperature.

2. Let the appliance operate for 1 hour.

Accessories can become hotter than usual. The

appliance can emit an odour and smoke. This is

normal. Make sure that the airflow is sufficient.

www.zanussi.com

7

Summary of Contents for ZCG63210BA

Page 1: ...EN ZCG63210BA ZCG63210WA ZCG63210XA User Manual Cooker GB IE ...

Page 2: ...le safety WARNING Risk of suffocation injury or permanent disability This appliance can be used by children aged from 8 years and above and persons with reduced physical sensory or mental capabilities or lack of experience and knowledge if they have been given supervision or instruction concerning use of the appliance in a safe way and understand the hazards involved Do not let children play with ...

Page 3: ...d by the manufacturer its Authorised Service Centre or similarly qualified persons in order to avoid a hazard Safety instructions This appliance is suitable for the following markets GB IE Installation WARNING Only a qualified person must install this appliance Remove all the packaging Do not install or use a damaged appliance Obey the installation instruction supplied with the appliance Always be...

Page 4: ...s air circulation around the appliance The information about the gas supply is on the rating plate This appliance is not connected to a device which evacuates the products of combustion Make sure to connect the appliance according to current installation regulations Pay attention to requirements regarding adequate ventilation Use WARNING Risk of injury and burns Risk of electrical shock Use this a...

Page 5: ... appliance is cold There is the risk that the glass panels can break Replace immediately the door glass panels when they are damaged Contact the Authorised Service Centre Be careful when you remove the door from the appliance The door is heavy Remaining fat or food in the appliance can cause fire Clean regularly the appliance to prevent the deterioration of the surface material Make sure the cavit...

Page 6: ...information on how to discard the appliance correctly Disconnect the appliance from the mains supply Cut off the mains cable and discard it Remove the door catch to prevent children and pets to get closed in the appliance Flat the external gas pipes Service To repair the appliance contact an Authorised Service Centre Use original spare parts only Product description General overview 5 1 2 3 1 2 3 ...

Page 7: ... the appliance before first use Put the accessories back to their initial position Setting the time You must set the time before you operate the oven When you connect the appliance to the electrical supply or after a power cut the indicator for the Time of Day function flashes Press the or to set the correct time After approximately five seconds the flashing stops and the display shows the time of...

Page 8: ...l device In this case approach the burner with a flame push the relevant knob down and turn it to maximum position Keep the knob pushed for equal or less than 10 seconds to let the thermocouple warm up If the burner accidentally goes out turn the knob to the off position and try to light the burner again after minimum 1 minute The spark generator can start automatically when you switch on the main...

Page 9: ...re placed centrally on the burner in order to get maximum stability and to get lower gas consumption Diameters of cookware WARNING Use cookware with diameters applicable to the size of burners Burner Diameter of cook ware mm Rapid 180 260 Semi rapid 120 220 Auxiliary 80 160 Hob Care and cleaning WARNING Refer to Safety chapters General information Clean the hob after each use Always use cookware w...

Page 10: ...r heating Keep the oven door open when you ignite the burner Oven safety device The oven burners have a thermocouple It stops the gas flow if the flame goes out You cannot operate the top oven burner when the grill is active 1 Open the oven door 2 Push the knob for the top oven and turn it counterclockwise to to ignite the top oven burner Push the knob for the top oven and turn it clockwise to to ...

Page 11: ...230 C 8 245 C 9 260 C Inserting the oven accessories Put the slide in accessories between the guide bars in the top main oven on the necessary shelf position The flame protection on the shelf must point up Use the shelf with flame protection only on the first and second shelf position in the top oven and on all shelf positions in the main oven Trivet and Grill Roasting pan WARNING Be careful when ...

Page 12: ...e Setting the Minute Minder Use this function to set a countdown time The maximum time you can set is 2 hours 30 minutes This function has no effect on the operation of the oven 1 Press again and again until the indicator for the Minute Minder function starts to flash 2 Press or to set the necessary time The Minute Minder starts automatically after five seconds 3 When the set time is completed an ...

Page 13: ...gs for a special recipe look for the one that is almost the same You can extend baking times by 10 15 minutes if you bake cakes on more than one shelf position Cakes and pastries at different heights do not always brown equally at first If this occurs do not change the temperature setting The differences equalize during the baking procedure With longer baking times you can deactivate the oven appr...

Page 14: ...ng tray The cake is not ready in the bak ing time given The oven temperature is too low The next time you bake set a slightly higher oven temperature Conventional Cooking Top oven Food Heat setting Total prepara tion time min Shelf posi tion Biscuits 4 10 20 2 Small Queen Cake 5 18 25 2 Sponge 4 18 20 2 Victoria Sandwich 4 18 25 2 Gingerbread 2 75 90 2 Flapjack 5 25 30 2 Shortbread 3 45 65 2 Fruit...

Page 15: ...idual Yorkshire Puddings 7 15 25 2 Conventional Cooking Main oven Food Heat setting Total preparation time min Shelf posi tion Biscuits 4 10 20 1 4 Bread 81 25 30 2 3 Bread rolls buns 81 15 20 3 4 Small Queen Cake 5 18 25 1 4 Sponge 4 20 30 1 4 Victoria Sandwich 4 18 25 1 4 Madeira Cake 4 75 90 2 3 Rich Fruit Cake 2 135 150 2 3 Christmas Cake 2 180 270 2 3 Gingerbread 2 75 90 2 3 Flapjack 5 25 30 ...

Page 16: ...ng Use heat resistant ovenware to roast refer to the instructions of the manufacturer You can roast large roasting joints directly in the deep pan if present or on the wire shelf above the deep pan Roast lean meats in the roasting tin with the lid This keeps the meat more succulent All types of meat that can be browned or have crackling can be roasted in the roasting tin without the lid We recomme...

Page 17: ...s per 500g 1lb and 35 40 minutes over 2 Rabbit 5 20 minutes per 500g 1lb and 20 minutes over 2 Grilling in general WARNING Always grill with the oven door opened When the grill is active closing the door automatically cut off the flames Do not use the door as a cut off device Always grill with the maximum temperature setting Always put the deep pan with trivet onto the second or third shelf positi...

Page 18: ... objects or a dishwasher It can cause damage to the nonstick coating Stainless steel or aluminium appliances Clean the oven door with a wet sponge only Dry it with a soft cloth Do not use steel wool acids or abrasive materials as they can damage the oven surface Clean the oven control panel with the same precautions Catalytic cleaning CAUTION Do not clean the catalytic surface with oven sprays abr...

Page 19: ... to remove it 4 Remove the glass panels To install the panels do the same steps in reverse Removing and cleaning the door glasses main oven The door glass in your product can be different in type and shape from the example you see in the image The number of glasses can also be different 1 Push the door trim at one side to remove it 1 2 A 2 Pull up the trim 3 Remove the glass panels To replace the ...

Page 20: ... connection There is no spark when you try to activate the spark generator Burner cap and crown are placed incorrectly Place the burner cap and crown correctly The flame extinguishes immedi ately after ignition Thermocouple is not heated up sufficiently After lightning the flame keep the knob pushed for equal or less than 10 seconds The flame ring is uneven Burner crown is blocked with food residu...

Page 21: ...urself contact your dealer or an Authorised Service Centre The necessary data for the service centre is on the rating plate The rating plate is on the front frame of the appliance cavity Do not remove the rating plate from the appliance cavity We recommend that you write the data here Model MOD Product number PNC Serial number S N Installation WARNING Refer to Safety chapters Technical data Dimens...

Page 22: ...30 mm 2 Mark the position of the wall and this gives anchor point for the stability chain 30 mm 180 mm Other technical data WARNING These instructions are only valid in the countries whose symbols appear on this booklet s cover Gas cate gory I3 Gas supply G30 31 3 28 30 37 mbar Gas burners BURNER NORMAL POWER kW LPG INJECTOR MARK 1 100 mm g h Auxiliary 1 0 50 71 8 Semi rapid 2 0 71 136 5 Rapid 3 0...

Page 23: ...e test The Rapid injector is used as a pressure test point 1 Connect the pressure gauge to the Rapid injector 2 Examine the supply pressure by turning the Rapid burner and one other burner fully on and lighting them The pressure must be a 20 mbar for Natural Gas b 29 mbar for LPG butane only c 37 mbar for LPG propane only 3 Turn the taps off and disconnect the pressure gauge 4 Make sure that all b...

Page 24: ... Semi Rapid 54 6 Energy efficiency for the gas hob EE gas hob 54 0 EN 30 2 1 Domestic cooking appliances burning gas Part 2 1 Rational use of energy General Hob Energy saving You can save energy during everyday cooking if you follow below hints When you heat up water use only the amount you need If it is possible always put the lids on the cookware Before you use the burners and pan support make s...

Page 25: ...ou want to use the residual heat to keep the meal warm choose the lowest possible temperature setting ENVIRONMENT CONCERNS Recycle the materials with the symbol Put the packaging in applicable containers to recycle it Help protect the environment and human health and to recycle waste of electrical and electronic appliances Do not dispose appliances marked with the symbol with the household waste R...

Page 26: ...26 www zanussi com ...

Page 27: ...www zanussi com 27 ...

Page 28: ...www zanussi com shop 867319441 B 302015 ...

Reviews: