background image

8

Important!

Before connecting up the machine to new pipework
or to pipework that has not been used for some time,
run off a reasonable amount of water to flush out any
debris that may have collected in the pipes.

Water drainage

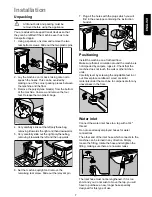
The end of the drain hose can be positioned in three
ways:

Hooked over the edge of a sink using the plastic
hose guide supplied with the machine

. In this

case, make sure the end cannot come unhooked
when the machine is emptying.
This could be done by tying it to the tap with a piece
of string or attaching it to the wall.

In a sink drain pipe branch

. This branch must be

above the trap so that the bend is at least 60 cm
above the ground.

Directly into a drain pipe at a height

of not less

than 60 cm and not more than 90 cm.
The end of the drain hose must always be

ventilated

, i.e. the inside diameter of the drain pipe

must be larger than the outside diameter of the drain
hose.

The drain hose must not be kinked.  Run it along the
floor; only the part near the drainage point must be
raised.

P

00

23

P

00

22

Electrical connection

This machine is designed to operate on a 220-230 V,
single-phase, 50 Hz supply.

Check that your domestic electrical installation can
take the maximum load required (2.2 kW), also
taking into account any other appliances in use.

WARNING: THIS APPLIANCE MUST BE

EARTHED.

The manufacturer declines any liability

should this safety measure not be
observed.

The appliance is supplied with a 13amp plug fitted.
In the event of having to change the fuse in the plug
supplied, a 13amp ASTA approved (BS1363A) fuse
must be used.
Should the plug need to be replaced for any reason,
proceed as described below.
The wires in the mains lead are coloured in
accordance with the following code:

Green and Yellow

- Earth

Blue

- Neutral

Brown

- Live

The wire coloured green and yellow must be
connected to the terminal marked with the letter «E»
or by the earth symbol 

or coloured green and

yellow.

The wire coloured blue must be connected to the
terminal «N» or coloured black.

The wire coloured brown must be connected to the
terminal marked «L» or coloured red.
Upon completion there must be no cut, or stray
strands of wire present and the cord clamp must be
secure over the outer sheath.

WARNING:

A cut off plug inserted into a 13 amp socket
is a serious safety (shock) hazard.
Ensure that the cut off plug is disposed of
safely.

GREEN & YELLOW

BROWN

CORD CLAMP

BLUE

13

A

P1

0

41

E

N

L

Summary of Contents for W1206

Page 1: ......

Page 2: ...vice Centre The symbols you will see on some paragraphs of this booklet have the following meaning The warning triangle and or the key words Warning Caution emphasize information that is particularly important for your safety or correct functioning of the appliance The information marked with this symbol provides additional instructions and practical tips on the use of the appliance Tips and infor...

Page 3: ... specifications 6 Installation 7 Unpacking 7 Positioning 7 Water inlet 7 8 Water drainage 8 Electrical connection 8 Your new washer dryer 9 Description of the appliance 9 Detergent dispenser drawer 9 Use 10 Control panel 10 Controls 10 14 Washing hints 15 Sorting the laundry 15 Temperatures 15 Before loading the laundry 15 Maximum loads 15 Laundry weights 15 Removing stains 15 Detergents and addit...

Page 4: ...ch fluids have been used to remove stains prior to washing wait until they have completely evaporated from the fabric before placing garments in the appliance Place small items such as socks belts etc in a cloth bag or pillowcase to prevent them getting trapped between the drum and the tub Warnings If you use a liquid detergent with a dispenser which has to be placed directly in the drum remember ...

Page 5: ...h washing and drying cycles The machine will consume less energy if the laundry is adequately spun before being dried With adequate pre treatment stains and limited soiling can be removed the laundry can then be washed at a lower temperature Measure out detergent according to the water hardness the degree of soiling and the quantity of laundry being washed Child safety Children are often not aware...

Page 6: ...PIN SPEED 1200 rpm max POWER SUPPLY VOLTAGE FREQUENCY 220 230 V 50 Hz TOTAL POWER ABSORBED 2200 W MINIMUM FUSE PROTECTION 10 A WATER PRESSURE Minimum 0 05 MPa Maximum 0 8 MPa This appliance complies with the following EEC Directives 73 23 EEC of 19 02 73 relating to low voltage 89 336 EEC of 03 05 89 relating to electromagnetic compatibility Technical specifications ...

Page 7: ...ide out the relevant pin P1127 P1126 P1124 2 3 1 P0001 P1129 7 Plug all the holes with the plugs which you will find in the envelope containing the instruction booklet Positioning Install the machine on a flat hard floor Make sure that air circulation around the machine is not impeded by carpets rugs etc Check that the machine does not touch the wall or other kitchen units Carefully level by screw...

Page 8: ...0 230 V single phase 50 Hz supply Check that your domestic electrical installation can take the maximum load required 2 2 kW also taking into account any other appliances in use WARNING THIS APPLIANCE MUST BE EARTHED The manufacturer declines any liability should this safety measure not be observed The appliance is supplied with a 13amp plug fitted In the event of having to change the fuse in the ...

Page 9: ... the programme phase which is running The special handwash wool programme with its new delicate wash system treats your woollens with extreme care The drying programmes will give your wash that soft relaxed feel whatever the weather 3 compartment drawer for detergent and fabric softener The balance control device ensures the machine is stable during the spin 1 Detergent dispenser drawer 2 Control ...

Page 10: ...st be hand washed 4 TEMPERATURE button Press this button repeatedly to increase or decrease the temperature if you want your laundry to be washed at a temperature different from the one proposed by the machine The relevant light will light up Maximum temperatures are 90 C for cotton 60 C for synthetic fabrics 40 C for delicate fabrics fabrics to be hand washed or wool fabrics and 30 C for MINI 30 ...

Page 11: ...r synthetics the relevant light illuminates To select cottons you have to push the button for about 2 seconds To select the drying time push the button until the time you want appears in the display according to the fabrics cotton or synthetics you have to dry For COTTON and SYNTHETICS you can select a drying time from 10 minutes to 130 minutes 2 10 Every time you press the button the time increas...

Page 12: ...when remain the last 2 hours each 30 minutes You can delay the start of the selected programme by up to 23 hours in one hour intervals An incorrect option selection has been made this is indicated by the message Err when a function incompatible with the current programme is selected 0 An alarm code indicates a fault in the machine operation see the relevant chapter on page 27 10 START PAUSE button...

Page 13: ...ss SKIP RESET twice the pilot lights WASH and RINSES go out Prewash Wash Rinse Spin Dry Drain DRAIN Depress SKIP RESET three times the pilot lights WASH RINSES and SPIN go out and only the pilot light DRAIN will light on Example In this case the machine will perform the rinses followed by the spin 12 DELAY START button This button makes it possible to delay the starting of the programme selected f...

Page 14: ...elect a programme the lights relevant to the phases that form the programme light up After you have started the programme only the light relevant to the phase that is currently being carried out will remain lit Prewash Wash Rinse Spin Dry Drain 14 ...

Page 15: ...makes the most efficient use of water and energy For heavily soiled laundry reduce the load size Laundry weights The following weights are indicative bathrobe 1200 g napkin 100 g quilt cover 700 g sheet 500 g pillow case 200 g tablecloth 250 g towelling towel 200 g tea cloth 100 g night dress 200 g ladies briefs 100 g man s work shirt 600 g man s shirt 200 g man s pyjamas 500 g blouse 100 g men s ...

Page 16: ...aste and protect the environment Although biodegradable detergents contain substances which in large quantities can upset the delicate balance of nature The choice of detergent will depend on the type of fabric delicates woollens cottons etc the colour washing temperature and degree of soiling All commonly available washing machine detergents may be used in this appliance powder detergents for all...

Page 17: ...wing symbols refer to drying Machine drying is usually possible Normal drying normal temperature Gentle drying reduced temperature Do not machine dry Duration of the drying cycle The drying time can vary according to the final spin speed the required degree of drying extra dry store dry or iron dry the type of laundry the size of load The usual drying times for the timed programmes are indicated i...

Page 18: ...n of the cycle Prewash Wash Rinse Spin Dry Drain FABRICS COTTONS SYNTHETICS DELICATES HAND WASH MINI 30 0 ON OFF Operating sequence Washing only Before washing your first load of laundry we recommend that you run a cotton cycle at 90 C with the machine empty in order to remove any manufacturing residue from the drum and tub Pour half a measure of detergent into the main wash compartment and start ...

Page 19: ... have chosen a delayed start the machine will begin the countdown The display will show the duration of the programme or the selected delay START PAUSE DELAY 6 Select the temperature Press the TEMPERATURE button if you wish to select a temperature value different from the one proposed by the machine or the COLD WASH The relevant light will light up 7 Select the spin speed or NO SPIN option Press t...

Page 20: ...hese requirements are met when you pause the machine the door can be opened Should it not be possible to open the door and should it be absolutely necessary to do so switch the machine off by pressing the ON OFF button After approximately 3 minutes you can open the door Pay attention to the level and temperature of the water in the machine When you close the door and press the ON OFF button again ...

Page 21: ...HETICS AUTO DRY 4 Press the START PAUSE button to start the programme 5 At the end of the programme press SKIP RESET button to clear the memory and switch the machine off by depressing ON OFF button 6 Remove the laundry 7 Proceed following the same steps to dry the remaining of fabrics Autodrying 2 kg of synthetics You intend to wash and dry automatically 2 kg of synthetics Do not use a dosing dev...

Page 22: ...cs e g acrylic fabrics viscose poly ester synthetic blends Handwash Wool Items to be hand washed Mini 30 Slightly soiled fabrics 30 40 30 40 30 40 60 30 40 60 60 7 kg 7 kg 3 kg 3 kg 2 kg 2 kg Max load Programme temperature Available options Cottons 90 C Cottons 60 40 30 C or COLD Synthetics 60 40 30 C or COLD Delicates 40 30 C or COLD Handwash 40 30 C or COLD Mini 30 30 C Description of programme ...

Page 23: ...pin speed 1200 Drying time mins 95 105 1 5 kg 1200 45 55 Synthetics and mixed fabrics jumpers blouses underwear household linen 2 kg 900 70 80 1 kg 900 35 45 Extra dry Ideal for towelling materials Cotton and linen bathrobes bath towels etc 3 5 kg 1200 105 115 1 5 kg 1200 55 65 Iron dry Suitable for ironing Cotton and linen sheets tablecloths shirts etc 3 5 kg 1200 75 85 1 5 kg 1200 40 50 ...

Page 24: ...re 30 C Hand wash Do not wash at all Bleaching Bleach in cold water Do not bleach Ironing Hot iron max 200 C Warm iron max 150 C Lukewarm iron max 110 C Do not iron Dry cleaning Dry cleaning in all solvents Dry cleaning in perchlorethylene petrol pure alcohol R 111 R 113 Dry cleaning in petrol pure alcohol and R 113 Do not dry clean Drying Flat On the line On clothes hanger Tumble dry high tempera...

Page 25: ...hand corner To facilitate cleaning the top part of the additive compartments can be removed C0067 C0066 P1050 Detergent can also accumulate inside the drawer recess clean it with an old toothbrush Refit the drawer after cleaning 4 Drain pump The pump should be inspected if the machine does not empty and or spin the machine makes an unusual noise during draining due to objects such as safety pins c...

Page 26: ...om the socket Close the water tap and unscrew the water inlet hose from the tap Place the end of the emergency emptying hose and that of the inlet hose in a bowl placed on the floor and let water drain out Screw the water inlet hose back on and reposition the emergency emptying hose after having put the cap on again By doing this any water remaining in the machine is removed avoiding the formation...

Page 27: ...se fittings It is not always easy to see this as the water runs down the hose check to see if it is damp The drain hose is damaged The cap on the emergency emptying hose has not been replaced after cleaning the pump Unsatisfactory washing results Too little detergent or unsuitable detergent has been used Stubborn stains have not been treated prior to washing The correct temperature was not selecte...

Page 28: ...r the laundry is not dry enough The electronic unbalance detection device has cut in because the laundry is not evenly distributed in the drum The laundry is redistributed by reverse rotation of the drum This may happen several times before the unbalance disappears and normal spinning can resume If after few minutes the laundry is still not evenly distributed in the drum the machine will spin at a...

Page 29: ...st producer of powered appliances for kitchen cleaning and outdoor use More than 55 million Electrolux Group products such as refrigerators cookers washing machines vacuum cleaners chain saws and lawn mowers are sold each year to a value of approx USD 14 billion in more than 150 countries around the world ...

Reviews: