background image

23

Water inlet

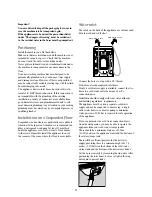
The inlets on the back of the appliance are colour coded,
blue for cold and red for hot.

Connect the hoses to a tap with a 3/4” thread.

Do not use already employed inlet hoses.
If only a cold water supply is available, connect the two
hoses to a cold water outlet by means of a «Y»
connection piece.

Installation should comply with local water authority
and building regulations’ requirements.

The appliance must be given a separate cold water
supply and not be connected to a mixer tap, a single
outlet water heater or a booster pump. A minimum
water pressure of 0.48 bar is required for safe operation
of the appliance.

If you cannot make the cold water connection direct
from the rising mains, you may be able to operate the
appliance from your cold water storage system.

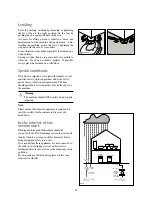
There should be a minimum distance of 5.02m 
(16.5 ft) between the appliance’s inlet and the bottom of
the water storage tank.

There will be sufficient pressure for the hot water
supply, providing there is a minimun height of 2.74
metres  (9 ft) between the bottom of the cold water
storage tank and the bottom of the hot water cylinder.

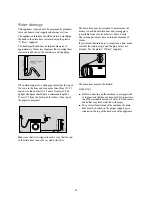
Set the hoses correctly by loosening the ring nuts. After
positioning the inlet hoses, be sure to tighten the ring
nuts again to prevent leaks.

Important !

You are advised to keep all the packaging for re-use in
case the machine is to be transported again.
If the appliance is to be moved, the precautions listed
under “The dangers of freezing” must be carried out
i.e. the residual water in the hoses must be pumped out. 

Positioning

Install the machine on a flat hard floor.
Make sure that air circulation around the machine is not
impeded by carpets, rugs etc. Check that the machine
does not touch the wall or other kitchen units.
Never place cardboard, wood or similar materials under
the machine to compensate for any unevenness in the
floor.

Your new washing machine has been designed to be
permanently plumbed in to your home’s water supply
and drainage system. However, if this is not possible, it
may be connected to suitable existing taps with the drain
hose discharging into a sink.
The appliance has two inlet hoses, hot and cold, with
female 3/4” BSP thread connectors. If this connection is
not compatible with the plumbing of the existing
installation, a variety of connectors are available from
good hardware stores and plumbers merchants to suit
most domestic plumbing. Any alteration to your existing
plumbing must be carried out by a competent person, or
qualified plumber.

Installation on a Suspended Floor

Suspended wooden floors are particularly susceptible to
vibration. To help prevent vibration we recommend you
place a waterproof wood panel, at least 15 mm thick
under the appliance, secured to at least 2 floor beams
with screws. If possible install the appliance in one of
the corners of the room, where the floor is more stable.

HOT WATER SUPPLY

COLD WATER SUPPLY

P0021

Summary of Contents for F1003W

Page 1: ...WASHING MACHINE F1003 W INSTRUCTION BOOKLET 35 292 832 1 GB ...

Page 2: ...ockets are empty and buttons and zips are fastened Avoid washing frayed or torn articles and treat stains such as paint ink rust and grass before washing Underwired bras must NOT be machine washed Any objects such as coins safety pins nails screws stones or any other hard sharp material can cause extensive damage and must not be placed into the machine Garments which have been in contact with vola...

Page 3: ... the programme 10 Washing Hints 11 12 Which detergent 12 And in which form 12 Wash Care Symbols 13 Washing Programmes 14 15 Maintenance and Cleaning 16 17 Descaling 16 After each wash 16 Maintenance Wash 16 External cleaning 16 Cleaning the dispenser drawer 16 Cleaning the drawer recess 16 Cleaning the pump 16 The dangers of freezing 17 Something Not Working 18 19 Service and Spare Parts 19 Guaran...

Page 4: ...stains and limited soiling can be removed the laundry can then be washed at a lower temperature so saving energy In the interest of the environment Materials marked with the symbol are recyclable Check with your local Council or Environmental Health Office to see if there are facilities in your area for re cycling this appliance When the appliance is to be scrapped cut off the power supply cable a...

Page 5: ...ergent dispenser drawer 2 Programme guide 3 ON OFF button 4 Option buttons 5 Mains on light 6 Programme selector dial 7 Door opening handle 8 Drain pump 9 Adjustable feet Detergent dispenser drawer Prewash Main wash Fabric softener C0069 ...

Page 6: ...F LOAD button Select this button to reduce water consumption on the rinse cycle when washing a smaller load of cottons or linens maximum load size 2 25 kg 6 The Control Panel 5 Mains on light This light illuminates when the machine starts working and goes out when the ON OFF button is released 6 Programme selector dial Turn the dial clockwise to select the required wash programme Before setting th...

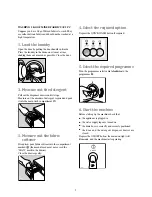
Page 7: ... drum one item at a time shaking them out as much as possible Close the door 2 Measure out the detergent Pull out the dispenser drawer until it stops Measure out the amount of detergent required and pour it into the main wash compartment If you wish to carry out the prewash pour detergent into the compartment marked C0070 P0004 3 Measure out the fabric softener If required pour fabric softener int...

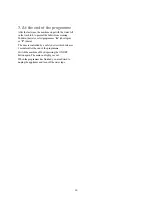
Page 8: ...e ON OFF button the mains on light will illuminate and the machine starts operating 7 At the end of the programme The machine stops automatically The door is controlled by a safety device which releases 2 minutes after the end of the programme Switch the machine off by depressing the ON OFF button again The mains on light goes out When the programme has finished you are advised to unplug the appli...

Page 9: ...sure out the fabric softener If required pour fabric softener into the compartment marked the amount used must not exceed the MAX mark in the drawer Close the drawer gently C0071 C0070 P0004 4 Select the required option Depress the QUICK WASH button if required 5 Select the required programme Turn the programme selector dial clockwise to the programme H 6 Start the machine Before starting up the m...

Page 10: ...To drain the water select programme K short spin or P drain The door is controlled by a safety device which releases 2 minutes after the end of the programme Switch the machine off by depressing the ON OFF button again The mains on light goes out When the programme has finished you are advised to unplug the appliance and turn off the water taps ...

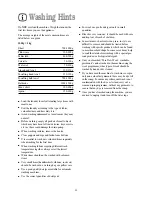
Page 11: ...erature White items should not be washed with coloured items Very small items handkerchiefs ribbons socks etc should be washed in a washing bag or a pillow case Use a good quality detergent suitable for automatic washing machines Use the correct quantities of detergent For wool use gentle detergent only in small quantities Bleach is very corrosive it should be used with care and kept out of reach ...

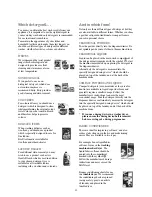
Page 12: ...shing machine washer dryer The liquid fabric softener should be poured into the compartment marked with the symbol Follow the manufacturer s dosage instructions and never exceed the MAX level Bounce conditioning sheets for use in a tumble dryer We recommend the conditioning sheets are pinned using a safety pin to an article of laundry and placed in the tumble dryer Which detergent To ensure you ob...

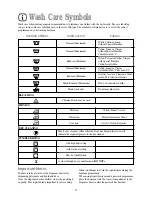
Page 13: ...ioner entering the machine prematurely When using liquid detergent and a prewash programme place the detergent into the correct compartment in the dispenser drawer after the prewash has finished 95 60 50 40 40 40 Chlorine bleach may be used May be tumble dried with high heat setting with low heat setting A cross through any symbol means DO NOT May be dry cleaned Other letters and or a bar beneath ...

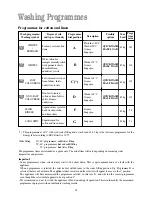
Page 14: ... 4 5 kg This programme at 60 C with cold water filling and a wash load of 4 5 kg is the reference programme for the Energy label according to EEC Directive 92 75 Water filling 30 30 40 programmes cold water filling 50 60 programmes hot and cold filling 95 programme hot water filling The programme times are intended as a guide only The actual time will vary depending on incoming water temperature a...

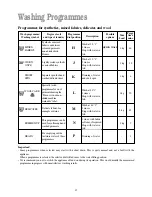
Page 15: ...synthetic or mixed fabrics This programme can be used for softening hand washed garments Separate spin for hand washed delicate items For emptying out the last rinse water of these programmes P K N Draining of water and short spin 1 rinse with fabric softener if required Stop with water in tub Draining of water Programmes for synthetics mixed fabrics delicates and wool 30 Max Load Progr time mins ...

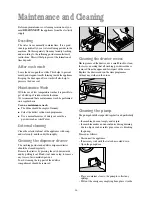
Page 16: ...iel Futur External cleaning Clean the exterior cabinet of the appliance with soap and water only and then dry thoroughly Cleaning the dispenser drawer The washing powder and additive dispenser drawer should be cleaned regularly Remove the drawer by pressing the catch downwards and by pulling it out Flush it out under a tap to remove any traces of accumulated powder To aid cleaning the top part of ...

Page 17: ...depending on the programme selected there can be hot water in the pump circuit Never remove the pump cover during a wash cycle always wait until the appliance has finished the cycle and is empty When replacing the pump cover after a cleaning inspection ensure it is securely retightened so as to stop leaks and young children being able to remove it Cleaning the water inlet filters If your water is ...

Page 18: ...ed The drain pump may be blocked The drain hose extension if fitted is not correct Follow the instructions for connecting to the waste The drainage system pipes are blocked The wash load is unbalanced redistribute the clothes inside the drum to allow the machine to spin A programme which ends with water in tub has been selected There is water on the floor Too much detergent or unsuitable detergent...

Page 19: ...ecting performance Service Spare Parts In the event of your appliance requiring service or if you wish to purchase spare parts please contact your local Zanussi Service Force Centre by telephoning 0870 5 929929 Your telephone call will be automatically routed to the Service Force Centre covering your post code area For the address of your local Zanussi Service Force Centre and further information ...

Page 20: ...parts of glass or plastic Costs incurred for calls to put right an appliance which is improperly installed or calls to appliances outside the United Kingdom Appliances found to be in use within a commercial environment plus those which are subject to rental agreements Products of Zanussi Electrolux manufacture which are NOT marketed by Zanussi Electrolux European guarantee If you should move to an...

Page 21: ...should be carried out by our Service Force Centre This appliance complies with the following E E C Directives 73 23 EEC of 19 2 73 Low Voltage Directive and subsequent modifications 89 336 EEC of 3 5 89 Electromagnetic Compatibility Directive and subsequent modifications DIMENSIONS Height 85 cm Width 60 cm Depth 60 cm POWER SUPPLY VOLTAGE 230 240 V 50 Hz TOTAL POWER ABSORBED 2100 W 10A Minimum hot...

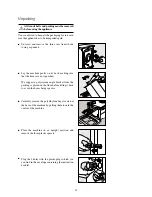
Page 22: ...the hoses are not squashed We suggest a polystyrene angle bracket from the packing is placed on the floor before tilting it back to avoid the hoses being spacers Carefully remove the polyethylene bags located at the base of the machine by pulling them toward the centre of the machine Place the machine in an upright position and remove the three plastic spacers Plug the 3 holes with the plastic plu...

Page 23: ... be transported again If the appliance is to be moved the precautions listed under The dangers of freezing must be carried out i e the residual water in the hoses must be pumped out Positioning Install the machine on a flat hard floor Make sure that air circulation around the machine is not impeded by carpets rugs etc Check that the machine does not touch the wall or other kitchen units Never plac...

Page 24: ...that it is designed in such a way that the end of the drain hose cannot be covered with water P1039 3 pin Max 90 cm 35 4 Min 60 cm 23 6 The drain hose may be extended to a maximum of 4 metres An additional drain hose and joining piece is available from your local Service Force Centre The joining piece must have an internal diameter of 18mm If you intend the drain hose to empty into a sink make sur...

Page 25: ...base should protrude a few centimetres beyond the edges of the machine Warning The machine should NOT be placed on deep pile carpeting Note Please ensure that when the appliance is installed it is easily accessible for the engineer in the event of a breakdown In the interest of the environment Washing machines and dishwashers should be connected to the FOUL drainage system the water will then be t...

Page 26: ...D The manufacturer declines any liability should this safety measure not be observed Before switching on make sure the electricity supply voltage is the same as that indicated on the appliance rating plate the plate is adhered to the rear of the appliance The appliance is supplied with a 13amp plug fitted In the event of having to change the fuse in the plug supplied a 13amp ASTA approved BS1363A ...

Page 27: ......

Page 28: ...largest producer of powered appliances for kitchen cleaning and outdoor use More than 55 million Electrolux Group products such as refrigerators cookers washing machines vacuum cleaners chain saws and lawn mowers are sold each year to a value of approx USD 14 billion in more than 150 countries around the world ...

Reviews: