background image

5 cm

min.

200 cm

2

min.

200 cm

2

 CAUTION!

Refer to the installation instructions for

the installation.

3.5 Door reversibility

Please refer to the separate document with

instructions on installation and door reversal.

 CAUTION!

At every stage of reversing the door

protect the floor from scratching with a

durable material.

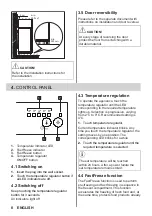
4. CONTROL PANEL

1

2

4

3

1

2

4

3

1. Temperature indicator LED

2. FastFreeze indicator

3. FastFreeze button

4. Temperature regulator

ON/OFF button

4.1 Switching on

1. Insert the plug into the wall socket.

2. Touch the temperature regulator button if

all LED indicators are off.

4.2 Switching off

Keep touching the temperature regulator

button for 3 seconds.

All indicators light off.

4.3 Temperature regulation

To operate the appliance, touch the

temperature regulator until the LED

corresponding to the required temperature

lights up. Selection is progressive, varying

from 2°C to 8°C. Recommended setting is

4°C.

1. Touch temperature regulator.

Current temperature indicator blinks. Any

time you touch the temperature regulator, the

setting moves by one position. The

corresponding LED blinks for a while.

2. Touch the temperature regulator until the

required temperature is selected.


The set temperature will be reached

within 24 hours. After a power failure the

set temperature remains stored.

4.4 FastFreeze function

The FastFreeze function is used to perform

pre-freezing and fast freezing in sequence in

the freezer compartment. This function

accelerates the freezing of fresh food and, at

the same time, protects food products already

8 ENGLISH

Summary of Contents for KTAK14FS1

Page 1: ...EN User Manual 2 Fridge Freezer DE Benutzerinformation 19 K hl Gefrierschrank KTAK14FS1...

Page 2: ...reference 1 1 Children and vulnerable people safety This appliance can be used by children aged from 8 years and above and persons with reduced physical sensory or mental capabilities or lack of exper...

Page 3: ...rigerator so that it is not in contact with or drip onto other food WARNING Keep ventilation openings in the appliance enclosure or in the built in structure clear of obstruction WARNING Do not use me...

Page 4: ...kers ovens or hobs Do not expose the appliance to the rain Do not install the appliance where there is direct sunlight Do not install this appliance in areas that are too humid or too cold When you mo...

Page 5: ...able for household room illumination 2 5 Care and cleaning WARNING Risk of injury or damage to the appliance Before maintenance deactivate the appliance and disconnect the mains plug from the mains so...

Page 6: ...part of the cooling unit that is near the heat exchanger 3 INSTALLATION WARNING Refer to Safety chapters WARNING Refer to installation instruction document to install your appliance WARNING Fix the ap...

Page 7: ...ted indoor position This appliance is intended to be used at ambient temperature ranging from 10 C to 43 C The correct operation of the appliance can only be guaranteed within the specified temperatur...

Page 8: ...cators light off 4 3 Temperature regulation To operate the appliance touch the temperature regulator until the LED corresponding to the required temperature lights up Selection is progressive varying...

Page 9: ...ff automatically after around one hour to avoid disturbing The alarm deactivates after closing the door 5 DAILY USE 5 1 Positioning the door shelves To permit storage of food packages of various sizes...

Page 10: ...ked immediately then cooled and then re frozen 5 6 Thawing Deep frozen or frozen food prior to being consumed can be thawed in the refrigerator or inside a plastic bag under cold water This operation...

Page 11: ...e is no frozen food Do not eat ice cubes water ices or ice lollies immediately after taking them out of the freezer Risk of frostbites Do not re freeze defrosted food If the food has defrosted cook it...

Page 12: ...ended to defrost the food inside the fridge Do not insert hot food inside the appliance Make sure it has cooled down at room temperature before inserting it To prevent food waste the new stock of food...

Page 13: ...ance over the motor compressor where it evaporates It is important to periodically clean the defrost water drain hole in the middle of the refrigerator compartment channel to prevent the water overflo...

Page 14: ...en to prevent unpleasant smells 8 TROUBLESHOOTING WARNING Refer to Safety chapters 8 1 What to do if Problem Possible cause Solution The appliance does not operate The appliance is switched off Switch...

Page 15: ...g of the door The lamp does not work The lamp is in stand by mode Close and open the door The lamp is defective Contact the nearest Authorized Service Centre There is too much frost and ice The door i...

Page 16: ...on section The temperature in the appliance is too low too high The temperature is not set cor rectly Set a higher lower temperature The door is not closed correctly Refer to Closing the door sec tion...

Page 17: ...2 If necessary adjust the door Refer to installation instructions 3 If necessary replace the defective door gaskets Contact the Authorised Service Centre 9 NOISES SSSRRR CLICK HISSS BRRR BLUBB 10 TEC...

Page 18: ...r any EcoDesign verification shall be compliant with EN 62552 Ventilation requirements recess dimensions and minimum rear clearances shall be as stated in this User Manual at Chapter 3 Please contact...

Page 19: ...einem sicheren und zug nglichen Ort auf 1 1 Sicherheit von Kindern und schutzbed rftigen Personen Das Ger t kann von Kindern ab 8 Jahren und Personen mit eingeschr nkten physischen sensorischen oder...

Page 20: ...e folgenden Hinweise ffnen Sie die T r nicht ber l ngere Zeit hinweg Reinigen Sie regelm ig Oberfl chen die mit Lebensmitteln in Kontakt kommen k nnen und zug ngliche Ablaufsysteme Lagern Sie rohes Fl...

Page 21: ...tzt wird Halten Sie sich an die mitgelieferte Montageanleitung Seien Sie beim Umsetzen des Ger tes vorsichtig da es sehr schwer ist Tragen Sie stets Sicherheitshandschuhe und festes Schuhwerk Stellen...

Page 22: ...ektrischen Ger te z B Eisbereiter in das Ger t wenn solche Ger te nicht ausdr cklich vom Hersteller f r diesen Zweck zugelassen sind Wird der K ltekreislauf besch digt stellen Sie bitte sicher dass es...

Page 23: ...lle Ersatzteile f r alle Modelle relevant sind T rdichtungen sind innerhalb von 10 Jahren nach Produkteinstellung des Modells erh ltlich 2 7 Entsorgung WARNUNG Verletzungs und Erstickungsgefahr Trenne...

Page 24: ...s einschlie lich Griff und zuz glich des notwendigen Freiraums f r die Zirkulation der K hlluft Platzbedarf insgesamt w hrend des Be triebs H3 A B mm 1482 W3 mm 548 D3 mm 1071 H he Breite und Tiefe de...

Page 25: ...nglich bleiben 3 3 Elektroanschluss Kontrollieren Sie vor dem Einschalten des Ger ts ob die Netzspannung und frequenz Ihres Hausanschlusses mit den auf dem Typenschild angegebenen Anschlusswerten bere...

Page 26: ...nem Stromausfall bleibt die eingestellte Temperatur gespeichert 4 4 Funktion FastFreeze Die FastFreeze Funktion dient dazu das Gefrierfach auf das Vorgefrieren und anschlie ende Schnellgefrieren der L...

Page 27: ...en 5 3 Obst Gem seschublade Im unteren Teil des Ger ts befindet sich eine spezielle Schublade die sich zur Aufbewahrung von Obst und Gem se eignet 5 4 Einfrieren frischer Lebensmittel Das Gefrierfach...

Page 28: ...ausgestattet Verwenden Sie zum Entnehmen der Schalen aus dem Gefrierfach keine Gegenst nde aus Metall 1 F llen Sie die Schalen mit Wasser 2 Stellen Sie die Eisschalen in das Gefrierfach 6 TIPPS UND H...

Page 29: ...ierger t genommen wurden Gefahr von Erfrierungen Frieren Sie aufgetaute Lebensmittel nicht wieder ein Wenn Lebensmittel aufgetaut wurden kochen Sie sie lassen Sie sie abk hlen und frieren Sie sie dann...

Page 30: ...re Temperatureinstellung im Ger t kann die Haltbarkeit der Lebensmittel verk rzen Decken Sie die Lebensmittel mit Verpackungsmaterial ab um ihre Frische und ihr Aroma zu bewahren Verwenden Sie immer g...

Page 31: ...en Neugeruch am besten durch Reinigen der Innenteile mit lauwarmem Wasser und einer neutralen Seife Sorgf ltig nachtrocknen VORSICHT Verwenden Sie keine chemischen Reinigungsmittel Scheuerpulver chlor...

Page 32: ...H nden an Ihre H nde k nnten an den Lebensmitteln festfrieren 3 Lassen Sie die T r offen Sch tzen Sie den Boden vor dem Abtauwasser z B mit einem Tuch oder einem flachen Beh lter 4 Zur Beschleunigung...

Page 33: ...alsch einge stellt Siehe Kapitel Bedienfeld Es wurden viele Lebensmittel gleichzeitig hineingelegt Warten Sie einige Stunden und pr fen Sie erneut die Tempera tur Die Raumtemperatur ist zu hoch Siehe...

Page 34: ...Tempera tur ein Siehe Kapitel Bedien feld Wasser flie t an der R ckwand des K hlschranks herunter W hrend des automatischen Ab tauprozesses taut das Eis an der R ckwand ab Das ist richtig An der R ckw...

Page 35: ...net ffnen Sie die T r nur bei Bedarf Die Funktion FastFreeze ist ein geschaltet Siehe Abschnitt Funktion FastF reeze Bestimmte Oberfl chen im Innern des K hlraums sind zu bestimm ten Zeiten w rmer Das...

Page 36: ...auf Es ist auch m glich die gleichen Informationen in EPREL zu finden indem Sie den Link https eprel ec europa eu sowie den Modellnamen und die Produktnummer die Sie auf dem Typenschild des Ger ts fi...

Page 37: ...erialien mit dem Symbol Entsorgen Sie die Verpackung in den entsprechenden Recyclingbeh ltern Recyceln Sie zum Umwelt und Gesundheitsschutz elektrische und elektronische Ger te Entsorgen Sie Ger te mi...

Page 38: ......

Page 39: ......

Page 40: ...222378723 A 472020...

Reviews: