


plik: inst_ext_en_efc-02 | modyfi kacja: 22.05.2014
TRANSMITTER TAB
ADDING TRANSMITTERS
CLONING
User using the tab can:
Creation of unlimited number of „virtual” transmitters system EXTA FREE, which can be then assigned to the receives system by giving the specific
functionality. Appearance created transmitters alludes to physical transmitters system EXTA FREE. Analogous is also method of assigning transmitters
to the receivers and available modes.
The transfer functionalities of physical transmitters system, to created in the application of transmitters by „virtual” through function cloning.
This allows for easy and fast transfer of configuration to the currently running system to the mobile application, without any needs for re-programming
receivers. The creatures of remote control, whose size (number of of buttons) is defined by the user.
The remote control, enables you to operate a plurality of receivers from one location of the application. This may be used for example, for con-
trolling windows blinds throughout the house. Creating shortcuts of the whole transmitters and single-buttons of the transmitter - shortcuts can
be located on your desktop of the mobile device or an additional desktop App.
Freely edition of the names of transmitters and buttons.
Free governance created of transmitters (edition creation, edition serial number, delete transmitters).
Transmitters are available in the tab ”TRANSMITTERS”:
In order to add a transmitter to the app should be:
● Go to the tab and select the button of transmitters
.
● Select from a list of transmitter what you want to add to the application.
● After selecting transmitter it will be added to the tab of Transmitters.
● Press to the added transmitter. It will be developed to the full screen of application.
● Give the functionality to the transmitter through the appropriate assignment to the receiver. During programming, consider the advices of the operating
instructions for a particular receiver. Transmitter visible in the application, should be treated as a typical transmitter system EXTA FREE.
The added functionality of transmitter can be assigned also through cloning options of the whole transmitter or various buttons.
CLONING OF TRANSMITTERS / BUTTONS
(function works similar in the tabs TRANSMITTERS / HOUSE / SCENES / TIMED)
● ”Cloning” option of transmitters/ buttons enables quick transfer of physical functionalities of transmitters directly to the application on the device mobile.
By configuring in this way the system is not necessary access to already installed on the object of receivers EXTA FREE system.
● You can clone all the transmitters while retaining their functionality or one of the buttons.
● All transmitters can be cloned only with appropriate so-called types, to the transmitter RNK-02 you can ‚’clone’’ only physical functionality from transmit-
ter RNK-02.
● Cloning between buttons however is so-called any completely, can ‚’clone’’ if enter to the functionality of transmitter battery RNK-02 under corresponding
transmitter buttons RNK-04 or P-257 / 4 remote control.
CLONING THE WHOLE TRANSMITTER
In order to “clone” the physical functionality of the entire of the transmitter to the
corresponding virtual transmitter in the application must be:
1. Create a new transmitter from the application.
2. By longer holding the created transmitter inputs in editing options and choose
“Clone transmitter”.
3. The controller will enter to the standby mode for the signal from the transmit-
ter, whose functionality we intend to move to the application. The controller
remains in standby waiting until you receive the signal from the transmitter or
press the “END”.
4. Press any button on physical transmitter. After its registration from controller
assignment must be confirm with pressing “YES”.
CLONING OF SINGLE BUTTON
In order to “clone” single button of the transmitter to the
appropriate virtual transmitter button in the applications
must be:
1. Create a new transmitter from the application.
2. Open the transmitter on the
full window of application and select the icon
.
3. Press the button that you want to “clone” and select
the “Clone button.”
4. The controller will enter to the standby mode on the
button code, whose functionality we intend to the
application. The controller remains in standby mode
until receiving a signal from the transmitter, or press
the “END”.
5. Press the select button of physical transmitter. After
its registered with the controller assignment must be
confirm with pressing button “YES”.
SCENES TAB
ADDING SCENES
DELAY BETWEEN EVENTS IN SCENE
CHANGING THE TIME OF PRESSING THE BUTTON IN THE SCENE
User of this tab is able to create unlimited number of scenes, understood as certain sequences of events. These sequences can be performed
simultaneously or sequentially with the declared delays. System events EXTA FREE understood as sending code, pressing particular button.This code must
realize specific task, for example, attach the lamp.
In a single scene, you can declare maximum 10 events (buttons).
CAUTION: Before you begin to create scenes best of all make the initial configurations from the whole system via menu Transmitters / HOUSE
(you need to create transmitters/devices and give them the functionality by assigning to the receivers of the system). For easy organization of
work by the time of creating scenes is recommended first of all calling all transmitters, buttons and devices.
To create a story you need:
● Go to bookmarks ”SCENES”
● Create a new scene by pressing
.
● Created scene is visible below the symbol
.
While holding the symbol of created scenes we have the opportunity:
● Amendment titles created scene
.
● Create a shortcut scene on the desktop of mobile phone or in an additional window
.
● Scene removing
.
● Editing scene (add / remove events, delay editing and pressing time)
.
In order to adding events to the scene should be created:
● Click the symbol to create scene, and then click to change scene
.
● Press the button
.
● Choose the first button (event) forming scene.
The button can be selected directly from the visible list of all declared in the buttons application or by moving tab TRANSMISTTERS / HOME.
You can also directly transfer the physical transmitter to the scene through function cloning (Clone button).
● In a similar manner add another events forming scene (maximum of 10 events).
In order playing of created scenes from the application level, you need press shotly on the symbol of the scene you want to play.
Start playing the scene displayed in the message: ”New scene has been launched”.
If the delay between events in the scene are set by default to 0 s is the event executing one after the other with distance of about 0.5 s.
In order to change delay between events in the scene needs:
● Press the symbol of created scene and select edition button of scene
.
● Select event (button), for which we want to introduce delay and hold it.
● Select option ”Change the delay”
.
● Enter the delay in the range 0 .. 99 s and confirm with ”OK”.
The delay is understood like as counted time between the event, for which they edit a preceding event.
The system EXTA FREE selected functions receivers are invoked by long pressing the button. To call up these functions from the scene is necessary to
regulate until you press a button.
In order time changes press the button on the scene needs:
● Press the symbol of created scene and select edition button of scene
.
● Select event (button), for which we want to change the time press and hold it.
● Select option ”Change the time of pressing”
.
● Enter the time pressing in the range 0 .. 99s and confirm with ”OK”.
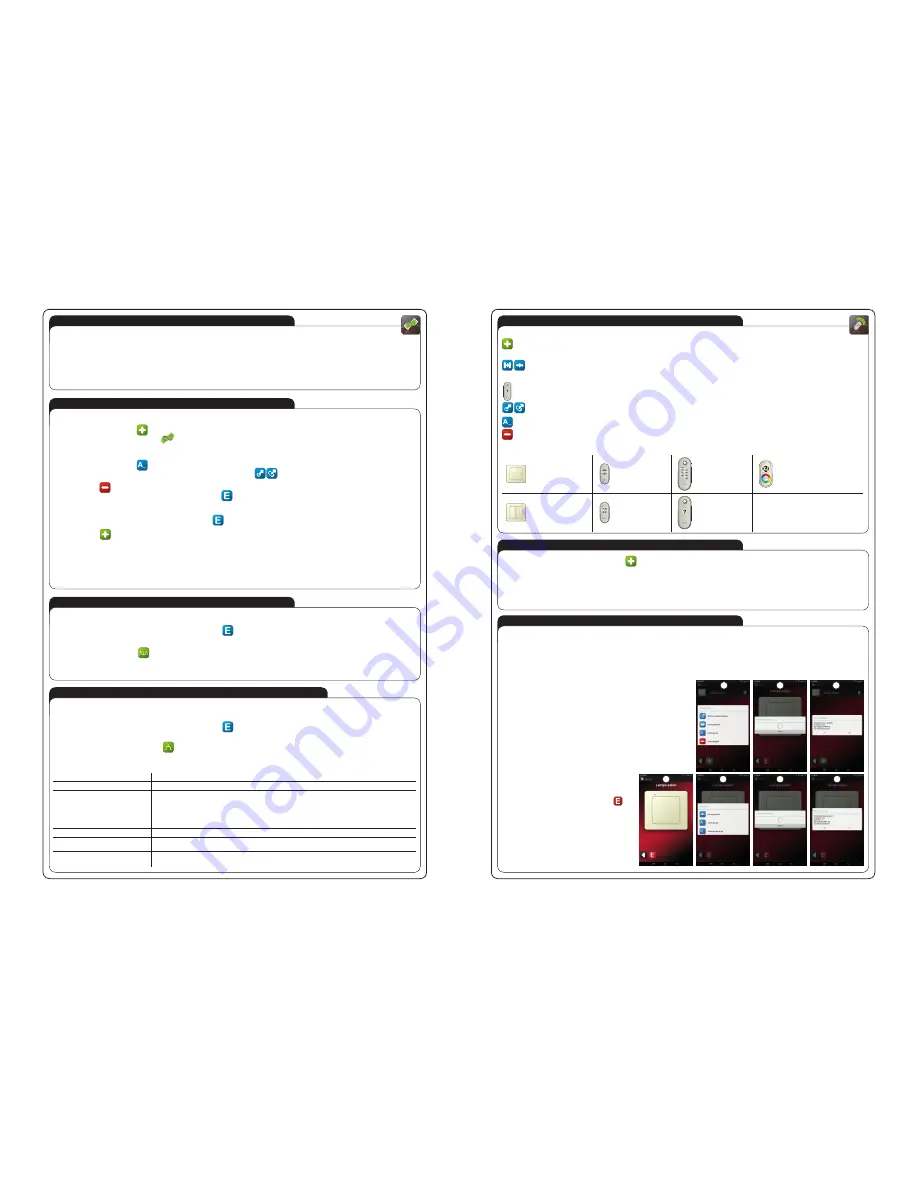
Special functions in the system EXTA FREE caused by pressing and holding the button (at least 3s):
Function
The receiver
Calling a comfortable settings
● SRP-02 Radio blinds control
Brightening / dimming
● RDP-01 boxing radio dimmer
● RDP-02/SLR-01 Radio LED receirver one color
● RDP-11/SLR-11 Radio Controller RGB
● LEDIX luminaires with integrated radio receiver
● LEDIX luminaireswith integrated RGB controller
(only in cooperation with the transmitter P-260 and sliders RGB)
Calling mode FLOATING
● RDP-11/SLR-11 Radio controller RGB
Calling mode FLOATING / STROBE
● LEDIX luminaireswith integrated RGB controller ( only in cooperation with the transmitter P-260 and sliders RGB)
Switching off
● LEDIX luminaireswith integrated RGB controller ( only in cooperation with the transmitter P-260 and sliders RGB)
1-button transmitter
(2 - channels)
2-buttons remote
control
8-buttons remote
control
RGB retome control P-260
(only with a radio controller RGB
SLR-11 and Ledix luminaires with
built-in controller RGB)
2-buttons transmitter
4-buttons remote
control
Remote control
is definition
(n- channels)
2
2
3
3
4
5
6