background image

www.zalman.co.kr    www.zalmanusa.com

Congratulations on your purchase of ZALMAN Tech

s TNN 500A,  the ultimate answer 

to every computer user

s dream of creating a silent computing environment with total 

system stability.  

With the TNN 500A, you will experience the true comforts of silence. 

Welcome

1. Safety Notice 

3

2. Features 

4

3. Components

10

4. Options 

14

5. Specifications

15

6. Patents 

16

7. Cautions Before Use

17

8. Cautions During Use 

22

9. How to Install 

23

10. Checklist before plugging in

48

11. Miscellaneous

49

TNN 500A

Contents

Summary of Contents for TNN 500A

Page 1: ...TNN 500A www zalman co kr www zalmanusa com Visit our website www zalman co kr and watch the TNN 500A installation video to facilitate the installation process English Edition...

Page 2: ...nt computing environment with total system stability With the TNN 500A you will experience the true comforts of silence Welcome 1 Safety Notice 3 2 Features 4 3 Components 10 4 Options 14 5 Specificat...

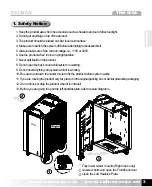
Page 3: ...heproductwhenitisinanuprightposition 7 Neverspillliquidontheproduct 8 Donotopenthebackcoverwhilesystemisworking 9 Donotinsertanythingintosystemwhileitisworking 10 Besuretoputdownthecastermounttofixthe...

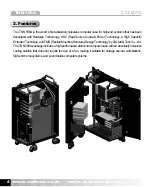
Page 4: ...gy HSC Heat Source Contact Power Technology a High Capacity Extrusion Technique andFMS FlexibleMountingStructure DesignTechnologybyZALMANTechCo Ltd TheTNN500Apackageincludesahighperformancealuminumcom...

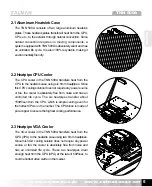
Page 5: ...6mm heatpipes Since this CPU cooling solution does not require any power source or fan the cooler is absolutely free from noise and has an unlimited life cycle The six heatpipes transfer about 150W s...

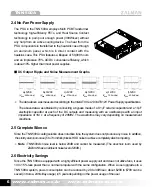
Page 6: ...ured The anechoic room used by ZALMANhasanambientnoiselevelof20dB ThedataabovewasmeasuredaccordingtotheIntelATXVer 2 03 ATX12VPowerSupplyspecifications The above data was obtained by connecting a bypa...

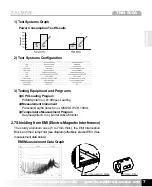
Page 7: ...erence The sturdy aluminum case 5 to 7mm thick the EMI Interception Block and the Clamp Filter see diagram effectively prevent EMI See measurement data below CPU Loading Program P4MAX Intel Inc 81 9W...

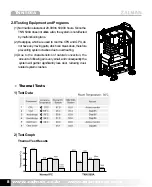
Page 8: ...fans 2 Heatpipes which are used to cool the CPU and GPU do not have any moving parts which can break down therefore preventing system crashes due to overheating 3 Due to the characteristics of natura...

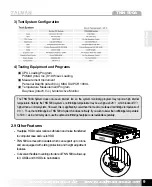
Page 9: ...Intel Inc 81 9W sec Loading Measurement Instrument Personal Daq 56 Iotech Inc KIKUSUI PCR 1000L Temperature Measurement Program DaqView Iotech Inc Intel Active Monitor The TNN 500A System does not use...

Page 10: ...TNN 500A www zalman co kr www zalmanusa com 10 3 Components...

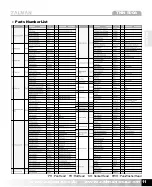
Page 11: ...www zalman co kr www zalmanusa com 11 TNN 500A English Parts Number List PH Pan Head FH Flat Head SH Socket Head PWH Pan Washer Head...

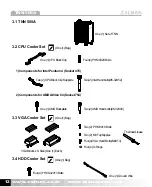
Page 12: ...3 VGA Cooler Set One 1 Bag 3 4 HDD Cooler Set One 1 Bag 1 Components for Intel Pentium 4 Socket 478 Two 2 CPUBlockClipSupports 2 Components for AMD Athlon 64 Socket 754 One 1 AMDBackplate VGABlocksL S...

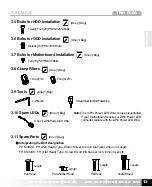
Page 13: ...ools One 1 Bag L Wrench ScrewdriverforBoltFastening 3 10 Spare LEDs One 1 Bag One 1 2 PinPowerLEDWire 3 11 Spare Parts One 1 Bag Interpreting the Bolt Designation PH M4X20 PH Pan Head Type Metric Scre...

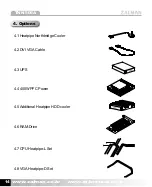
Page 14: ...alman co kr www zalmanusa com 14 4 Options 4 1 Heatpipe Northbridge Cooler 4 2 DVI VGA Cable 4 3 UPS 4 4 400W PFC Power 4 5 Additional Heatpipe HDD cooler 4 6 RAM Drive 4 7 CPU Heatpipe L Set 4 8 VGA...

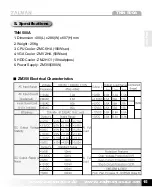
Page 15: ...500A English 5 Specifications TNN 500A 1 Dimension 400 L x 286 W x 607 H mm 2 Weight 25Kg 3 CPU Cooler ZMC 6HA 150W sec 4 VGA Cooler ZMV 2HA 50W sec 5 HDD Cooler ZM 2HC1 10 heatpipes 6 Power Supply ZM...

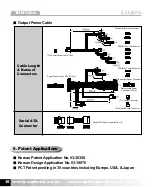
Page 16: ...A Japan Output Power Cable Cable Length Name of Connectors Serial ATA Connector Serial ATA Power Connector Two 2 Peripheral Power Connectors FDD 1 Power Connector FDD 12 Power Connector VGA Auxillary...

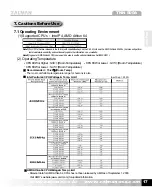
Page 17: ...humans is also Intel Pentium 4 CPU Wattage Temp Limit AMD Athlon 64 CPU Wattage Temp Limit Relevant data for AMD Athlon 64 CPUs has not been released by AMD as of September 1 2003 Visit AMD s website...

Page 18: ...any onboard components that interfere with this product cannot be used Ifyouencounterinterferenceduringinstallation stopinstallingandreturntheproduct Note1 For ATI Radeon 9800 or Faster models and nVi...

Page 19: ...www zalman co kr www zalmanusa com 19 TNN 500A English 3 ODD Fanless products are recommended As of Sep 1 2003 4 Motherboard...

Page 20: ...TNN 500A www zalman co kr www zalmanusa com 20...

Page 21: ...rtheCPUsocket MotherboardsnotcomplyingwithIntel s 10 2mmmotherboardcomponentheightrestriction as seen in Figure 2 may have components that interfere with the CPU Block Clip If interference doesoccur t...

Page 22: ...s website Note 2 WhenusinganIntelmotherboard ifyouremovethemotherboardfromanexistingsystemandattachitto theTNN500A thesystem sActiveMonitormaygenerateanalarmsoundwithawarningthatthereisno CPUfan Remo...

Page 23: ...Interception Block Then unscrew the HDD ODD Bracket s upperandsidefasteningbolts PHM4X12 FHM4X10 counterclockwisebyoneturnsothatthey become loose TheHDD ODDBracketshouldthenberemovedandstoredinasafep...

Page 24: ...k doors completely Remove the 10 socket head bolts SH M5x12 of the Left Heatsink Plate using the provided L wrench NowpulltheLeftHeatsinkPlateout Note 1 Donotunscrewthepartsfastenedwithcasterbolts PHM...

Page 25: ...es should be organized in the order in which they are removed as they will be reassembled in the someorderafterinstallingthemotherboard 2 Thebushings 20mm andbolts PHM3X60 separatedatthetimeoftheCPUBl...

Page 26: ...TNN 500A www zalman co kr www zalmanusa com 26 4 InstalltheI OShieldthatcamewiththemotherboardontotheEMIBracket I O Shield EMI Bracket...

Page 27: ...thlon64Motherboard 1 InstallCPUandRAMasinstructedinthemotherboardmanual 2 Asshownbelow inserttheAMDNipplesthroughtheRetentionFrameholesandscrewthemintothe Backplate Ifthereareboltsalreadypresent remov...

Page 28: ...WHM3X5 Note The Motherboard Nipples on the case must line up with the holes on the motherboard Remove any unnecessary nipples before installing the motherboard If you do not remove the unnecessary nip...

Page 29: ...Supports and Clips 1 Installing CPU Block Base Spread the thermal grease thinly onto the surface of the CPU core Then install the CPU Block Base in a mannerthattheHeatpipeGroovesarefacingupwards assee...

Page 30: ...ends of the heatpipe look different round vs sharp The round end should be placedtowardtheheatsource CPUBlock 2 If CPU heatpipes are not fully inserted into the CPU Block Base due to distance Use lon...

Page 31: ...ases can be moved to the left and right and the CPU Heatpipes can be fitted properly Apply thermal grease to the bottom of each of the CaseBlockBases andusingtheCaseBlockBasefasteningboltsfortheTopPla...

Page 32: ...the heatpipes are to be placed 4 Fasten the CPU Block cover onto the CPU Block Base using bolts PH M4X20 Note Make sure the CPU Heatpipes over the Case Block Bases are not hovering or movable 5 Fasten...

Page 33: ...ghtly then tighten them incrementally in an alternatingmanneruntilcomplete 2 For AMD Athlon 64 CPU 1 PlacetheClipontheCPUBlockCoverandinserttheAMDhandbolts 6 32X40 intotheOuterHoles 2 Screwtheboltsont...

Page 34: ...mbly VGA Block Cover VGA Case Block Cover VGA Heatpipes Bolts 2 types VGA Nipples and Rubber Rings Note VGA Heatpipes should be organized in the order in which they are removed as they will be reassem...

Page 35: ...center GPUs VPUs with a protective frame for the core especially need to have a lot of thermal grease applied 3 Check the holes around the core and choose the right VGA Block Base for Assembly Note T...

Page 36: ...Spring separates from the VGA Block Base fasten the bolt PH M2X4 and the nut onto the Plate Spring and insert the Plate Spring into the groove on the VGA Block Base 3 After the VGA Block Base is prope...

Page 37: ...o the grooves in the VGA Block Base Then place the VGA Heatpipes as shown in the diagram and screw on the VGA Hand Bolts M3 X 13 just enough for movement of the VGA Heatpipes to be possible Note 1 The...

Page 38: ...ar usingtheCardFixBolts 2 There are many types of graphics cards Thus the VGA heatpipes may not fit well in the grooves on the Case Block Base In this case the user needs to reshape the heatpipes to b...

Page 39: ...se Then fasten the VGA Case Block Base onto the Right Heatsink Plate using the bolts PH M3X7 and spread thermal grease where the VGA Heatpipes will come in contact with the VGA Case Block Base 9 On th...

Page 40: ...se Block Cover with the bolts PH M3X10 Note Confirm once more that the VGA Heatpipes are properly installed as in the following diagram Proper Installation of the Heatpipe for the VGA Cooler Heatpipe...

Page 41: ...ch of the switch Panel s connectors have labels indicating which jumper pins to connect the to 2 Unscrewing the Right Heatsink Plate s bolts PH M4X12 counterclockwise by one turn enables thepanel sloc...

Page 42: ...m 42 9 5 Reassembling the Left Heatsink Plate Reassemble the Left Heatsink Plate which was initially removed The reassembly steps are the reverse of the disassembly steps L Wrench Bolt SH M5X12 Back D...

Page 43: ...on the Left Heatsink Base by unscrewing its bolts PH M3X15 by a small fraction of a turn 9 7 Installing the HDD ODD 1 The HDD and ODD can be installed either on the HDD ODD Bracket or on the bottom of...

Page 44: ...he HDD onto the Al Bar 2 Install on the HDD ODD Bracket 1 Put four 4 Dampers on the Al Bar While doing this use one of the Dampers to connect the round terminal of the Ground Wire to the Al Bar Fasten...

Page 45: ...d terminal of the Ground Wire to the Al Bar Fasten the completed assembly onto the HDD ODD Bracket Then connect the Y terminal of the Ground Wire to the HDD ODD Bracket or the case Note The HDD can be...

Page 46: ...diagram slide the bracket into the TNN 500A Using a screw driver tighten the bracket fastening bolts PH M4X12 FH M4X10 on the top and side of the TNN 500A and install the EMI Interception Block Bolt...

Page 47: ...Back Door and use the Card Fix Bolt to install 9 9 Installing the Clamp Filter 1 Insert the power cable into the middle of the Clamp Filter and make a loose loop 2 Close the Clamp Filter and pull bot...

Page 48: ...been removed 6 Is the ground wire of the HDD Cooler is connected 7 Is the system installed on a flat level and solid surface 8 Has the power supply been set to the correct voltage i e 110V or 220V 9...

Page 49: ...www zalmanusa com 49 TNN 500A English If attempting to overclock use an electric fan to cool the system Zalman Tech Co Ltd is not responsible for any damage to a system or a CPU caused by overclocking...

Reviews: