background image

1

ISO

60

4

100 198

[

]

F

MAIN MENU

BRIGHTNESS
CONTRAST
CHROMA
BLUE ONLY

RECALL USER PRESET

MONOCHROME

BATTERY LEVEL
SCALING [Preset - 4]
FRAME LINE [None]

10

-2

OFF
OFF

COLOR BARS

ON

OFF

SCALING

AUTO / PLAYBACK
CAMERA PRESETS
CREATE USER PRESET

ON

CAMERA PRESETS

CANON 5D MK II
CANON 7D
CANON 1D MK IV
CANON T2i (550D)
CANON 60D

NIKON D3S
NIKON D5100
NIKON D300
PANASONIC AF100
PANASONIC GH2

NIKON D7000

SONY F3L

CREATE USER PRESET

ACTIVE VIDEO SCALE
ACTIVE VIDEO LF/RT
ACTIVE VIDEO UP/DN
FRAME LINE SCALE
FRAME LINE LF/RT

PREVIEW

PREVIOUS MENU
MAIN MENU

FRAME LINE UP/DN
DEFAULT

SAVE USER PRESET

SCROLL

MAIN MENU

SHOW SCALING

VIDEO FORMAT: 480p

PREVIOUS MENU
MAIN MENU

OVERSCAN

OFF

MAIN MENU

BRIGHTNESS
CONTRAST
CHROMA
BLUE ONLY
MONOCHROME

BATTERY LEVEL
SCALING [Preset - 4]
FRAME LINE [None]

10

-2

OFF
OFF

COLOR BARS

1.85:1

FRAME APPEARANCE
CENTER CROSS

MAIN MENU

ON

OFF

FRAME LINE

1.33:1 (4x3)
1.66:1 (15x9)
1.78:1 (16x9)

2.35:1

LINE

ON
ON

1.33:1 (4x3)

ENABLE
ACTION SAFE

MAIN MENU

PREVIOUS MENU

OFF

3x3 GRID

OFF

15

16

Z-F

inder EVF User M

an

ua

l

Z-F
inder EVF User M

an

ua

l

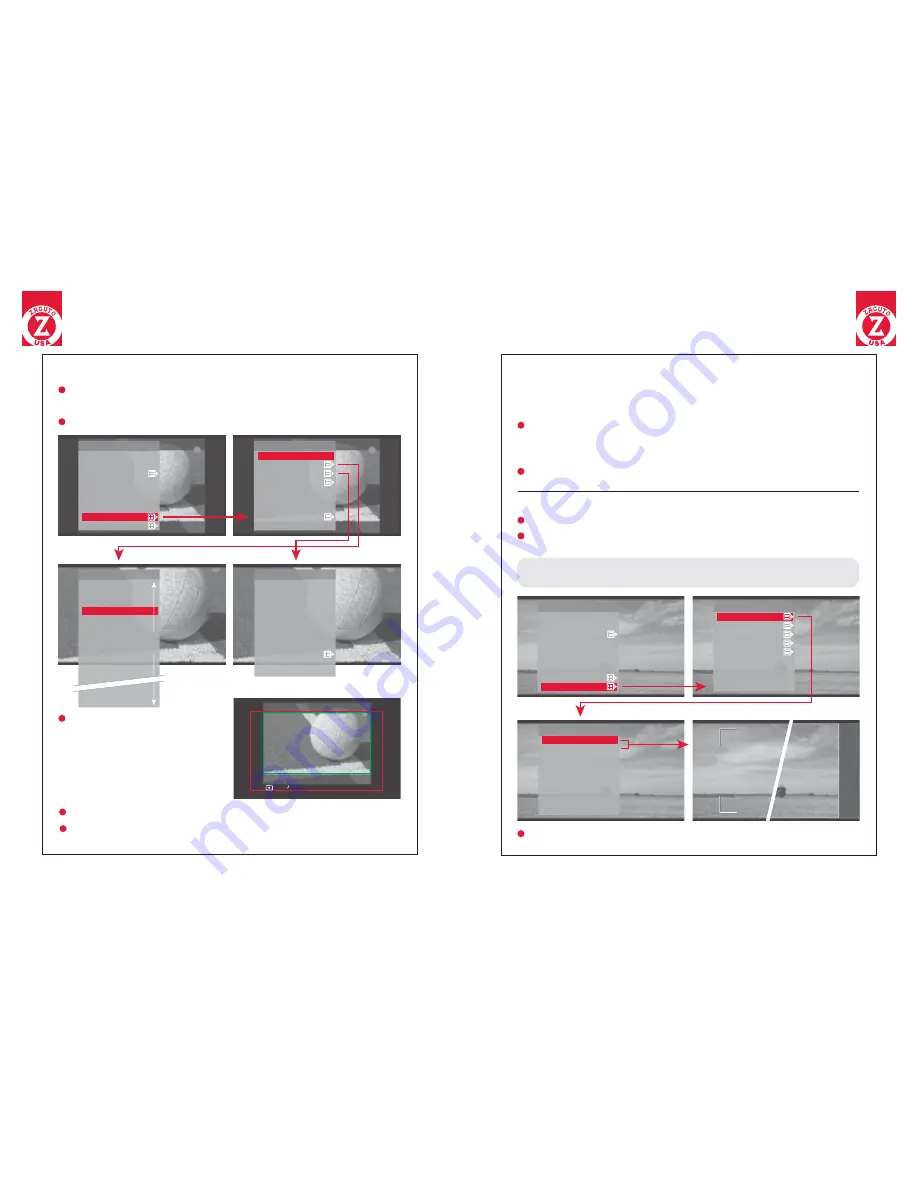
Scaling

AUTO / PLAYBACK allows the EVF to scale and format the image by 

automatically detecting the camera’s output (Default)
Choose CAMERA PRESETS to activate an included camera preset

Auto

User Presets

Non-scaled 5D image

(See tutorial video at www.zacuto.com/zfinderevf)

Frame Lines 

Choose the frame lines that you wish to display on screen
You are able to toggle ON or OFF the frame lines and/or action safe 

within each selection

When not using a camera preset, a USER PRESET is necessary 

for the frame lines to be displayed correctly (see scaling on pg.15)

*

If your camera outputs a different format during standby and record, ie: 

Canon 5D (1080i/480p) the scaling must be set and saved to the same 

preset for both modes.

When creating a user preset, 

the ACTIVE VIDEO (Red Line) 

represents what will be shown 

full frame on the screen while the 

FRAME LINE (Green Line) tells 

the EVF where the picture area of 

the recorded video image will be

*

FRAME APPEARANCE can be toggled to either LINE or BOX

LINE FRAME

APPEARANCE

BOX FRAME

APPEARANCE

Camera Presets

You can PREVIEW and SAVE a user setting while in the CREATE 

USER PRESET menu.  After saving you can recall a preset in the RE-

CALL USER PRESET menu

FRAME LINE

ACTIVE VIDEO

OVERSCAN can be toggled ON or OFF from the scaling menu

Creating a user preset may be useful if you are trying to view camera 

data on the screen while it is scaled

Frame line type is selected in the FRAME LINE menu

Menus

Menus

Summary of Contents for 1-EVF-1F

Page 1: ......

Page 2: ...es 05 EVF Controls 05 Connecting the EVF to your camera 06 Connecting the EVF to an external monitor 06 Attaching the Hot Shoe Mount 07 Adjusting the Hot Shoe Mount 08 Operating the Menus 12 Brightness 13 Contrast 13 Chroma 13 Monochrome 14 Blue Only 14 Color Bars 14 Battery Level 14 Scaling 15 Frame Lines 16 Anamorphic 17 Focus Assist Peaking 17 Exposure Assist Zebra 18 Image Flip 20 Pixel to Pix...

Page 3: ...th D Tap Zacuto Z Finder Jr Standard w Z Finder EVF Zacuto Z Finder Pro Standard with Z Finder EVF Pro Zacuto Tri Mount System with Zud and Additional 7 Male Rod Optional accessories may be purchased from the Zacuto web store at www Zacuto com or from any Zacuto authorized dealer Pincher HDMI Cable Mount 16x9 Sun Shield 6 HDMI Right Angle Adapter 7 EVF Cheese Plate Bar w Screws 3ft HDMI to HDMI Ca...

Page 4: ... 6 7 8 1 4 5 6 7 8 2 3 HDMI In 3 1 Plug the included HDMI cable into the EVF unit input 2 Plug the mini end of the HDMI cable into your camera 1 Plug the optional HDMI cable into the EVF unit output 2 Plug the other end of the HDMI cable into your external monitor EVF to Ext Monitor Optional Camera to EVF We recommend using the right angle adapter for best performance EVF Controls Connections ...

Page 5: ...t 2 Slide the mount into your camera s hot shoe 3 Tighten the knurled knob to secure the mount into the hot shoe 1 Loosen the knob on the Hot Shoe Mount to free the apparatus 2 Position the EVF to your desired position and tighten the knob Tighten Loosen Attaching the Hot Shoe Mount Adjusting the Hot Shoe Mount ...

Page 6: ...he included charger B Note Only use LP E6 type batteries with the EVF unit Doing otherwise may dam age the unit and cause a malfunction A B A B A Insert the male D Tap end into a compatible power source Slide the battery adapter into the back of the EVF unit B Optional equipment required External battery attachment with D Tap Compatible battery source Using the Included Battery Using an External P...

Page 7: ...asing the red lever near the bottom of the unit B See Z Finder instructions for complete installation and operation directions Press Menu Button 1 Display home menu screen Return to top menu at any point from within the menu tree Selection Button UP F1 2 Navigate up within menu Activate the function assigned to F1 Selection Button DOWN F2 3 Navigate down within menu Activate the function assigned ...

Page 8: ...the select button to reveal the contrast scale Use the up and down buttons to modify the current value Chroma Select a parameter and modify each value with the up and down but tons Zero 0 is the factory preset and can be modified or Select SATURATION to modify the overall amount of color in the image Select the RED GREEN or BLUE options to modify the amount of color in each individual channel Blue...

Page 9: ...e camera s output Default Choose CAMERA PRESETS to activate an included camera preset Auto User Presets Non scaled 5D image See tutorial video at www zacuto com zfinderevf Frame Lines Choose the frame lines that you wish to display on screen You are able to toggle ON or OFF the frame lines and or action safe within each selection When not using a camera preset a USER PRESET is necessary for the fr...

Page 10: ... Zoom OFF OFF 17 18 Z Finder EVF User Manual Z Finder EVF User Manual Anamorphic Choose the correct anamorphic setting for your lens from the list Uncorrected Corrected Peaking OFF Peaking ON Focus Assist Peaking Press the select button to enter the peaking menu The EVF uses a sharpening method to enhance hard edges to aid in focusing the image When an object is in focus the edges will be intensif...

Page 11: ...FOCUS ASSIST Peaking EXPOSURE ASSIST Zebra FALSE COLOR IMAGE FLIP AUDIO METERS FRAME STORE FEATURE LOCATION OFF OFF ON PIXEL TO PIXEL Zoom OFF 1 2 0dB 12dB 20dB 19 20 Z Finder EVF User Manual Z Finder EVF User Manual Pixel To Pixel Press the select button to toggle PIXEL TO PIXEL ON or OFF Image Flip Press the select button to toggle the IMAGE FLIP ON or Overexposed Objects will be displayed RED P...

Page 12: ... User Manual Z Finder EVF User Manual Assigned Function Buttons To change the function assigned to each button first select the button you wish to change from the list From the subsequent menu choose the desired function and select it It can now be activated by pressing the ap propriate function button on the side of the EVF unit without the use of the menu system Feature Location Select the featu...

Page 13: ...rom the menu and select USB DRIVE Choose START UPDATE The current firm ware version may be confirmed in the ABOUT menu For more information visit www zacuto com zfinderevf About Choose ABOUT to view the EVF firmware version on your device UPDATE PREVIOUS MENU CONTINUE INSERT USB DRIVE MAIN MENU INVALID USB DRIVE UPDATE PREVIOUS MENU CONTINUE INSERT USB DRIVE MAIN MENU NO USB DRIVE DETECTED UPDATE ...

Page 14: ...ure while in 480p standby or record If possible set the output of your camera to a higher format than 480p to be able to use the PIXEL TO PIXEL zoom feature Solution Problem You have attempted to set the ZEBRA 2 value below the ZEBRA 1 value Set the ZEBRA 1 lower than ZEBRA 2 or increase the level of ZEBRA 2 so that it is higher than ZEBRA 1 Solution Problem You have attempted to show a stored fra...

Page 15: ...ur Z Finder Pro models come with two expendable anti fog protective covers All Zacuto version 1 Z Finders can easily and inexpensively be upgraded to anti fog with the addition of the Anti Fog Protective Upgrade Kit Why does my EVF have excessive strobing while panning Q A We have tested the EVF for what people have complained as exces sive strobing while panning and have discovered that our EVF d...

Page 16: ...e warranty covers defects in workmanship and materials of our products for up to one year This warranty does not cover any damage to this product that results from improper installa tion accidents abuse misuse negligence natural disaster insufficient or excessive electrical supply if applies abnormal mechanical or en vironmental conditions dust or any unauthorized disassembly repair or modificatio...

Page 17: ...www zacuto com ...

Reviews: