background image

                                                                                   HD409N

-User’s Guide


21

38


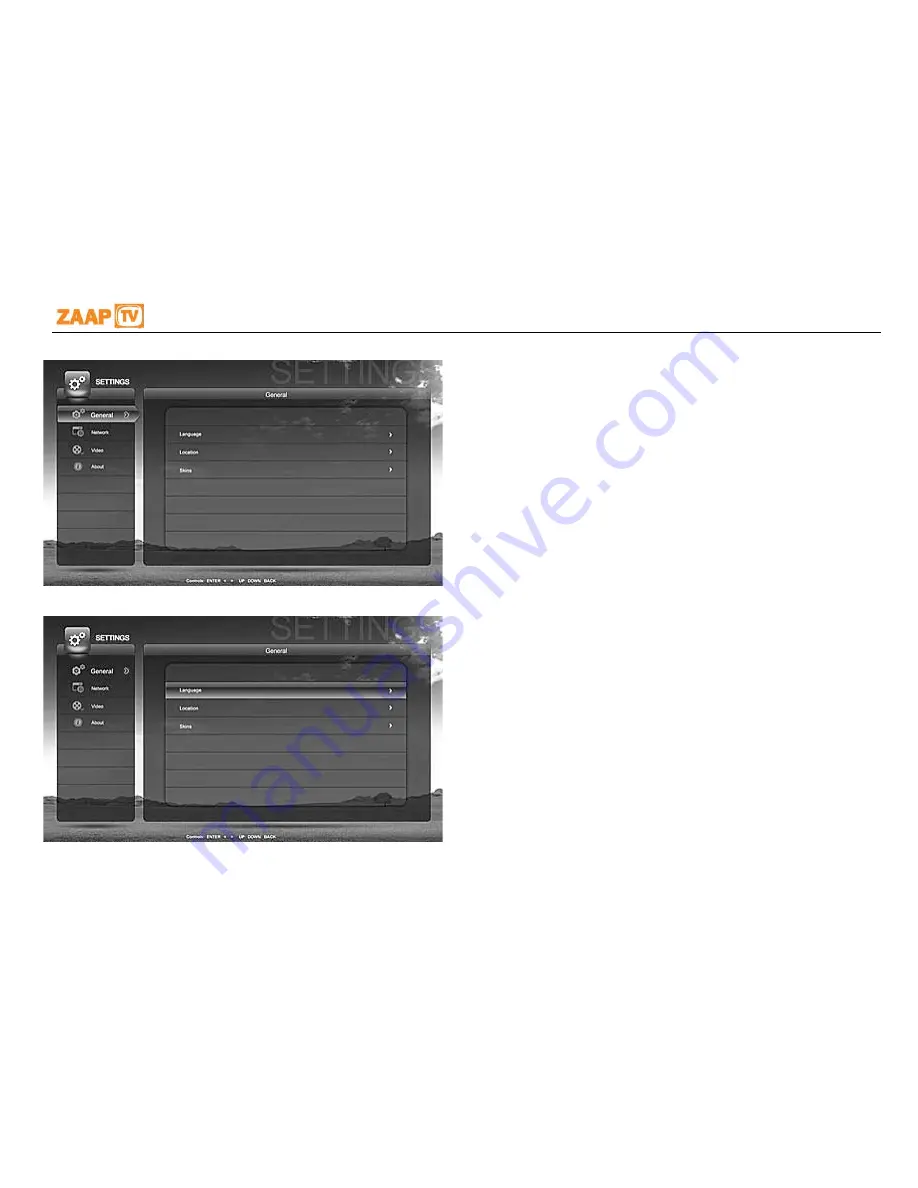
On the Settings page, use the remote control buttons 

to navigate up and down selection. Select General tab and 
press right arrow button to enter the page. At any point of 
the operation if you wish to go back to the left side menu 
selection, you can either press the left arrow button or the 
Back button on the remote control. 


On the Language tab, press right arrow button to go to 

the system language page.


Summary of Contents for HD409N

Page 1: ...ZAAPTV HD409N User s Guide How to use this HD409N set top box ...

Page 2: ...en damaged in any way such as the power supply cord or plug is damaged liquid has been spilled or objects have fallen into the apparatus the apparatus has been exposed to rain or moisture does not operate normally or has been dropped In ambient temperatures of no more than 27º C 80º F the normal operating temperature for HD409N is between 50º C 122º F to 60º C 140º F IMPORTANT SAFETY CONSIDERATION...

Page 3: ...he cooling vents are blocked or impede the flow of air through the ventilation openings Install so that its position does not interfere with its proper ventilation For example do not place HD409N on a bed sofa rug or similar surface that could block the ventilation openings CAUTION Do not place anything on top of your HD409N set top box especially other home entertainment components Be sure to pro...

Page 4: ...s including amplifiers that produce heat Installation of HD409N near consumer electronics devices such as stereo receiver amplifiers and televisions is permitted as long as the air surrounding HD409N does not exceed 40º C 104º F Do not install HD409N in an area where condensation occurs To prevent the temporary loss of guide data and cause a temporarily non responding HD409N do not plug the AC pow...

Page 5: ...y one or more of the following measures Reorient or relocate the receiving antenna Increase the separation between the equipment and set top box Connect the equipment into an outlet on a circuit different from that to which the set top box is connected Consult the dealer or an experienced radio TV technician for help Caution Changes or modifications not expressly approved by ZAAPTV for compliance ...

Page 6: ... or commercial waste Recycling your ZAAPTV Equipment Please do not dispose of this product with your residential or commercial waste Some countries or regions such as the European Union have set up systems to collect and recycle electrical and electronic waste items Contact your local authorities for information about practices established for your region ...

Page 7: ... the double D symbol are registered trademarks of Dolby Laboratories All other product or service names are the property of their respective owners All rights reserved ZAAPTV reserves the right to revise this publication and to make changes in content from time to time without obligation on the part of ZAAPTV to provide notification of such revision or change ZAAPTV provides this guide without war...

Page 8: ...2 2 OPERATION 13 Turning Power On and Off 13 Changing Channels 13 Adjusting the Volume 13 Interactive Programming Guide 14 Video Output Format Option 14 3 CONNECTING YOUR HD409N SET TOP BOX TO YOUR HOME 15 4 HOW TO MANUALLYCONFIGURE THE HD409N SET TOP BOX 20 5 TROUBLESHOOTING 36 ...

Page 9: ...ty audio and video It comes with a T connector just in case your TV set doesn t support High Definition TV It s also equipped with a built in WiFi module optional so that you can seamlessly connect it to your home network and or Internet without the need of a network cable although it is included in the package This User s Guide introduces you to the basic features outlines important safeguards an...

Page 10: ...D Audio format support MPEG 1 LAYER 1 2 MP3 WMA WMA PRO AAC LC AA LC SBR L2 AAC L2 AAC L4 AAC 5 1 AC3 DOLBY DIGITAL DOLBY DIGITAL PLUS 3D SRS AUDIO Support many display modes PAL NTSC 720p 1080i Full HD 1080p Support aspect ratios 4 3 and 16 9 letterbox zoom and full screen mode HDMI 1 4 T connector for Component Composite Digital Audio S PDIF Audio L R Ethernet USB 1080p 24 30 video decode output...

Page 11: ...HD409N User s Guide 11 38 Front Panel Availability of certain features is dependent upon application support 1 Power and Activity LED 2 IR Receiver ...

Page 12: ...HD409N User s Guide 12 38 Rear Panel Availability of certain features is dependent upon application support 1 T CONNECTOR 2 OPTICAL SPDIF 3 HDMI 1 4 4 USB 2 0 5 ETHERNET RJ 45 6 IR Dongle 7 POWER ...

Page 13: ...ing the number keys on the remote control Select the channel in the Interactive Program Guide Adjusting the Volume Press VOLUME or on the remote control to adjust the volume When you adjust the volume the volume scale is displayed on the screen Press MUTE on the remote control to toggle the sound on and off For best audio quality when using the analog L R var volume controlled audio outputs use th...

Page 14: ...format used by the Composite Video Component Video YPbPr and HDMI outputs The HD409N set top box is capable of providing the following video formats on the YPbPr and HDMI video outputs High Definition 1080i 1920 x 1080 pixels High Definition 720p 1280 x 720 pixels Enhanced Definition 480p 720 x 480 pixels Standard Definition 480i 720 x 480 pixels The HD409N set top box is also capable of passing t...

Page 15: ...ng connections High Definition Television HDTV Standard Definition TV SDTV WiFi Router Before you move or change components on your entertainment system review the following Disconnect power from your equipment before connecting or changing connections For information on connecting to an HDTV see the Video Connection Options page ...

Page 16: ...t video Note Component video does not provide audio A separate audio connection must be made Composite video SDTV If a Component input is not available on your TV use the composite video video connection Note Composite video does not provide audio A separate audio connection must be made HDMI If your TV has an HDMI input this is for both audio and video if you are using the TV speakers Connect the...

Page 17: ...ox to the nearby power outlet 3a Connect the network cable from the set top box to the router 3b Alternatively you can also connect the set top box wirelessly to your wireless router This option is only available if your HD409N set top box has a wireless module in it and you have a working wireless router You can setup the wireless connection later in the Settings page 4 Connect the HDMI cable wit...

Page 18: ... top box to the nearby power outlet 3a Connect the network cable from the set top box to the router 3b Alternatively you can also connect the set top box wirelessly to your wireless router This option is only available if your HD409N set top box has a wireless module in it and you have a working wireless router You can setup the wireless connection later in the Settings page 4 Connect the HDMI cab...

Page 19: ... top box to the nearby power outlet 3a Connect the network cable from the set top box to the router 3b Alternatively you can also connect the set top box wirelessly to your wireless router This option is only available if your HD409N set top box has a wireless module in it and you have a working wireless router You can setup the wireless connection later in the Settings page 4 Connect the HDMI cab...

Page 20: ...s Guide 20 38 4 HOW TO MANUALLYCONFIGURE THE HD409N SET TOP BOX On the Main Menu page use the remote control buttons to navigate and select Settings tab Press Enter on the remote control to enter the Settings page ...

Page 21: ...Select General tab and press right arrow button to enter the page At any point of the operation if you wish to go back to the left side menu selection you can either press the left arrow button or the Back button on the remote control On the Language tab press right arrow button to go to the system language page ...

Page 22: ...rol to navigate up and down selecting your desired language Once you have made a selection press Enter on the remote control It will automatically change the system language to the language of your selection On the Settings page use the remote control buttons to navigate to Location tab and press right arrow button to enter ...

Page 23: ...page select your location and press Enter HD409N will then set itself to the location of your selection On the Settings page use the remote control buttons to navigate to Skins tab and press right arrow button on the remote control to select it ...

Page 24: ...t skins you can choose from Use the remote control buttons to navigate up and down to select your desired skin for your HD409N Once you have made your selection press Enter on the remote control to change the system skin to the one that you choose ...

Page 25: ...remote control buttons to navigate up and down to select Network tab and press right arrow button on the remote control If you want to connect the HD409N to your home network by means of a network cable then select LAN Local Area Network tab and press Enter ...

Page 26: ...409N into your home network Press any numeric button on the remote control and it will bring up the soft keyboard onto the screen If you want to cancel at this point press the Back button on the remote control to go back Once you have entered all the necessary information press Enter on the soft keyboard or select OK and press Enter on the remote control to finish setting the Static IP address ...

Page 27: ...ork settings page use the navigation buttons on the remote control to move up and down to select between tabs Select DHCP if you don t want or need to manually configure the IP address for your HD409N Press right arrow button to select it ...

Page 28: ... User s Guide 28 38 You will then be asked to confirm if you want the DHCP mode to be enabled or not Once you have selected yes and press Enter on the remote control then the DHCP mode is enabled from then on ...

Page 29: ...d down to select between tabs Select PPPoE and press right arrow button on the remote control to enter Press any numeric button on the remote control to bring up the soft keyboard Enter all the necessary information and press Enter on the soft keyboard or select OK and press Enter on the remote control when you finish ...

Page 30: ...409N User s Guide 30 38 Please wait while HD409N is trying to establish the network connection for you When it has successfully established the connection you will see the check mark next to the PPPoE tab ...

Page 31: ...network by means of wireless connection then on the Network page select WIFI and press the right arrow button on the remote control to enter the WIFI page HD409N then will display a list of all the available wireless connections nearby that it can find for you to select ...

Page 32: ...ere you can press any numeric button on the remote control to bring up the soft keyboard for ease of entering information into the required field Once you have finished entering press Enter on the soft keyboard When the wireless connection has been fully established you will see a check mark on the wireless connection of your own choosing ...

Page 33: ...page you will see that you re connected to your home network by WiFi when you see the check mark next to the WIFI tab On the Settings page use the navigation buttons on the remote control to select Video and press right arrow button to enter the display mode page ...

Page 34: ...o select it Select the display mode that you want by pressing Enter on the remote control Please base your selection on what your television unit can support Once you have made the right display mode selection you will see a check mark next to the display mode of your selection ...

Page 35: ...age use the navigation buttons on the remote control and select About tab and press right arrow button to know more information about your HD409N You might need to provide this information to your service provider or for some customer assistance ...

Page 36: ...d a software update and may not power on while the new software is being installed Try again in a few minutes Verify that the AC power cord of the external power supply is connected to the HD409N set top box and an AC outlet Unplug the HD409N set top box from the AC outlet plug it back in If the HD409N set top box is connected to a switched outlet on another unit verify that that unit is powered o...

Page 37: ...ide Press and release operation keys one at a time firmly and deliberately Check the batteries in the remote control Install new batteries if needed There is no audio when viewing channels Verify that the mute button on the HD409N set top box or the remote control has not been pressed Press mute on the remote control to restore sound If the HD409N set top box audio output is connected to the TV ve...

Page 38: ...is document may be reproduced or transmitted in any form or by any means electronic or mechanical for any purpose without the express written permission of ZAAPTV Under the law reproducing includes translating into another language or format ...

Reviews: