


35
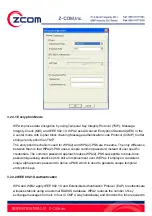
profile. With a profile activated, each time you start the wireless LAN adapter, it automatically
scans for the specific SSID and joins that network with the pre-defined wireless security settings.
To create the profile, go to the
Profile
field, type a profile name and set the corresponding
parameters. If one of the profiles is no longer used, you may remove it by clicking the
Delete
button. After changing parameters, save the profile and click the
Apply
button to take effect. You
can have multiple profiles and modify the profile at any time.
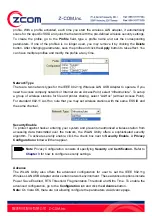
Network Type
There are two network types for the IEEE 802.11g Wireless LAN USB Adapter to operate. If you
need to access company network or Internet via an Access Point, select “Infrastructure”. To set up
a group of wireless stations for file and printer sharing, select “Ad-Hoc” (without Access Point).
For standard 802.11 Ad-Hoc, note that you may set wireless stations with the same ESS ID and
the same channel.
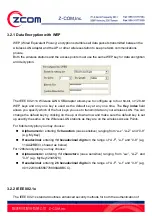
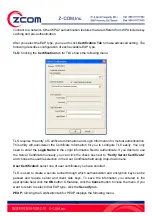
Security Enable
To protect against hacker entering your system and prevent unauthorized wireless station from
accessing data transmitted over the network, the WLAN Utility offers a sophisticated security
algorithm. To activate security enable, click the check box next to
Security Enable
. A
Privacy
Configuration
window will then appear.
Note
: Privacy Configuration consists of specifying
Security
and
Certification.
Refer to
Chapter 3
for how to configure security settings.
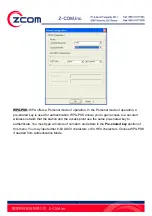
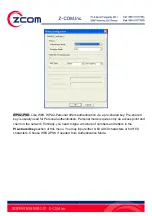
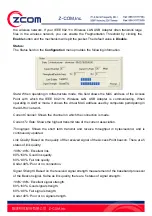
Advance
The WLAN Utility also offers the advanced configuration for user to set the IEEE 802.11g
Wireless LAN USB Adapter under certain network environment. These advanced options include
Power Save Enabled, RTS Threshold, Fragmentation Threshold and Nitro Time. To enable the
advanced configuration, go to the
Configuration
tab and click the
Advance
button.
Note:
On Vista OS, there are not allowing configure the parameters via Advance page.
Summary of Contents for XN-790
Page 20: ...20 Step 12 Click Finish to complete the installation ...
Page 33: ...33 ...
Page 39: ...39 ...


