


III. FRONT PANEL AND OPERATION
①
Process Value(PV), or parameter code
②
Set Value(SV), alarming code, or value of a parameter
③
Setup key, for accessing parameter table, and confirming change.
④
Data shift key, also for activating auto turning
⑤
Data decrease key
⑥
Data increase key
⑦
Status display LED
Basal display status:
When power on, will shows the process value (PV),shows the set point (SV).
lf the input signal is out of the measurable range (for example, the thermocouple
or RTD circuit is break, or input specification sets wrong),
Will alternately display “orA” and the high limit or the low limit of PV,
and the instrument will automatically stop output.
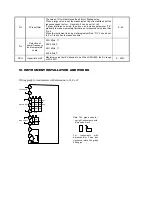
IV. OPERATION DESCRIPTION
●
Set Value Setting:
In basal display status, if the parameter lock “Loc” isn't locked, we can set setpoint (SV) by pressing
、
or
. Press
key to decrease the value,
key to increase the value, and
key to move to the digit expected to modify. Keep
pressing
or
, the speed of decreasing or inscreasing value get quick. The range of setpoint is between the parameter
SPH. The default range is 0 to 400.
●
Parameter Setting:
In basal display status, press
and hold for about 2 seconds can access Field Parameter Table. Pressing
can go to the
next parameter; pressing
、
or
can modify a parameter. Press and hold
can return to the preceding
parameter. Press
(don't release) and then press
key simultaneously can escape from the parameter table. The
instrument will escape auomatically from the parameter table if no key is pressed within 30 seconds. Setting Loc=808 and then
press can access System Parameter Table.
●
AI artificial intelligence control and auto tuning
When AI artificial intelligence control method is chosen (CrL=AI), the PID parameters can be obtained by running auto-tuning. In
basal display status, press
for 2 seconds, the “At” parameter will appear. Press
to change the value of “At” from “oFF”
to “on”, then press to active the auto-tuning process. During auto tuning, the instrument executes on-off control. After 2-3
times of on-off action, the instrument will obtain the optimal control parameter value. If you want to escape from auto tuning status,
press and hold the
key for about 2 seconds until the "At" parameter appear again. Change “At” from “on” to “oFF”, press to
confirm, then the auto tuning process will be cancelled.
Note 1:
If the setpoint is different, the parameters obtained from auto-tuning are possible different. So you’d better set setpoint to an
often-used value or middle value first, and then start auto-tuning. For the ovens with good heat preservation, the setpoint can
be set at the highest applicable temperature. Depending on the system, the auto-tuning time can be from several seconds to
several hours.
Note 2:
Parameter Ctl (on-off differential, control hysteresis) has influence on the accuracy of auto-tuning. Generally, the smaller the
value of Ctl, the higher the precision of auto tuning. But Ctl parameter value should be large enough to prevent the instrument
from error action around setpoint due to the oscillation of input. Ctl is recommended to be 2.0.
Note 3:
AI series instrument has the function of self-learning. It is able to learn the process while working. The control effect at the
first run after auto tuning is probably not perfect, but excellent control result will be obtained after a period of time because of
self-learning.
AT
RUN
STOP
①
②
③
④
⑤
⑥
⑦
PV
SV
AI
OP1
AU1
AU2
RUN